02 Jeep Grand Cherokee Build (AKA Project Silent Night)

I almost went with paint on the inside after I didn't like the stain that I had originally bought to use. My audio friend pointed me in the direction of this stain. I had bought some of the Minwax water based stain tinted Crimson red but it didn't show the wood grain at all. So today I stained the inside it's not dry in the pictures. I also got the braces put in, I believe they will eliminate the last likely point where the enclosure could flex if it tried to. I have 6 cans of spray lacquer to go on the stain but my friend said I'll be likely to need more.*

One last thing about the stain it seems to be difficult to get a picture that shows it well as it all depends on how the light is hitting it.*


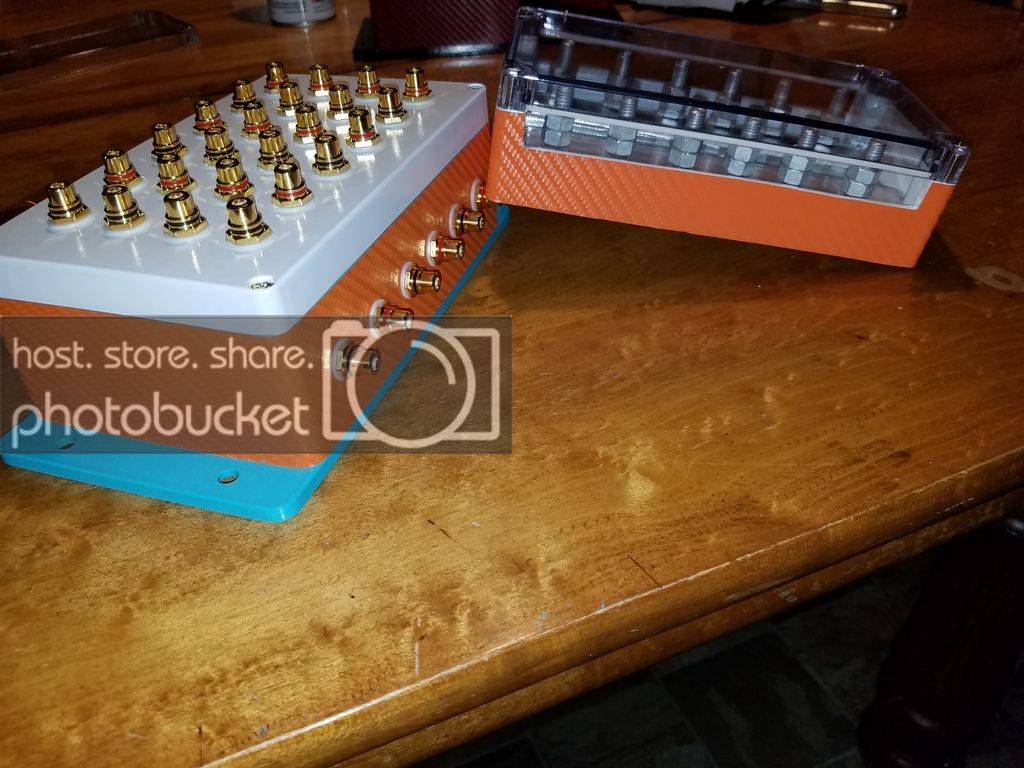
I also made a fuse holder for a local guy but I determined that after cost I won't be making any money on it lol. I also made another RCA box still have to solder it but it will be for sale. I think the random color scheme on it looks good.*


The whole menagerie together.*


Tomorrow I'm hoping to make the last fuse holder I need for myself, get some sound deadener in the doors, working on part one of sealing off the wall and making a brace for someone that's coming over for me to weld it.*

 
Well it certainly isn't my mother lol.
Well I sure as hell hope it isn't lol

This build is solid....you shouldn't have any flex whatsoever. Strongest enclosure I've seen to date.

Good thing I finished up those pieces yesterday...was nice out earlier today and then bam thunderstorms.

 
Well yesterday not much was done really and today nothing got done. This is part of phase 1 for the whole sealing it off thing. The next part of this phase involves some spray foam which I really abhor. If you're thinking to yourself, "man Nick it looks like you have no idea what you're doing" you would be correct kind of made these up as I went along but they're definitely strong. Additionally a guy from a local audio team came over and he took his subs out of his 4th and I welded him a brace for his sealed side, it was tricky as his back wall is at a 50ish degree angle. He put the subs back in and I got a demo.

Both sides aren't identical but they're each made with 2x4s, some 3/4 inch birch for the tight spots and PL Premium of course. I ran out of 2x4's so I didn't get to the bottom. I leave for work Monday so I'm not sure how much more will be getting done between now and then.

Drivers side:


Passenger Side:


Starting to look like a wall overall, don't worry it won't be this ugly in the end (I hope):


Alright did a little more today I hope these pictures might help some people in the future like me that have no clue what to do. So after doing all the wood to get as close to the door as possible I covered the door in painters tape and then put spray foam on the wood and on the door. After the foam has had sufficient time to sure I opened the door, pull hard and then peeled the tape (which was stuck more to the foam than the door). Afterwards I just trimmed it all with a sawzall blade. It gives you a really nice fit to the door and I can still open it which is a plus. I also put down my first coat of polyurethane on the inside of the enclosure tonight but I'm waiting for it to try so I can get a better picture representation tomorrow. I will probably do 2-3 coats but tomorrow I'm going out of town for work for the next 3 weeks.

Oh a note about the foam the side with the completed trimmed pictures is great stuff and the application pictures are loctite. I ran out of painters tape and spray foam last night and only got one side done. I think the loctite will prove to be better quality but I will post a picture when I get it trimmed. The Loctite really expanded I could have used less than I did but I wasn't really used to it.


Loctite Foam in this picture:


Great Stuff:


Great Stuff:

 
Well I ended up riding home with a coworker for mother's day I was home for a little under 24 hours. I did get a few small things done but nothing major to report.*

First off I do have to say that the Loctite Foam is worth the extra money you can tell it's much more dense. It did seem a little more messy when cutting it. *

Got the second coat of polyurethane down one or two more and it should be good. I don't think the pictures do it justice honestly.*

I got these fans in for cooling my amps they aren't exactly quiet but they do move some air, not sure if I'll set it up so both flow one way or do like a push pull kind of deal. They don't exactly match I wasn't paying attention and ordered them from two different ebay sellers, oh well.*


Finished the last fuse holder I should need nothing to it. *

Washed the Jeep and my truck both were covered in dust, pollen and saw dust. *

Trimmed the lower part of the B-Pillar trim to fit nailed it on the first try. *

Lastly pulled the door panel on the passenger side to check it out. The factory stuff to seal the door was shot so it got pulled off. I set the speakers in the panel to try and determine a layout I think this will work. It's a lot of stuff for one panel. *

​​​​​​​

​​

 
Haha or it could be a huge flop, time will tell whenever it gets finished.
I think you good brother I don't see any real issues. if you have some loading issues just cut you a few peace's of wood and load the drivers hat are unloading. but it looks pretty good to me honestly..

 
Well some more updates I'll just keep plugging along, I've started my new job so I'm really going to try and push to make slam. I've also been working on how I'm going to mount my amps, then I'll probably try and run some wire. *

Deadened the front doors with this damp pro from second skin hoping this stuff lives up to the hype. I hate deadening doors I feel like it takes forever. After I did the drivers side I feel like the passenger side turned out better. *


The UPS guy must have hated my *** on this one. 120 pounds of 2/0 EB Flex welding cable. 110 feet of red and 110 feet of black.


Got my battery terminals back from Dennis after he drilled and tapped all the holes for me. The middle one is aluminum because of when I broke a bit in the piece of copper I just opted for aluminum to replace it. Need to get some shorter M6 bolts the ones I ordered were about a 1/4 inch too long.*


Well I'm going to stop with the coats of polyurethane I have 4 down now and you really can't tell the difference between coats three and 4 in my opinion.*

Coat 3:


Coat 4:


Lastly built a holder for my lithiums, turned out pretty well I think. I let my girlfriend stain it tonight and I'll probably do a couple coats of polyurethane on it eventually.*


Activity
No one is currently typing a reply...
Old Thread: Please note, there have been no replies in this thread for over 3 years!
Content in this thread may no longer be relevant.
Perhaps it would be better to start a new thread instead.

Similar threads

Be sure to see the sub specs. It should tell you the ideal sealed enclosure size.
3
648
TBH, that is too many speakers for just a pair of 10" subs. The Skar 6.5s and tweeters are very efficient and can get super loud on moderate...
6
968
I purchased a set of 1" stand off rings, should still be good from door to cone as well. They won't fit without the spacers, the recoils I...
30
9K
It is the same one that Rockford Fosgate sells as well. They are identical and the NVX is cheaper as well. Even Amazon has them iirc for 199.99...
12
1K
Is anyone familiar with, or can help with the Infinity system (with amp) fitted in 2001 Jeep Grand Cherokee? I've installed a Atoto A6 head unit...
0
839

About this thread

nkrell11

10+ year member
CarAudio.com Elite
Thread starter
nkrell11
Joined
Location
Mt. Pleasant, MI
Start date
Participants
Who Replied
Replies
217
Views
27,559
Last reply date
Last reply from
hispls
20240604_170857.jpg

metalheadjoe

    Jun 5, 2024
  • 0
  • 0
Screenshot_20240605_200209_Adobe Acrobat.jpg

Dylan27

    Jun 5, 2024
  • 0
  • 0

New threads

Top