1999 Chevrolet Blazer

So, did some work on this meter panel.

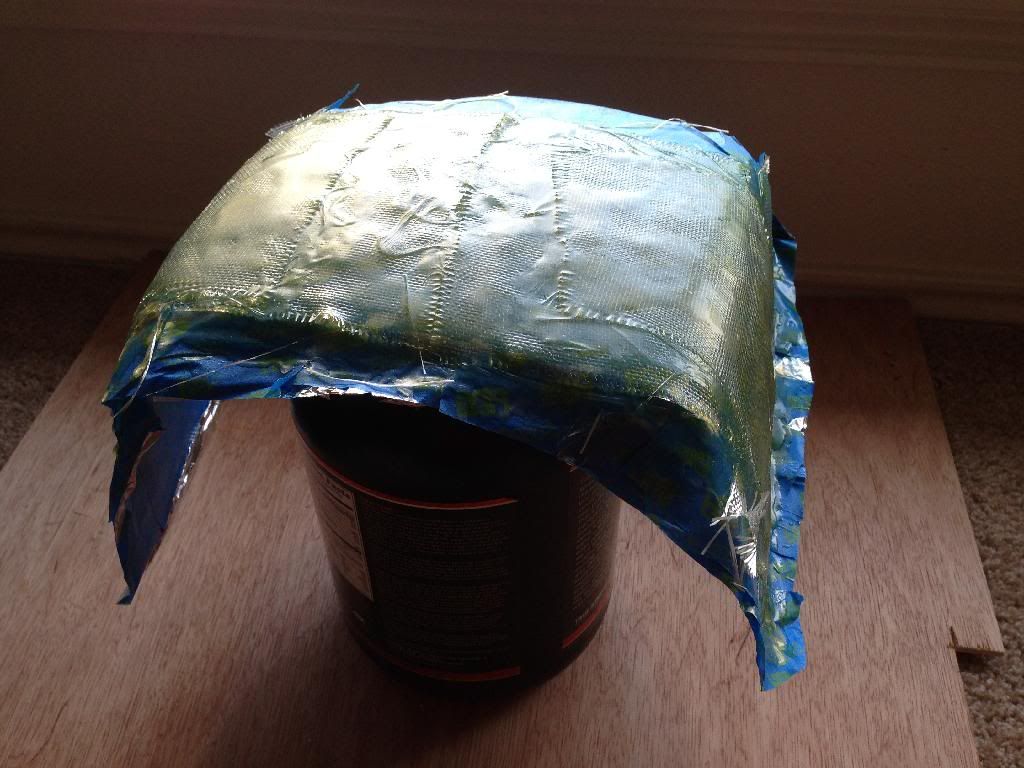
Taped up and covered the area I was working with. I covered the whole thing because I wasn't sure how much I was actually going to use.


Then I laid down one layer of glass, and figured out after an hour I didn't use enough hardener. So I just mixed up another and threw it on top. Don't remember if this was my first or second:


One or two more layers, and I popped it off:


Decided I'm just going to use the top section, not going down the sides. Cut it up:


Then cut the meter baffle, placed it on and marked the fiberglass where I want it:


Then just tacked it on with hot glue:


And that's where I stopped for the day. Tomorrow I'll throw some bondo on so the baffle will be a bit sturdier, then stretch some cloth.

Car show and boozin time!

 
More work on the meter panel.

Threw some bondo on the bottom for strength so I could stretch the cloth without worrying:


Then wrapped the thing with some shammy cloth I had laying around. It was soft cotton not microfiber. Used hot glue to tack it. Not perfect, but good enough to where I can fix with Bondo.


Just resin, coat #1 :


Added another coat of resin, then checked for fitment:


Cut the excess cloth and a quick sand, and here it is:


Made sure the meters still fit:


Cut out an access hole:


Added mat for strength:


That's where I stopped for today. Got some work left yet, but it's going well. I work slow, and that's fine with me.

Also, ordered a board of 3/4" plexi for the window on the box //content.invisioncic.com/y282845/emoticons/biggrin.gif.d71a5d36fcbab170f2364c9f2e3946cb.gif

 
Bondo coat #1 :


A wee bit o' sandin:


After sanding Bondo coat #2 :


Gettin there. Just got some small stuff to fill in, sides to sand down, and it's almost ready for primer.

 
Taken with a potato, but last coat of Bondo:


Shot it with a clear primer, it's all I had. Need to get some black tomorrow.


The plexi also came in! This stuff is hard as a rock, I have no worries about this flexing.


Also just ordered some UV LEDs //content.invisioncic.com/y282845/emoticons/biggrin.gif.d71a5d36fcbab170f2364c9f2e3946cb.gif

I am debating on where I should put "Tantric Sounds" on the box. Originally I was going to seal the letters in the back of the box before I stain it so it would be much lighter. But now I'm thinking I will simply frost the plexiglass. Thoughts?

 
Just some primer and sanding. Alternating between grey and white coats so I know how deep I'm sanding:


This is the point where I start getting annoyed with sanding and my mistakes and just start accepting imperfections lol. It's not too bad right now, some stuff will be noticeable though. Gonna plasti-dip for the finishing coats.

Still want opinions on where to put "Tantric Sounds"! Either in the stain on the wood in the back, or on the plexi window.

 
So, this upsets me:


My guess is it was cooler in the house where I sprayed it, and now out in this heat the fiberglass expanded and caused the plastidip to tear. Guess I'll have to take a sharpie to it.

But got them wired in. The ammeters are working correctly, but the voltage is off, I'll explain that later. First, two videos:


Notice how little my Levi draws.

The voltage is off. I wired it all together, ran off a single wire from my daisy chain in the back. Didn't start dropping like that until I wired those two in. I know it's off, because if I turn the fans on in the amp rack it drops to 14.4V and stays there, and that ain't right. I'll have to run some more wires and hopefully that will solve it.

Also, Texas is already unbearable:


Or for those of you in the US:


looks good. maybe try to use SEM rather than plastidip? may help out with the paint not coming off or cracking.
Well it's already done //content.invisioncic.com/y282845/emoticons/frown.gif.a3531fa0534503350665a1e957861287.gif

I'll keep it in mind though.

Sick lookin. Your HU reads voltage?
Yeah, the 80PRS does.

 
So here's part of the knock-down kit. Still missing the three biggest panels, haven't cut those yet. Been battling with my saw, keeps curving to the left, so there's some shoddy cuts. Need a new blade, hopefully that will fix it. Then I'll cut those panels, because they're the outer face panels I'm gonna be staining so they need to be good. This is gonna be a fun jigsaw puzzle.


Just an idea, quick dry-fit:


Activity
No one is currently typing a reply...
Old Thread: Please note, there have been no replies in this thread for over 3 years!
Content in this thread may no longer be relevant.
Perhaps it would be better to start a new thread instead.

Similar threads

Are you planning on reusing the power pack? If yes cut the wires at the top red arrow only. Connect your new radio harness to the translucent one...
1
921
I would prob go and take it to a shop to someone that knows how to install, pay the $50-75-100 bucks so its done correctly.If you continue to do...
1
1K
Ok. I think I get it. There's really not much to be gained between charging them at say 60% and 100%. At least not on a daily system. Please...
13
2K

About this thread

gckless

5,000+ posts
CarAudio.com Veteran
Thread starter
gckless
Joined
Location
San Antonio
Start date
Participants
Who Replied
Replies
379
Views
90,025
Last reply date
Last reply from
Tripn88
20240604_170857.jpg

metalheadjoe

    Jun 5, 2024
  • 0
  • 0
Screenshot_20240605_200209_Adobe Acrobat.jpg

Dylan27

    Jun 5, 2024
  • 0
  • 0

New threads

Top