Hi everyone,
this is my SQ‑oriented door deadening build, using a multi‑layer approach similar to high‑end shop installs.
The project is currently 50% complete, and I’m sharing progress as I go.
1. Goal of the Project
Build a rigid, sealed and acoustically optimized midbass chamber, eliminate resonance, reduce road noise and stabilize the door structure for high‑quality front stage performance.
This is not a basic “deadening job” — this is a full SQ Door Build.
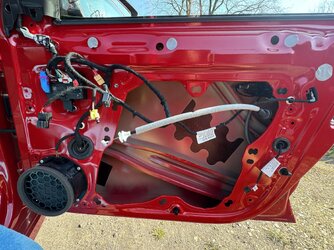
2. Factory Condition (Before)
The stock door had:
large open service holes
thin outer skin with noticeable resonance
minimal OEM damping
plastic door card with no decoupling
speaker mounted on factory rivets
no acoustic sealing around the driver
Result: weak midbass, panel buzz, energy loss, and poor acoustic control.
3. Materials Used (SQ‑grade configuration)
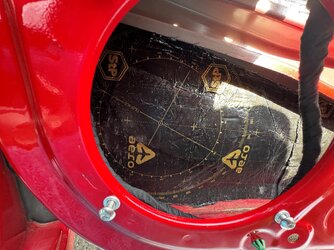
Outer Skin (external metal panel)
Layer 1: STP Aero Gold 2.3 mm
Layer 2: Bitmat C3S
Purpose:
Aero Gold stiffens the outer skin
C3S absorbs reflections and reduces road noise
Together they create a “dead” acoustic surface
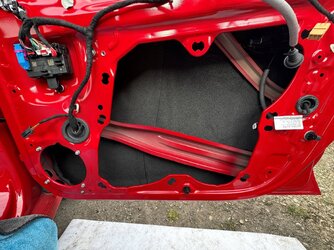
Inner Metal Panel (technical plate)
 CURRENTLY IN PROGRESS (ONGOING)
Layer 1: STP Aero Gold
Layer 2: Bitmat Accent
Purpose:
Aero Gold eliminates resonance of the structural plate
Accent absorbs reflections and decouples the door card
This stage is critical for midbass control and overall SQ
More photos and updates will follow as this part is being completed.
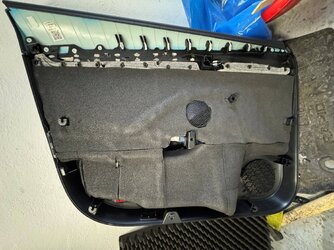
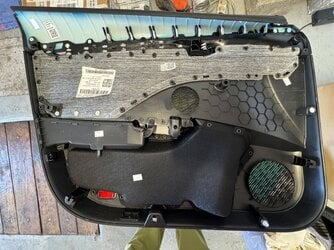
Door Card (plastic panel)
Layer 1: Aero Gold – spot treatment
Layer 2: Bitmat C6S
Purpose:
spot Aero Gold stiffens key areas
C6S decouples the card and prevents rattles
improves door behavior and reduces coloration
Speaker Mounting (premium upgrade)
M5 aluminum rivet‑nuts
stainless steel bolts
Bitmat foam ring behind the speaker
Purpose:
rigid, serviceable mount
zero micro‑movement
improved midbass attack
directs sound into the cabin, not into the door
4. Process (So Far)
4.1 Outer Skin – COMPLETED
Aero Gold applied to large flat areas
fully rolled for maximum adhesion
C3S applied on top for absorption and noise reduction
4.2 Door Card – COMPLETED
spot Aero Gold stiffening
full C6S decoupling layer
no rattles, no plastic resonance
4.3 Inner Metal Panel – IN PROGRESS
Currently working on:
applying Aero Gold to the structural plate
adding Accent foam
preparing for final sealing and assembly
This is the most delicate part of the build and will be updated soon.
5. Results (So Far)
Midbass
stronger punch
better attack
no panel resonance
Mids
cleaner
less coloration
Noise Reduction
noticeable drop in road noise
door feels heavier and more “premium”
Overall
The door already behaves more like a proper enclosure, even before finishing the inner panel.
6. Summary
This build uses a 4‑layer system:
Door Area Layer 1 Layer 2 Status
Outer Skin Aero Gold C3S ✔ Done
Inner Panel Aero Gold Accent In progress
Door Card Aero Gold (spot) C6S ✔ Done
Plus a premium speaker mount with rivet‑nuts and foam sealing.
More updates coming as the inner panel work continues.
this is my SQ‑oriented door deadening build, using a multi‑layer approach similar to high‑end shop installs.
The project is currently 50% complete, and I’m sharing progress as I go.
1. Goal of the Project
Build a rigid, sealed and acoustically optimized midbass chamber, eliminate resonance, reduce road noise and stabilize the door structure for high‑quality front stage performance.
This is not a basic “deadening job” — this is a full SQ Door Build.
2. Factory Condition (Before)
The stock door had:
large open service holes
thin outer skin with noticeable resonance
minimal OEM damping
plastic door card with no decoupling
speaker mounted on factory rivets
no acoustic sealing around the driver
Result: weak midbass, panel buzz, energy loss, and poor acoustic control.
3. Materials Used (SQ‑grade configuration)
Outer Skin (external metal panel)
Layer 1: STP Aero Gold 2.3 mm
Layer 2: Bitmat C3S
Purpose:
Aero Gold stiffens the outer skin
C3S absorbs reflections and reduces road noise
Together they create a “dead” acoustic surface
Inner Metal Panel (technical plate)
CURRENTLY IN PROGRESS (ONGOING) Layer 1: STP Aero Gold
Layer 2: Bitmat Accent
Purpose:
Aero Gold eliminates resonance of the structural plate
Accent absorbs reflections and decouples the door card
This stage is critical for midbass control and overall SQ
More photos and updates will follow as this part is being completed.
Door Card (plastic panel)
Layer 1: Aero Gold – spot treatment
Layer 2: Bitmat C6S
Purpose:
spot Aero Gold stiffens key areas
C6S decouples the card and prevents rattles
improves door behavior and reduces coloration
Speaker Mounting (premium upgrade)
M5 aluminum rivet‑nuts
stainless steel bolts
Bitmat foam ring behind the speaker
Purpose:
rigid, serviceable mount
zero micro‑movement
improved midbass attack
directs sound into the cabin, not into the door
4. Process (So Far)
4.1 Outer Skin – COMPLETED
Aero Gold applied to large flat areas
fully rolled for maximum adhesion
C3S applied on top for absorption and noise reduction
4.2 Door Card – COMPLETED
spot Aero Gold stiffening
full C6S decoupling layer
no rattles, no plastic resonance
4.3 Inner Metal Panel – IN PROGRESS
Currently working on:
applying Aero Gold to the structural plate
adding Accent foam
preparing for final sealing and assembly
This is the most delicate part of the build and will be updated soon.
5. Results (So Far)
Midbass
stronger punch
better attack
no panel resonance
Mids
cleaner
less coloration
Noise Reduction
noticeable drop in road noise
door feels heavier and more “premium”
Overall
The door already behaves more like a proper enclosure, even before finishing the inner panel.
6. Summary
This build uses a 4‑layer system:
Door Area Layer 1 Layer 2 Status
Outer Skin Aero Gold C3S ✔ Done
Inner Panel Aero Gold Accent
In progressDoor Card Aero Gold (spot) C6S ✔ Done
Plus a premium speaker mount with rivet‑nuts and foam sealing.
More updates coming as the inner panel work continues.
Last edited:


")

