JBL MS62c / 06 Passat Speaker Baffles

  • 4
    Participant count
  • Participant list

neo_styles
10+ year member

AKA Pop Twidget
3,722
0
WA
Thought I'd post up a quick build log/noob tutorial on cutting speaker baffles. I'll be doing it pretty ghetto but someone could learn from this I guess. Heads up, I will not be including photos of everything. I already ran out of daylight after one ring today.

PARTS NEEDED

Two blocks of MDF, one 1/2" and one 3/4"...I used particleboard from Lowe's (shut up, it works)

#8 (or #10 ) sheet metal screws, 1" in length

Additional sheet metal screws, 1.5" in length

A jigsaw

A drill with bits

Beer (yes, it's a necessity, trust me)

To start things off, anyone who has owned one of the new-ish VW/Audi cars and tried a DIY speaker swap have learned two things. One: VW is retarded and riveted in their speaker baffles as well as bolted them from the rear. They call it anti-theft, I call it just plain stupid. Two: even if you remove the speaker from the stock baffle, a new 6.5" will not fit without severe modification, so you have two choices. You can either jury-rig one in there or you can create new baffles. I've chosen to take the second option.

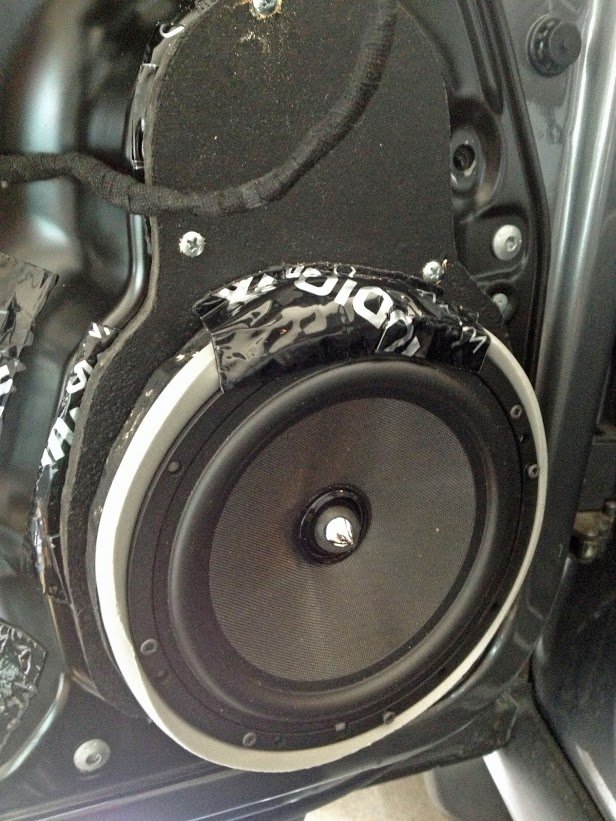
To drill out the rivets, I took a masonry bit and drilled down on the rivet until it spun freely. From there, I used a pair of dike cutters (*snicker*) to cut out the rest of the rivet. Once all the caps were removed, I pulled the baffle off and hammered out what was left of the rivets and pulled them out of the inner door skin. Once you're done, you end up with something like this:

IMG_0091.JPG


You will use this to make the shape for your baffles. Since it doesn't lay flat, cut the leads from the terminals on the bottom and cut out the empty cup from the top so the baffle will lay flat. Now it looks like this:

IMG_0093.JPG


Trace around the baffle with a wood pencil (or Sharpie, I prefer Sharpie) both inside and out on the 1/2" board. Using the speaker brackets from your new set of speakers, trace and mark the drilling points/openings. Do this again with just the speaker bracket on the 3/4" to make your rings. You'll end up with this:

IMG_0094.JPG


IMG_0095.JPG


Ignore the cut, I was testing out a saw that couldn't complete and has since been returned...FIRST LESSON LEARNED: you will need a jig that plugs in. The cordless ones won't last.

The following parts I didn't photograph because I was running out of daylight and doing this solo. Take your jigsaw and cut around the outer perimeter of the shape. When you get to the inner ring, drill a couple pilot holes so you can fit your jigsaw blade in and trace the lines you made.

Once you're done with that, you'll want to cover your baffle in something to waterproof it. Some people use Thompson's WaterSeal, others bedliner, I used Plasti-Dip because I could find it easily at Lowe's and it'll do the same damn thing. Here's what one of my rings looked like after the first coat:

IMG_0096.JPG


This is where I've run out of sunlight and charge on my jig, so I'll be resuming tommorrow.

You may now commence flaming my amateur and ghetto tactics. Good day.

 
Looks good so far. How you liking those comps? Heard good things about them. What have you heard you can compare to?
Closest comparison would be my Rainbow SLC comps (had the coax, too). Otherwise, I've had JL TR comps, JBL Power (old generation), Alpine S-Types, and Infinity Reference. Have also auditioned Focal's entire line minus the BE, Zapco, and anything else Best Buy puts on the sound board when I visit bored during lunch time.

Only testing I've done on the MS are free air wrapped in towels. They produce some really solid midbass as long as the front and back waves are isolated (so install will make or break your impression of the midbasses). Haven't yet tested the tweets outside of a soundboard, but they were buttery and detailed on the board.

 
IMG_0103.JPG


I have to find my other camera that has the rest of the photos, but you can see where I added layers of CLD in between each metal/wood or wood/wood point, then applied a layer of CCF weatherstripping between the wood and speaker itself. This was my attempt to isolate the front and back waves as much as possible and it worked out pretty darn well. For good measure, I applied one more layer of CLD around the CCF and overlapped the speaker itself. I'm not intending to sell these, so I wasn't worried about getting butyl on the speaker itself, just had to make sure I didn't go over the surround, which I didn't

 
Additional photos will show I mounted the tweeter directly above the woofer and reapplied the door skin. So here go for impressions:

Doing a quick RTA on my iPhone, I noticed that performance was considerably more flat. I did have to dip the 400Hz and 8KHz about 4dB just to cancel out some of the boominess and rough edge on the tweeters, but overall, everything else stayed at 0dB and did not require cuts. Unfortunately, the iPhone has HPFs in place to keep out wind noise, so 40Hz and 80Hz adjustments were more about guesswork.

Once everything was set, I played Romeo Machado from one of the Focal Spirit of Sound discs and my jaw hit the floor. Soundstaging is about as good as it can be considering I don't have any external processing, but everything was there and in front of me. I was worried that mounting the tweeters so low was going to be a problem, but I couldn't localize them. They still sounded like they were mounted in the sails (factory location). I did not experience any harshness, so can attest that these tweeters really are as awesome as people made them out to be. Even listening on axis while I was routing the remaining wires and the crossover, I wasn't feeling the need to dial anything down.

What impresses me most about these components, and this should speak to JBL's lineage in loudspeaker tech, is its all-out accuracy. A cymbal hit sounds like a cymbal hit, all the way from the initial percussive hit of the drumstick through the reverb of the cymbal itself and then everything fades away naturally. Nothing lingers, nothing stops abruptly, it just sounds right. Hits on the snare and toms feel realistic as well.

What these comps do best (IMO), though, is their ability to accurately reproduce various types of guitar work. My wife and I were listening to Dishwalla's "Opaline" and had to shoot a double-take at the doors because it literally sounded like there was a live performer behind the door skin. Bass guitars have their own specific presence and their representation is far from boomy. Especially blended with the ID10 in the back, everything sounded like I was hearing it live. On Deftones' "My Own Summer," I got a hint of that 2x4 to the chest kinda bass on the kick and there was a clear difference in visceral-ness between the verse and chorus when they go into super-crunch mode.

Electronic music has its own special quality, though not as impressive as natural instruments. On Sander Van Doorn & Julian Jordan's "Kangaroo," everything was clear as a bell and even when the synth kicks in for the hook, I didn't feel myself running for the volume knob (something I used to do every single time with the stock speakers). Final test track of the day was Nero's "Guilt," and this is where I really started smiling. Never before had I heard the drum-roll leading up to the initial drop and it was a pleasant surprise to feel like the song didn't ramp unnecessarily.

So there you have it. Perhaps the MS62c really has a valid place in DIYMA's current forum boner. I'm definitely impressed so far. And at Sonic's price point of under 200 bucks, it gives Focal, CDT, and Massive's budget offerings a solid run for their money. Two thumbs up and I look forward to thousands of hours of enjoyment.

 
Nice work man. Should help some newbs out. But, where are the tweeters???
Pics were taken on my digicam which I can't find right now. If I can't find it by tomorrow I'll just take a snapshot with the iPhone for posting. Tweet is directly above the woofer, so just use your imagination. I didn't use any of the cups, just added the double-sided foam tape that was included directly to the tweeter housing for clearance's sake.

 
Pics were taken on my digicam which I can't find right now. If I can't find it by tomorrow I'll just take a snapshot with the iPhone for posting. Tweet is directly above the woofer, so just use your imagination. I didn't use any of the cups, just added the double-sided foam tape that was included directly to the tweeter housing for clearance's sake.
Ah, ok. Where they aimed?

 
Ah, ok. Where they aimed?
Same path as the woofers. Didn't angle them or anything, so they're parallel to the midrange, aimed at the center console. Spread is extremely good and I thought localization would be an issue with them mounted so low, but they disappear.

 
Ok, found the digicam. Here's a few more shots:

DSC00841.JPG

Bare door, no matting whatsoever, baffle already removed. This is your blank canvas

DSC00843.JPG

The aforementioned baffle. Notice how the window track is pretty close to where the speaker would be. Hence why you need an additional speaker ring on top of the back plate.

DSC00844.JPG

Adding some AT deadener, courtesy of @cthedinger ; and his giveaway. I got 10 sq ft, so I really tried to keep true to the 25 percent coverage philosophy. I knocked around the panel trying to find the resonant spots and placed strips on them as well as a couple strips on the outer skin. It's really narrow in there, so I couldn't go too far in the door which is why I focused on the areas immediately around the baffle.

DSC00845.JPG

And the finished passenger door! I know there's steps missing, so just use your imagination and what I've previously posted. Speaker wire for the woofer was routed through the rubber grommet containing the handle pull cable (big black thing towards the top). The tweeter was since moved down to directly above the woofer due to clearance issues. As stated before, this didn't hurt staging one bit and, even behind the door card, they sing clear as a bell.
 
I left the length as is just in case I decide to relocate the tweeter to the a-pillar. There's no way to safely route speaker wire through the door grommet, so I'll have to move the crossovers to the trunk and a new line of speaker wire up to the tweet alone. I hacked into the factory wire for now.


---------- Post added at 05:42 PM ---------- Previous post was at 05:41 PM ----------


And I already said this would be a pretty ghetto install. I don't have the world's best patience

 
I left the length as is just in case I decide to relocate the tweeter to the a-pillar. There's no way to safely route speaker wire through the door grommet, so I'll have to move the crossovers to the trunk and a new line of speaker wire up to the tweet alone. I hacked into the factory wire for now. 

---------- Post added at 05:42 PM ---------- Previous post was at 05:41 PM ----------


And I already said this would be a pretty ghetto install. I don't have the world's best patience
Drill a hole, get some flexible tubing man. Shouldn't be too hard if you wanted to do it that way. Also, just noticed how sealed your doors were to begin with. I'm jelly.

 
Drill a hole, get some flexible tubing man. Shouldn't be too hard if you wanted to do it that way. Also, just noticed how sealed your doors were to begin with. I'm jelly.
Yeah, definite plus. There were even some factory CLD tiles in place on the outer door skin. My concern with routing new speaker wire isn't about drilling and rubber grommets, it's about the fact that just inside the cabin that I'd be drilling into, there's a pair of airbags. Last thing I need to do is have to pay to replace one of those...

 
Activity
No one is currently typing a reply...
Old Thread: Please note, there have been no replies in this thread for over 3 years!
Content in this thread may no longer be relevant.
Perhaps it would be better to start a new thread instead.

Similar threads

I didn't see where there was a difference (didn't see a "light" or "lite" version). That said, if you can fit it, then the JBL BassPro SL 2 would...
1
540
WANTED JBL 800GTI
Slava Ukraini, Brother! Don't have that amp but good luck and welcome!
1
796
I don't think this is ideal, but let's assume you can easily mount all the tweeters. That installing them is going to be really simple, and...
13
1K
Working with undersized material, adjusting on the fly, testing before setting; you sound like and old pro. You are as meticulous as alot of the...
76
5K

About this thread

neo_styles

10+ year member
AKA Pop Twidget
Thread starter
neo_styles
Joined
Location
WA
Start date
Participants
Who Replied
Replies
40
Views
8,606
Last reply date
Last reply from
neo_styles
1000007975.jpg

Mr FaceCaser

    May 16, 2024
  • 0
  • 0
1000007974.jpg

Mr FaceCaser

    May 16, 2024
  • 0
  • 0

New threads

Top