You have a portable video player and would like to watch your favorite movies using it? Or you would like to upload your movie clips to YouTube, Google Video, Myspace and other online sites? Tipard Video Converter enables you to solve these problems quite easily with a few mouse clicks.
The following guide includes three parts show you how to use Tipard Video Converter.
Part One: How to convert between all popular video formats on Windows?
Things you will need: Tipard Video Converter
Make Preparations: Install and run Tipard Video Converter

Quick Start:
Step 1: Add files
Click “Add File” to add your video files.
Step 2: Set output video format
Click “Profile” button from the drop-down list to select the output video format such as AVI, MPG, MPEG and WMV. You can click the “Settings” button to set parameters of your output video such as Frame Rate, Bitrate to get the best video quality as you want.
Step 3: Click the “Start” button to start the conversion.
Part Two: How to convert between all popular video formats on Mac?
Thins you will need: Tipard Video Converter for Mac
Make Preparations: Install and run Tipard Video Converter for Mac (Intel Users, Power PC Users)

Quick Start:
Step 1: Add files
Click “Add File” to add your video files.
Step 2: Set output video format
Click “Profile” button from the drop-down list to select the output video format such as AVI, MPG, MPEG and WMV. You can click the “Settings” button to set parameters of your output video such as Frame Rate, Bitrate to get the best video quality as you want.
Step 3: Click the “Start” button to start the conversion.
Part Three: Edit the video files (both for Windows and Mac Users)
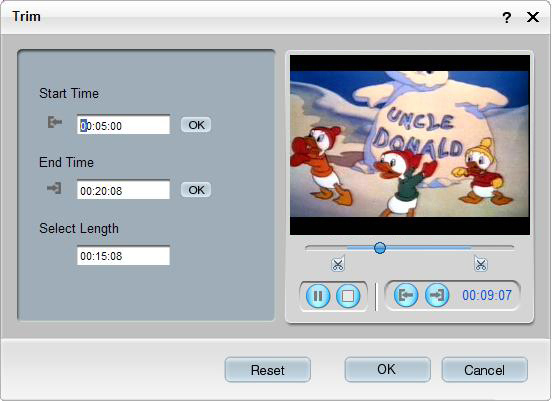
1.Trim any segment
There are 3 ways that you can trim your video.
a.You can drag the button to set the start and end time
b.You can preview the video first and when you want to start trim click the left one of the pair button when you want to end click the right one.
c.You can set the exact start and end time on the left side of the trim window.
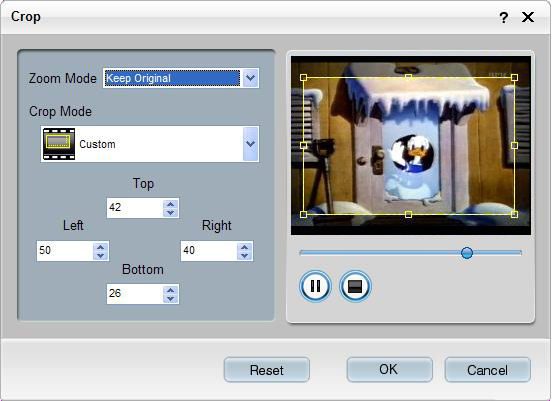
2.Crop any play region
There are 3 ways that you can crop your video.
a.We provide 7 modes on our “Crop Mode”
b.You can set your own mode on the left side of the crop window
c.You can drag frame to set your own crop mode
3.Snapshot and merge into one file
If you like the current image of the video you can use the “Snapshot” option. Just click the “Snapshot” button the image will be saved and you can click the “Open” button next to “Snapshot” button to open your picture.
If you want to make several files output as one you can choose “Merge into one file”.
The following guide includes three parts show you how to use Tipard Video Converter.
Part One: How to convert between all popular video formats on Windows?
Things you will need: Tipard Video Converter
Make Preparations: Install and run Tipard Video Converter
Quick Start:
Step 1: Add files
Click “Add File” to add your video files.
Step 2: Set output video format
Click “Profile” button from the drop-down list to select the output video format such as AVI, MPG, MPEG and WMV. You can click the “Settings” button to set parameters of your output video such as Frame Rate, Bitrate to get the best video quality as you want.
Step 3: Click the “Start” button to start the conversion.
Part Two: How to convert between all popular video formats on Mac?
Thins you will need: Tipard Video Converter for Mac
Make Preparations: Install and run Tipard Video Converter for Mac (Intel Users, Power PC Users)
Quick Start:
Step 1: Add files
Click “Add File” to add your video files.
Step 2: Set output video format
Click “Profile” button from the drop-down list to select the output video format such as AVI, MPG, MPEG and WMV. You can click the “Settings” button to set parameters of your output video such as Frame Rate, Bitrate to get the best video quality as you want.
Step 3: Click the “Start” button to start the conversion.
Part Three: Edit the video files (both for Windows and Mac Users)
1.Trim any segment
There are 3 ways that you can trim your video.
a.You can drag the button to set the start and end time
b.You can preview the video first and when you want to start trim click the left one of the pair button when you want to end click the right one.
c.You can set the exact start and end time on the left side of the trim window.
2.Crop any play region
There are 3 ways that you can crop your video.
a.We provide 7 modes on our “Crop Mode”
b.You can set your own mode on the left side of the crop window
c.You can drag frame to set your own crop mode
3.Snapshot and merge into one file
If you like the current image of the video you can use the “Snapshot” option. Just click the “Snapshot” button the image will be saved and you can click the “Open” button next to “Snapshot” button to open your picture.
If you want to make several files output as one you can choose “Merge into one file”.


