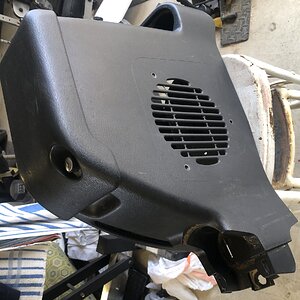
2018 Wrangler JL- Upgrading from JL Audio 8" microsub

the previous 8 would have had a lot of midbass which caused all the localization pulling the bass to the rear, the dayton should hit a bit deeper, more linear so there should be a better blend from the swap along with proper alignment which helps the phasing as well. However the most important aspect of up front bass, your front speakers need to have really strong midbass to pull the bass up front, like ungodly amounts, that is mainly what affects the up front bass image the most next would be with getting the subs and mids in proper phase with polarity control and time alignment for more accurate thuds on par with the midbass thuds. Since you already have a fix86 i'd just do the twk88 to have a matching set so you can sell it later on easier. You'll have an easier time tuning as well for a set it and forget it.  With a dayton its less forgiving and requires an RTA to get the most out of it.  
Thanks again...I have 12awg to wire up the box.  How do you connect the wire to the back of the wire terminal on the box?  I don't know how to solder...are crimped butt connectors good?  

Secondly, is it ok to mount the sub over the carpet that extends to the edge of the round speaker cutout or do I need to try and cut out more carpet to allow the sub to mount directly to the wood?

 
the dsp will make the biggest difference in the sound quality, right now you really have nothing that will help your sound quality at all, adjusting crossovers and polarity does little to nothing because you cant set the crossover points for mid and tweet.

 
Thanks again...I have 12awg to wire up the box.  How do you connect the wire to the back of the wire terminal on the box?  I don't know how to solder...are crimped butt connectors good?  

Secondly, is it ok to mount the sub over the carpet that extends to the edge of the round speaker cutout or do I need to try and cut out more carpet to allow the sub to mount directly to the wood?
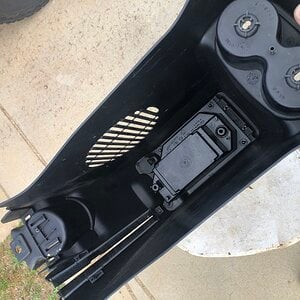
female spade connectors, crimped, no need to solder, just crimp well

you actually want the carpet to help gasket the sub better. Just mount over it.

 
female spade connectors, crimped, no need to solder, just crimp well

you actually want the carpet to help gasket the sub better. Just mount over it.


2 hours ago, Jeffdachef said:


I tried to copy his technique, but it seems to take practice to look good.  In hindsight, I definitely should've bought the prefab bbox for $50.  In my opinion, if you dont have proper equipment, box building is too expensive, takes alot of labor and the finished product looks worse than a prefab.  Mine has cost me about $190+ 3-4 hrs labor.  I sure hope this thing sounds good and lasts a long time.  Costs include:

Birch plywood: $55

Carpentry cuts and angles: $40

Titebond 2: $6

Silicone caulk: $4

Black carpet $28

3m 77 adhesive: $10

Wire terminal $8

Gasket $7

Parts Express polyfil: $18

Screws: $3

Female connector and crimp $10
Lmao dude i already told you get the normal sanded pine ply, which is literally the "birch" you bought, have home depot cut the wood which is free. Get a jigsaw and cut the hole.   3m90 is 3.99 at home depot... A premade box would not have the terminals, polyfill, connectors, either.  You literally chose to needlessly pay more rather than going the simple and effective path.

 
From the looks of the shop in op's pic someone around there knows how to make cuts? 

Seems like there should be enough materials left over to build another one. Maybe paint it or stain it next time?

Maybe got into a hurry and didn't take all the advice 2?

Idk sometimes learning isn't cheap I guess 

Hell build another 1 maybe you can get this thread to 20 pages 

 
Lmao dude i already told you get the normal sanded pine ply, which is literally the "birch" you bought, have home depot cut the wood which is free. Get a jigsaw and cut the hole.   3m90 is 3.99 at home depot... A premade box would not have the terminals, polyfill, connectors, either.  You literally chose to needlessly pay more rather than going the simple and effective path.
The pine would've saved $25, but it was 5 ply and had alot more voids.  Home depot would only make 2 cuts and no angled cuts that were needed for the angled back.  I would've had to buy a saw...so I elected to pay $40 to a carpenter for good cuts.  I forgot to add the $15 cost of the universal grill...so total cost is $200.  The polyfil was $11.  I dont see how you can build an angled box for less than $125 unless you already have tools and half the materials.  Prefab bbox would cost about $90 finished.  However, it was a fun learning experience and I like the satisfaction of DIY and appreciate all your help.  I'm putting the sub in tonight and installing everything tomorrow  night.  Excited to hear this Dayton!!

 
The pine would've saved $25, but it was 5 ply and had alot more voids.  Home depot would only make 2 cuts and no angled cuts that were needed for the angled back.  I would've had to buy a saw...so I elected to pay $40 to a carpenter for good cuts.  I forgot to add the $15 cost of the universal grill...so total cost is $200.  The polyfil was $11.  I dont see how you can build an angled box for less than $125 unless you already have tools and half the materials.  Prefab bbox would cost about $90 finished.  However, it was a fun learning experience and I like the satisfaction of DIY and appreciate all your help.  I'm putting the sub in tonight and installing everything tomorrow  night.  Excited to hear this Dayton!!
I'd rather have your box than a pre fab mdf box 

It should sound good as long as it's air tight. 

My 1st box wasn't too pretty. There's something to be said for building it yourself vs ordering 1 off the internet 

 
I'd rather have your box than a pre fab mdf box 

It should sound good as long as it's air tight. 

My 1st box wasn't too pretty. There's something to be said for building it yourself vs ordering 1 off the internet 
Well said!  I was going to put caulk around the wire terminal to seal it.  Is it ok to mount the sub tonight with the silicone drying?  Read that the silicon fumes could hurt the sub...

 
Look forward to the review. Bright Star Car Audio made some good enclosures but I can no longer access their page I wonder if they closed down

or changed their website?

What program was used to determine the box size?

 
I'd rather have your box than a pre fab mdf box 

It should sound good as long as it's air tight. 

My 1st box wasn't too pretty. There's something to be said for building it yourself vs ordering 1 off the internet 
@Jeffdachef

Added 1lb of acoustifil...it's definitely well sealed.  Wired it up for 2ohm and got her playing on medium volume with 8awg power to break it in and it definitely hits ALOT deeper!😀   It's very noticeable...cant wait until I get the 4awg ran tonight.

 
Activity
No one is currently typing a reply...
Old Thread: Please note, there have been no replies in this thread for over 3 years!
Content in this thread may no longer be relevant.
Perhaps it would be better to start a new thread instead.

Similar threads

Opted to show my buckeyes some love. Used some padding and also a unique piece of laminate I hade laying around. Needless to say, I’m happy it’s...
6
466
I used BASS Box Pro. It’s what parts express uses on most all their woofer spec recommends. I didn’t build the box phisically that is. I also...
9
2K
run your subwoofer amp on RCAs from your head unit. Tap the loc in the rear speakers or the wiring harness in the back of your head unit to the...
2
1K

About this thread

JeeperVol

CarAudio.com Recruit
Thread starter
JeeperVol
Joined
Location
Start date
Participants
Who Replied
Replies
208
Views
22,427
Last reply date
Last reply from
JeeperVol
IMG_1309.jpeg

vlusardi

    Apr 24, 2024
  • 0
  • 0
IMG_1308.jpeg

vlusardi

    Apr 24, 2024
  • 0
  • 0

Latest topics

Top