Volvo S60 build resurrected! Old School!

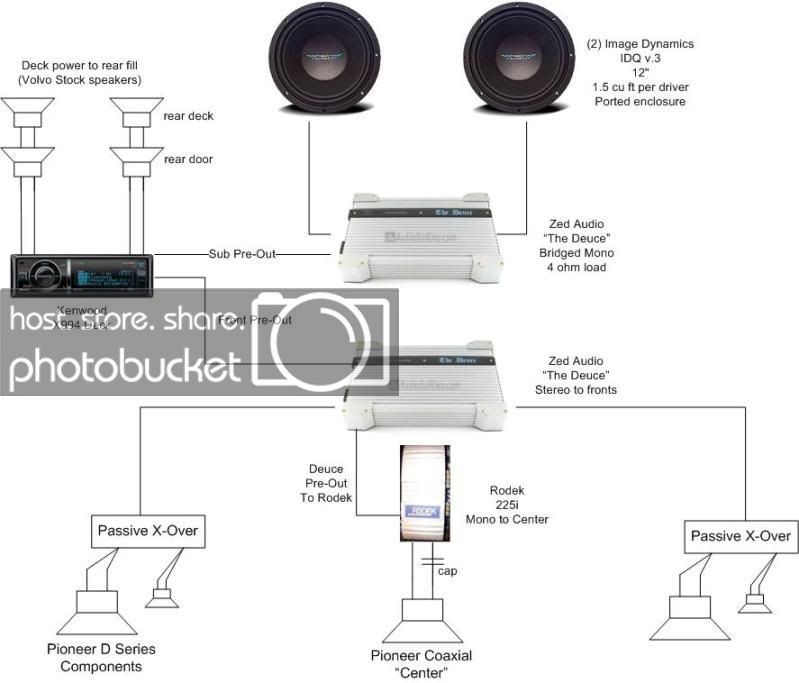
Tonight I put a couple hours into the system, getting ready for the subs build coming up. I removed the rear deck speakers and deadened the top side of the rear deck. The bottom of the rear deck already got a layer of GTMatt. So now I have a layer of deadener on both sides. The rear deck speakers were surprisingly large in this car, look like 8" woofers with a coaxial mounted tweeter. Not a bad rear deck opening if someone wanted to go for a free air mounted 8" woofer in this vehicle. That would definitely be a more straight forward build than what I am doing here. For me, I have removed the rear deck speakers and will leave the holes open for the bass to pass through. I'm getting accustomed to these fronts now and can't wait to have the subs in action. Over the weekend I hope to have a rough cubic footage measurement of the airspace I have to dedicate to the subs and then will email Frankie at ID to get some specifics on how large to make the port. I'm shooting for a 35Hz tuning. We'll see how that works out with the amount of air space I have to sacrifice. I'm estimating somewhere between 1.5cu ft. and 2.0 cu ft. per IDQv3 12 driver. Deuce bridged mono into 4 ohms should really put out a nice amount of power for the bass. At least according to Steve Mantz, the Deuce does better on the bench into 4 ohms than the original hifonics zeuss. Can't wait to experience this bass.

Here's before the GTMatt applied to the rear deck.

S60system9.jpg


Here's after. I applied more of the mat towards the middle, most flexible, parts of the rear deck. I have a feeling I may need to add more deadening to the rear deck platform which sits over this metal. It will likely resonate quite a bit with what I am putting into this car.

S60system8.jpg


I'm posting some of my early drawings for this system design. Things haven't changed too much except for how I'm thinking about this center channel. Right now I have the center wired as shown in the diagram with the center channel amp taking a feed from the outputs on the front Zed Deuce amp. I have decided to completely ditch the rear speakers so I think that taking the rear outputs from the deck and feeding them into the center channel amp will be a better way to go. That will give me the flexability of the electonic crossover on the deck to adjust those outs and also will allow me to adjust the amount of center in the mix from the deck rather than going into the trunk and adjusting the gain on that amp which has proven difficult to dial in because I can't hear it in the trunk. Using the rear outs dedicated to the center should prove easier to get it adjusted in the mix.

system.jpg


TheDeuce_AmpRack_All.jpg


Finally got to work on the subwoofer enclosure. The holidays are a busy time to fit this in but made some time tonight. First picture here is of the enclosure on the workbench with the front facing towards the camera. The front will have a part MDF, part fiberglass baffle so it will fit against the amp enclosures on the side walls and create a wraparound sort of look in the trunk. The back is angled to go against the rear seat and will get an MDF back. Second picture is when I test fitted it in the vehicle. I'm estimating this will come in at about 1.8 cu ft per driver.

S60system12.jpg


S60system13.jpg


Finally got to work on the subwoofer enclosure. The holidays are a busy time to fit this in but made some time tonight. First picture here is of the enclosure on the workbench with the front facing towards the camera. The front will have a part MDF, part fiberglass baffle so it will fit against the amp enclosures on the side walls and create a wraparound sort of look in the trunk. The back is angled to go against the rear seat and will get an MDF back. Second picture is when I test fitted it in the vehicle. I'm estimating this will come in at about 1.8 cu ft per driver.
S60system12.jpg


S60system13.jpg
Wow !! man, that looks awesome,,Very nice work indeed...You do nice detailed work

 
Hey folks, a question about ports. I'm going with 4" round for this box. It will be easier to integrate into the front than a slot port here. I'm looking at some of the flared port options on Parts Express, such as these precision ports. Do you have any recommendations?

Here's a few I'm looking at.

I like this option because the flares are only $4 each. Could I fix these onto 4" ABS that I get at the hardware store with some ABS or PVC glue? Reason I ask is it looks like the extension they sell for these is 12" and my port will need to be a few inches longer than that. Also, I'm a cheap bastard so I like the $4 price.

Precision Port PSP-4IF 4" Inside Flare for Port Tube 268-377

268-377_a.jpg


Now, this kit comes with an 18" extension so it seems ideal. However, what's up with this dimpling of the flare? I know it states in the description that it is supposedly better because it "reduces air velocity". Obviously the dimples add drag. So my question is, how would you model that? Or should I just not worry about the dimples affecting the tuning of the port? They're a bit on the pricey side but they do look pretty nice, asthetically.

Let me know if you guys have any thoughs or recommendations around ports.

Precision Port Dimpled 4" Flared Port Tube Kit 268-353

268-353_a.jpg


Made a little progress tonight by cutting the pieces of MDF which will make the front baffles on the enclosure. I am using two pieces of 3/4" MDF sandwiched together to make a 1.5" baffle. I applied a layer of wood glue in between the pieces and clamped 'em down. I also used a heavy jug of water on top for good measure. A layer of aluminum foil is between the two baffle pieces to prevent them from sticking together as glue runs down the sides.

One thing I did also was start drawing out placement of the woofer and the port on these baffles. With a 6" diameter area necessary for these 4" flared ports, I am concerned I may not have enough space on the front baffle for them. I may need to go to a 3" port although that may run the risk of some port noise. With the ports firing back, though, it may be OK. I'm also toying with either top placement of the round ports or working in a slot port into the back of this enclosure. Heck, even a 1.8 cu ft sealed enclosure models really well with these drivers so that's an option and may provide better SQ. I have some thinking to do on this. Any suggestions are welcome.

S60system15.jpg


S60system14.jpg


Made a decision to go with the 3" Precision Ports. Placed an order on parts express for those and also a terminal cup that looked pretty good. One of the things that can be a challenge is that I don't have a lot of fancy tools at my disposal. A neighbor lets me borrow his table saw whenever I need it which is a huge help. I had planned to use my plunge router with a rabbeting bit to recess the woofer into this baffle piece. But with these woofers I would need a 3/4" rabbeting bit which is only available with a 1/2" shank. My router only accepts 1/4" shanks. So rather than invest in a new router and bit, or rent one. I got creative here and cut a piece of 1/2" MDF and glued it to the two 3/4" pieces. So this now makes a 2" baffle which is kind of overkill. But I used the 1/2" MDF piece to cut the woofer hole so the speaker will sit flush. Here's a couple photos. First is a test fit of the woofer. It should sit nice and flush now once I wrap this with fiberglass, including the thickness for that. The second photo is the 1/2" MDF piece glued and clamped. Tomorrow when it's dry, I'll cut around the line draw on it which will make "snowman" or "figure 8" shape which should look neat with the fleece wrapped around it and glassed in. Having done the fiberglass once now, with the trunk panels, it's getting easier to imagine the possibilities, what shapes are possible, and how it will come together.

S60system16.jpg


S60system17.jpg


Still working on the enclosure. It turned out the rings that I was cutting in the above pictures didn't turn out the way I wanted. A large part of this was the crappy jig saw I have been using since 1990. The motor was literally starting to smoke on this job and it didn't have the muscle. After looking at how poorly the ring cutouts turned out, I bit the bullet and finally retired that old thing. Picked up a new Ryobi model at the Home Despot. I really dig this saw. It's twice as powerful as my old one and has a nice bearing guide on it with an LED which illuminates where you are cutting. Also picked up a few blades for it including a long progressive cut blade which did the trick nicely to turn out these rings. So, long story short, those first two rings went in the trash and I started over. Again, cut the 3/4" MDF and glued them together. Then I cut a trim ring out of 1/2" MDF to make a 2" thick baffle. These two turned out much better and most of that is thanks to the new saw which cut through the 2" thick MDF like butter.

I'd be interested in what you guys think for the ports. I have a couple options. As you can see in this picture, in the upper corners of the box, I have barely enough room to fit 3" ports there. It will be tight but I can do it. I do not have room for flared ports there. 3" is all I have. I could put the 3" ports there and wrap the fleece around so they will sit flush with the curvature of the front of the box. Might look cool. But they're not flared ports. If I go that route then I'll also need to make some trim rings for them out of the black acrylic to cover the rough edge of the vinyl around the ports. The acrylic shop was kind enough to give me the cutouts which came out of the center of my amp frames. So I have some scrap material that I could make port trim rings out of using a circle jig with a plunge router. Interesting idea... Might look kind of cool and tie in with the trim on the amps. However, the downside is they are not flare ports. Should I care?

The alternative would be to mount the precision ports that I got on the top of the box. Ports firing up? Would they sound as good as the front firing ports? They'd be aiming right up at my rear deck which is perforated in several areas. Might sound good but might sound crappy because any port noise will be more audible AND I would be missing out on any db gains which I would get by firing the ports back. But...the plus side to this option is I can use those nice Precision ports and it will be super easy to mount them. What do you guys think will sound better? Flared Precision Ports up vs. non-flared ports firing back? Keep in mind, even with the ports firing back, I can still flare the inside but I just don't have room on the front of this thing for the outside flare. They take over 5" of diameter as it turns out and I don't have that real estate on the front.

S60system18.jpg


Very nice, detailed build! The amp racks look great! I'm anxious to see the sub enclosure now.. I'm no expert, but I'm going to say you need a larger port than the 3". You may be better off sticking with a sealed enclosure if you can't get the layout to allow for larger ports. @pro\-rabbit ; may be able to chime in with suggestions on the ports.
 
Any cliff notes? Lots of text and its to early for that lol
Hey, thanks for taking a look here. So I'm trying to decide what would be better, to use regular, non-flared 3" ports on the front of this box firing back towards the trunk with the woofers or to use 3" precision ports on the top of the box firing up. I just don't have the room on the front of the box for the precision ports that I hoped. I'm stuck with 3" ports because 4" will be too long for this box.

 
Activity
No one is currently typing a reply...
Old Thread: Please note, there have been no replies in this thread for over 3 years!
Content in this thread may no longer be relevant.
Perhaps it would be better to start a new thread instead.

Similar threads

Ok, but it sure seems strange that every other speaker I've ever seen has it wired to the positive, And they switched later too. It kind of goes...
8
875
Well, I've owned probably over 100 different drivers in the last 40 years and almost every single speaker in the NVX line-up over the last 8...
16
1K
https://www.youtube.com/@therealmatty_s/videos
0
594
I think you're gonna have to get good with fiberglass or something, or find someone with a 3d laser scanner that can 3d print or mold you some...
7
1K

About this thread

americannight

10+ year member
Senior VIP Member
Thread starter
americannight
Joined
Location
Bellevue, WA
Start date
Participants
Who Replied
Replies
122
Views
38,555
Last reply date
Last reply from
audiobaun
Screenshot_20240531-022053.png

1aespinoza

    May 31, 2024
  • 0
  • 0
Screenshot_20240524_202505_Samsung Internet.jpg

winkychevelle

    May 24, 2024
  • 0
  • 0

New threads

Top