2009 Mini Cooper, Mini System

Beau M
10+ year member

Senior VIP Member
Just finished a little system in my daily driver Mini Cooper. System was cheap to build, but sounds pretty good!

I like to make build logs when I do major installs on my vehicles. If you like Mustangs, here is my 68 with a 2.3T:

Beau's 68 Coupe - Vintage Mustang Forums

Anyway, I'm going to keep track of my audio build here. The car is a 2009 MCSa.

IMAG0061.jpg


The build might take a while, but I am starting with the hard stuff. First off, subwoofer boxes. As we all know, space is at a premium in these cars. I am re-using an amp I already own, and it is huge. There is no way it will fit anywhere except the trunk, which would leave almost no room for an in-floor sub. At first I thought I would be able to fit two 8" subs on one side of the trunk, but after measuring I was not happy with some of the compromises I would have to make. But, I already bought the subs, these Infinity's:

IMG_0194.jpg


These have pretty good reviews online, and meet two of my main criterea: Perform in a small sealed box and able to handle a decent ammount of power. They will be getting about 300 watts RMS each. However, the motors on these are pretty big, and I want to save as much trunk space as possible.
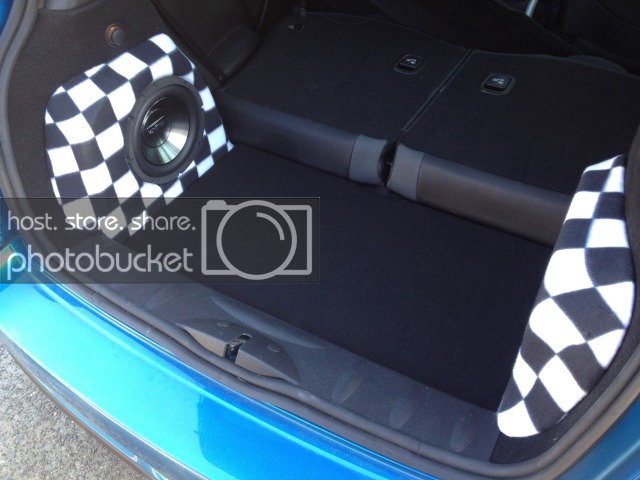
The trunk:

IMG_0270.jpg


Access panels removed. The drivers side is much better than the passengers as far as space.

IMG_0272.jpg


IMG_0271.jpg


I noticed that the factory wiring runs through here. I will be doing the same with my stereo wiring, but that makes corner boxes kind of tricky.

I decided on a fiberglass box on each side. The front face of the box will end at the factory jack access panel, which makes them very slim. I will have to use the space inside the side access panels not only for airspace, but for the magnets of the subs to slide into.

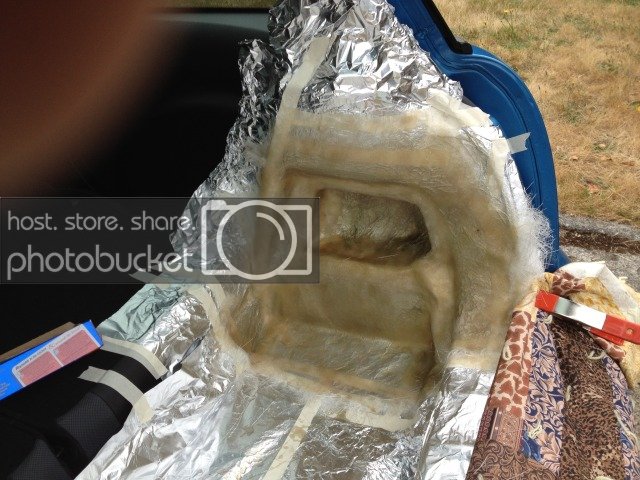
Here is one side foiled up:

IMG_0273.jpg


Notice in the mass of tape in the right hand corner. I ran a tube behind there that goes from the access hole down to the trunk floor. My plan is that once I glass over it, it will create a void that I can use to run all my wiring and keep it hidden.

Trunk all foiled up:

IMG_0274.jpg


This took a long time, but I wanted to make sure I didn't get any glass on the car or carpet.

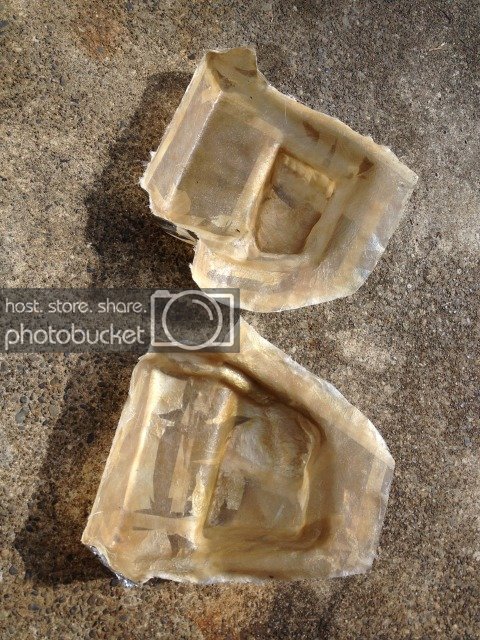
Here is one side with two layers of glass.

IMG_0275.jpg


I haven't made a fiberglass box in about 10 years, I forgot what a PITA it can be. Anyway, notice how I went into that passenger side cavity as far as possible. There will be just enough room for the sub magnet to slide in there, tucking them way in. You can also see the "channel" I have made for the wiring, I did this on both sides.

 
After the first two layers of mat fiberglass had hardened, I popped them out of the car. Here they are after a very rough trim around the edges:

IMG_0278.jpg


I then put on two more layers of fiberglass, using cloth this time. I think 4 layers will be fine for the rear, I hear some people like to do 7 -10 layers but that seems like overkill in this situation. Here they are after the last two layers drying.

IMG_0280.jpg


I had a little time left, so I cut out a couple speaker rings. Don't worry, I don't plan on making the typical "volcano" boxes.

IMG_0279.jpg


---------- Post added at 07:55 PM ---------- Previous post was at 07:55 PM ----------


Here are a couple shots of me measuring for the front panels. You can see how much space I don't have to work with. Getting the hole on the passenger side in just the right place was tricky, I only had about 1/4" room to play with up and down or side to side between the woofer motor and the box.

IMG_0287.jpg


IMG_0286.jpg


Here is one of the front panels after trimming, routing, sanding etc. The ring I showed a picture of before is being glued on from the back, which will let me flush mount the woofer.

IMG_0289.jpg


---------- Post added at 07:56 PM ---------- Previous post was at 07:55 PM ----------


Here are the baffles being mounted. I drilled straight through them and put in some wooden dowels. That let me get the baffles exactly where I wanted them, so I could hot glue them on place. I didn't want to mess with cutting the dowels to length and messing that up. This way, I can just trim them flush with the face, drop some fiberglass resin in to seal them up, and you will never know they were there.

IMG_0290.jpg


IMG_0291.jpg


IMG_0292.jpg


Here is some tee-shirt material stretched and glued over the gap:

IMG_0300.jpg


Here they are after a few layers of fiberglass:

IMG_0301.jpg


IMG_0302.jpg


Now I need to trim around the edges, smooth everything out, slap a little bondo on there and figure out what I am going to cover them with. I have a funky idea that might be cool if I can find it.

 
Here are the boxes after trimming, a coat of bondo, and some sanding to get them smooth.

IMG_0339.jpg


IMG_0338.jpg


I have been searching for something to cover these in. I wanted to do them in union jack fabric, but I just couldn't find any. Today at the fabric store my wife pointed this checkerboard pattern out, which fits in with Mini culture just perfect.

IMG_0340.jpg


IMG_0341.jpg


IMG_0342.jpg


I just had to see what the subs would look like in their new homes:

IMG_0345.jpg


IMG_0344.jpg


IMG_0343.jpg


Here is a sneak peek at my amp, its a monster:

IMG_0346.jpg


IMG_0347.jpg


Here are the power and ground wires for the amp. I used an exisiting hole over the wheel well. I just sanded the paint down and ran a bolt with a lock nut. Remember those cavitites in the speaker boxes I made with the paper? Now you get an idea of how the wires will run behind them.

IMG_0348.jpg


IMG_0349.jpg


---------- Post added at 07:58 PM ---------- Previous post was at 07:58 PM ----------


Here is the new trunk floor, also in checkerboard. The amp will be mounted to this.

IMG_0350.jpg


I came up with these little stands for the false floor. They are just some 1" wooden dowel, wrapped in electrical tape with rubber chair feet on the end.

IMG_0351.jpg


When screwed on from the bottom of the floor, they almost look like chess pieces.

IMG_0352.jpg


I then made the false floor out of 3/4" MDF covered in carpet. It fits really well, and helps push the speaker boxes into their cavities. When installed, everything is very solid, I can easily sit on the floor. I think I will need to get some grills for the speakers. The floor makes the boxes look smaller, and is about 1/2" above the amp. Before you ask if I'm worried about it overheating, no I'm not. I've had this amp for a long time, and I'm not pushing it nearly as hard in this system as I have in the past.

IMG_0353.jpg


IMG_0354.jpg


IMG_0355.jpg


IMG_0356.jpg


I decided to make a pass through adapter for the x9331 plug also. I ordered the plug ends form across the pond, everything else came from Radio Shack or my spare wire box.

IMG_0668.jpg


See the "disk drive power extension" cables? Those have a male and female 4 pin molex plug, and plenty of wiring, assembled, for 3 bucks. I will be using them for my speakers.

Here is me crimping and soldering all the wires for the connector.

IMG_0669.jpg


IMG_0670.jpg


I ended up with this. I made sure to use big gauge wire where needed. The two pigtails are where I will tap into the front speaker level outs, then send my amplified levels back in.

IMG_0671.jpg


These will be crimped on to the speaker wires going back to and comming from the amp:

IMG_0672.jpg


Here is a shot of the amp all wired up, and the line out converter I used from autosound2000 (Dave Navone).

IMG_0673.jpg


Now for the fun part. Which atually did turn out to be fun, and relatively easy. The front stage.

These are the components I chose, CDT CL-61A with upgraded 1" silk dome tweets. They get decent reviews online, and were only 130 bucks shipped.

IMG_0674.jpg


First the tweeter comes out.

IMG_0676.jpg


Then remove the cat.

IMG_0677.jpg


I cut out my tweeter mounting plates as soon as I pulled the first tweeter because I know they would take some time for the paint to dry.

IMG_0678.jpg


Here is the big door panel removed. I did the passenger side first after reading horror stories about the mirror controls on the drivers side.

IMG_0679.jpg


I pulled the woofers out, and put in some dynamat.

IMG_0680.jpg


I stripped some of the factory wiring covering away to give me some room to work. This is the one place where I would be cutting factory wires, the speaker plug. I wanted to give myself enough wire on each end of the cut, so that if I ever wanted to put the stock speakers back in I could.

IMG_0681.jpg


TomFarin chose to put his crossovers in teh door itself. However, I wanted to keep mine out of the elements, and also retain acces to them so I could play with the tweeter level switched during tuning. I elected for the arm rest. Here I'm running the wires.

IMG_0682.jpg


Here is the passenger door with the woofer, tweet, and crossover all installed. Not too shabby right?

IMG_0683.jpg


IMG_0684.jpg


Drivers door looks the same, except for that pesky switch. Turned out to be a cake walk. When you take the cover off, the switch will probably pop in half like Tom's did, and you run the risk of those little pins falling out. Once the cover is off, un plug the wires from the other half of the switch.

IMG_0685.jpg


Snap the switch back together and set it aside. Now, when you put the cover back on, all you have to do is plug the switch back in and pop it in the hole. Took 30 seconds.

IMG_0686.jpg


IMG_0687.jpg


My last shot here is of my adapter in place.

IMG_0688.jpg


I wired it all up, stuffed the wiring up under the dash, crossed my fingers and turned it on. Everything works!

The LOC has a built in amp turn on, and its fast enough that I still get all the door chimes and stuff.

I have not adjusted the gains or crossovers on the amp yet (they are the same as they were my old system), but it already sounds 200x better than stock. I'm hoping I can get the subs a little louder, but what can you expect from 2 8's sealed after having a monster 15" ported.

I can't believe I waited this long to upgrade the stereo, what a difference it makes in driving enjoyment.

Thoughts?

 
Activity
No one is currently typing a reply...
Old Thread: Please note, there have been no replies in this thread for over 3 years!
Content in this thread may no longer be relevant.
Perhaps it would be better to start a new thread instead.

Similar threads

Check out Sonic Electronix as well. They have some great deals usually and excellent Customer Service also. I like to buy my HUs /Head Units from...
6
348
A problem may be caused by your phone's or vehicle infotainment systems' software. Be sure you have the latest software version for your phone and...
1
439
so, here is what im working with and end goal and working with 100% factory Car 2009 nissan altima 4 door base radio Music style Country rap...
0
621

About this thread

Beau M

10+ year member
Senior VIP Member
Thread starter
Beau M
Joined
Location
Burien, WA
Start date
Participants
Who Replied
Replies
12
Views
12,795
Last reply date
Last reply from
macsdad
1000007975.jpg

Mr FaceCaser

    May 16, 2024
  • 0
  • 0
1000007974.jpg

Mr FaceCaser

    May 16, 2024
  • 0
  • 0

New threads

Top