Featured Pioneer Head Unit and Amp/Sub Configuration

Justin Hughes

CarAudio.com Newbie
Hello all ... can someone please describe to me the best way to 'wire up' this combination.
I've tried multiple times witout sucess and have just been stabbing in the dark.

Idealy, obviously, I would like to be able to control the fader for Front and Rear balance,
and use the head units Subwoofer volume control to seperatly balance that as well.

What would YOU plug WHERE ???

Cheers :0)
 

Attachments

  • IMG_8181.JPEG
    IMG_8181.JPEG
    147 KB · Views: 6
  • IMG_8183.JPEG
    IMG_8183.JPEG
    120.5 KB · Views: 5
  • IMG_8184.JPEG
    IMG_8184.JPEG
    159.2 KB · Views: 4
  • IMG_8186.JPEG
    IMG_8186.JPEG
    223.7 KB · Views: 6
  • IMG_8187.JPEG
    IMG_8187.JPEG
    211 KB · Views: 4
Hello all ... can someone please describe to me the best way to 'wire up' this combination.
I've tried multiple times witout sucess and have just been stabbing in the dark.

Idealy, obviously, I would like to be able to control the fader for Front and Rear balance,
and use the head units Subwoofer volume control to seperatly balance that as well.

What would YOU plug WHERE ???

Cheers :0)
To wire your Pioneer amplifier and head unit properly while allowing for control of front/rear balance and subwoofer volume, follow these steps:
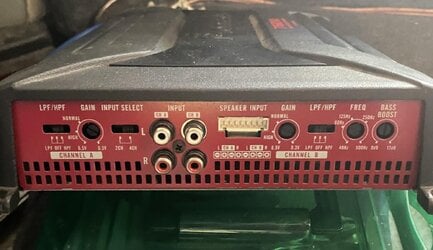
### Wiring Diagram:

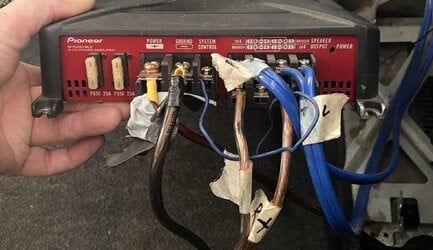
**1. Power Connections:**
- Connect the positive battery cable to the "+" terminal of the amplifier.
- Connect the ground cable to the "-" terminal of the amplifier.
- Ensure you use appropriate gauge wiring (usually 4 or 8 gauge).
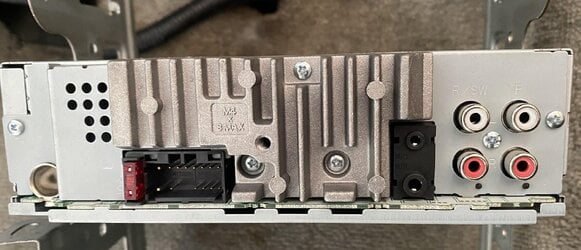
**2. RCA Connections:**
- Connect the RCA output from the head unit to the amplifier's "Speaker Input."
- Use the left and right outputs for channels A and B, respectively.
- Ensure that you connect any subwoofer RCA output from the head unit to the appropriate RCA input on the amplifier if it has dedicated sub channels.

**3. Speaker Connections:**
- Connect the front speakers to the amplifier’s output for Channel A (if it's a 4-channel setup).
- Connect the rear speakers to the output for Channel B.
- If using a subwoofer, connect it to the "Speaker Output" terminals, which may be marked for bridging if the subwoofer requires that.

**4. Gain Settings:**
- Adjust the gain settings on the amplifier for the best sound quality, starting with lower settings and adjusting as needed.

**5. Fader and Balance Control:**
- Use the head unit’s built-in fader to control front/rear speaker balance.
- The subwoofer volume can be controlled using the dedicated control on your head unit, provided that your head unit supports subwoofer level control.

### Setting Up Fader and Subwoofer Control:
- Ensure that your head unit allows for separate subwoofer control. Check the settings in your head unit to enable this feature if needed.
- You can usually adjust the fader settings directly on the head unit to set the balance as desired.

### Final Checks:
- Double-check all connections for security.
- Test the system at low volume first to ensure everything works before increasing volume.

### Troubleshooting:
- If you have issues, check RCA connections, speaker wire polarity, and ground connections for continuity.

By following these steps, your system should be set up correctly, allowing you to balance your speakers and control the subwoofer effectively.
 
Hello all ... can someone please describe to me the best way to 'wire up' this combination.
I've tried multiple times witout sucess and have just been stabbing in the dark.

Idealy, obviously, I would like to be able to control the fader for Front and Rear balance,
and use the head units Subwoofer volume control to seperatly balance that as well.

What would YOU plug WHERE ???

Cheers :0)
To wire up your Pioneer amplifier (GM-A6604) with the head unit (DEH-S5250BT) and achieve independent control over the front/rear fader and subwoofer volume, follow these steps:

### 1. Connections Overview:
- **Front Speakers**: Connect to CH A output on the amplifier.
- **Rear Speakers**: Connect to CH B output on the amplifier.
- **Subwoofer**: Connect to the subwoofer output on the head unit to the amplifier.

### 2. Wiring Steps:

#### From Head Unit to Amplifier:
1. **Front Speaker Outputs**:
- **Left Front (+ and -)**: Connect the left front speaker wires from the head unit to CH A inputs on the amplifier.
- **Right Front (+ and -)**: Connect the right front speaker wires from the head unit to CH A inputs on the amplifier.

2. **Rear Speaker Outputs**:
- **Left Rear (+ and -)**: Connect the left rear speaker wires from the head unit to CH B inputs on the amplifier.
- **Right Rear (+ and -)**: Connect the right rear speaker wires from the head unit to CH B inputs on the amplifier.

3. **Subwoofer Output**:
- Connect the subwoofer output (usually marked as "R/SW" or similar) from the head unit to the "Speaker Input" or a dedicated subwoofer input on the amplifier.

#### From Amplifier to Speakers:
4. **Connect Speakers**:
- Connect the front speakers to CH A output on the amplifier.
- Connect the rear speakers to CH B output on the amplifier.
- If your amplifier supports bridging and you want to use it for a subwoofer, you may bridge the channels as appropriate based on your setup, but this typically requires a different configuration.

### 3. Additional Settings on Amplifier:
- **Gain Control**: Adjust the gain settings on the amplifier for each channel (CH A and CH B) to balance the speaker levels with respect to your preferences.
- **LPF (Low Pass Filter)**: Set the LPF for the subwoofer if you're using it with the amplifier.
- **Input Select**: Ensure you have the correct input selected based on your configuration.

### 4. Head Unit Settings:
- Check settings on the head unit to make sure you can control the front/rear fader and the subwoofer output level.

### Conclusion:
This setup should give you independent control over the front/rear speakers and the subwoofer. Make sure to test each channel after installation to ensure everything is wired correctly and adjust as necessary for optimal sound quality. If you're still facing issues, double-check all connections and settings.
 
Idealy, obviously, I would like to be able to control the fader for Front and Rear balance,
and use the head units Subwoofer volume control to seperatly balance that as well.
Not possible. Radio only has 4 RCA outputs. The rear channels can be as sub out but not both simultaneously. So you must choose Fade control on your full ranges OR subwoofer output control. To get both you must add an amplifier that has a bass knob.
 
Probably more work. If there is a parking brake light green wire to the Pioneer single din wiring harness, you will need to connect that to the parking brake switch. Under the parking brake area, connected to a green and red wire also. This will give more power to the single din via the parking brake switch. ABS, it automatically switches to brakes, even with out pulling the brakes. Activates it through the radio.

Secondly the RCAs, wiring harness, amplifiers, wiring harness is color to color. RCAs, is RCA output radio to Amplifier input. Color to color. Ground and power wire from the battery are done just as I see it. An equalizer needs to be set if you want fader controls for your speakers, left or right. Red, yellow, black, White, Blue, Blue-white, etc. power wires for the equilizer. What ever they give you, follow them. Looks like a great deal you've got. Good luck to setting it up.​
 
Activity
No one is currently typing a reply...

About this thread

Justin Hughes

CarAudio.com Newbie
Thread starter
Justin Hughes
Joined
Location
Australia
Start date
Participants
Who Replied
Replies
4
Views
406
Last reply date
Last reply from
Mitchell Fosgate III
20250615_144206.mp4

Mr FaceCaser

    Jun 15, 2025
  • 0
  • 0
20250614_210411.mp4

Mr FaceCaser

    Jun 14, 2025
  • 0
  • 0

New threads

Top