Not clowning around BMW Z3M Focal, Mosconi, iPad MIni

  • 2
    Participant count
  • Participant list

Octave
10+ year member

Member
This is the second car that I have built for Vince and by far the most elaborate. Vince isn't just an ordinary client. He's a VIP, a friend and someone who's OCD makes me look like I'm a normal person. So to say this build needs to be on point is an understatement. Plus this is his baby.....even more pressure. So without further ado here's Vince's Z3M.

That's all genuine Hamann gear you see there folks. Being a concourse level detailer you can see that Vine takes immaculate care of this M.

*

The system break down is:

Front stage - Focal K2 130KR

Rear fill - Focal K2 130KR

Subwoofer - Polyglass 33 V2

Gladen One 120.4 - front and rear

Gladen One 120.4 - subwoofer

Mosconi 4to6 with optical in

???? - and a little something special for later

One key point for the install like his M3 convertible was that throughout the install no OEM metal was to be cut and no screw holes were to be drilled into the body. I daunting task but I like a challenge.

First step was to get the car broken down and all the system wiring ran. To do this the seats needed to be removed to make it easier to work within the tiny cabin.

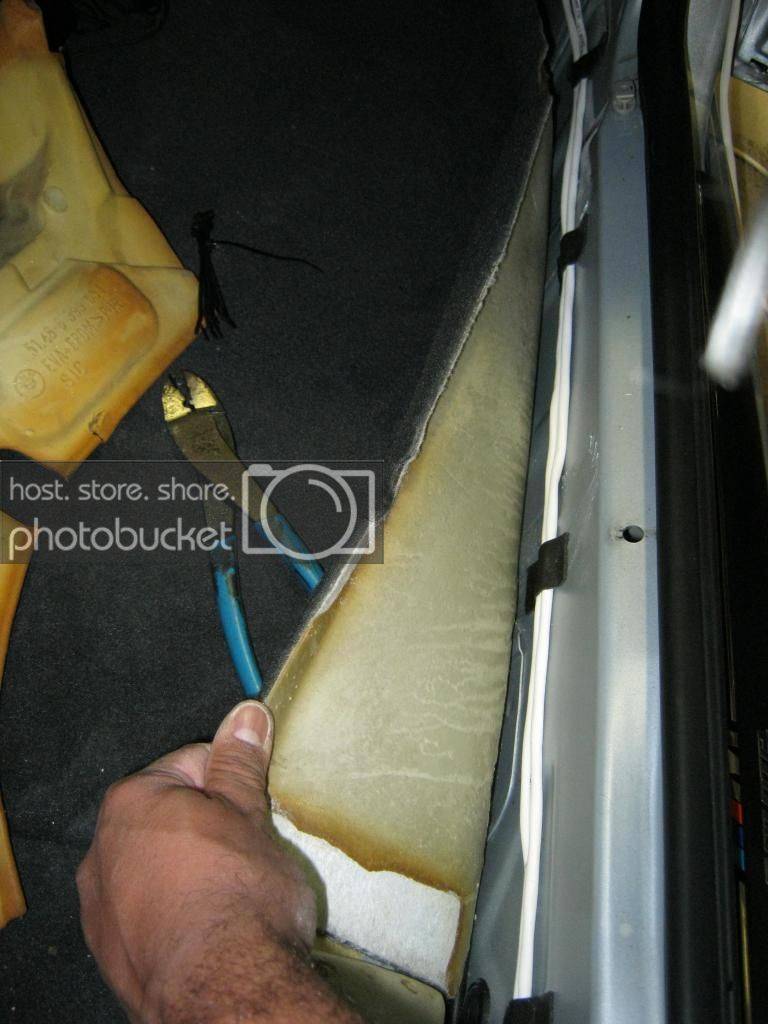
Straight Wire Wave Guide speaker wire was ran forward. The wire was tied to OEM wiring and held down in place with Hush Mat Quite Tape (man I love that stuff).


A rear support had to be removed to run the wire properly. I go out of my way to make sure all wiring is ran along OEM lines. This makes the life of any BMW service tech easier.


With all the wiring ran to a central location a place needed to be made to house the crossover networks. Since the OEM amplifier and subwoofer was not going to be reused their mounting locations were used to house the crossovers. The OEM mounting bolts were used to secure the mounting board of the crossovers.


With the crossovers mounted a mount for the system's capacitor a Tsunami 5 farad with volt meter needed to be fabbed up. As with the crossover mounting board OEM mounting locations were utilized to mount the capacitor. A 1/4" piece of ABS plastic is used as the mounting base for the capacitor. The capacitor is within 18" of the battery and the main fuse is mounted right next to the capacitor.


After that I turned my attention to mounting the speakers. The Focal K2 tweeters dropped right into the OEM locations with even gasp the use of the mounting hardware from the tweeter. I haven't used mounting hardware for a tweeter in YEARS. So this was a welcomed comfort.


It was impossible to remove the molex plug given the tight door jam area so the OEM tweeter wire was cut and solder onto the tweeter lead.


A layer of Focal BAM mat was applied to the back of OEM speaker area. BlackHole Enclosure Stuff was also stuffed into the enclosure to help cancel the speaker's rear wave.


The speaker terminals were color heat shrunk.


The Focal K2 130KR mid was mounted over some Focal BAM mat to deaden and decouple the speaker from the mounting surface and to provide a seal.


The passenger side received the same treatment as the driver.


With the fronts done the rears were up next. Continuing the good fortune the Focal K2 tweeters dropped into the OEM mounts.* The only mod that needed to be done was the mounting hole needed to be widen a touch to fit the tweeter mounting cup. The OEM grille holds the tweeter in place.


Quick disconnects were color heat shrunk and some Hush Mat Quite tape was used on the wire bundle to ensure that the wire wouldn't rattle against the roof metal.


As with the fronts the rear mid enclosures received a layer of Focal BAM Mat and some BlackHole enclosure fill.

*

The terminals were color heat shrunk and a foam gasket was applied to the Focal K2 130 KR mid.


The passenger side was done in the same way as the driver.


While the Z3M was in the shop the headliner needed to be attended to because it was starting to hang down. So it got the genuine Alcantara treatment. An Octave specialty.


Moving this build right along one of the special features of this build is an iPad Mini in the dash. A lot had to be done to accommodate the iPad which barely fit. The OEM accessory gauges had to be deleted and then the a/c control needed to be relocated to their position. Longer clutch style cables needed to be order in order for the control to reach its new home. I really don't take build pics but take my word for it this was not an easy task to pull off.


The subwoofer speaker lead is the Straight Wire 4 core TPR cable.*The leads were twisted together and color heat shrunk.


As with all my installs a lot of thought and care went into the wiring layout. Straight Wire Symphony RCAs were made to custom length in house. A Tsunami all-in one fused distribution block was used to distribute power along Tsunami power wire. All wires were tied down every 6". Another key feature of the subwoofer enclosure is that it is pressure fit to the trunk area going along with the not drilling any holes.


If you thought the iPad in dash was that little extra I was saving for later you would be wrong. What we have here is an Apple Airport Express that has been modded to run on 12v. It communicates with the iPad via wifi and has an optical cable running to the Mosconi 4to6 DSP. This is the first set up of its kind because most tried to run the Airport via a DC-AC converter with less than satisfactory results. This Airport wires directly to the 12v supply of the car and runs flawlessly.


The USB cable for the Mosconi is tucked up inside one of the rear trim panels for easy access when tuning needs to be done.


With the carpeted panel in place Vince has complete use of his trunk. A feature he didn't have with his last system. A perforated aluminum grille allows things to place on the floor without fear of damaging the subwoofer.


With the panel removed the beauty underneath is revealed. The trim was designed to use all the design elements of the interior to give it a fully integrated look. The center panel is painted the same as the other interior pieces and aluminum accents were milled in house to replicate the rings around the a/c controls and the shifter ring down to the Allen head screws. The field under the center piece is trimmed out in black Alcantara. And the outside trim is wrapped in factory grain matched vinyl.


The center piece actually floats above the Alcantara field.


From this view you can see were the shape of the center piece was derived. The intended look was to follow the dash lines so all the lines allow your eye to follow from one to the other.


With the system lighting on you can see why the center piece was floating because it is now floating on light. The edge around the subwoofer and Mosconi lights up too. I do apologize for the crappy pic....time for a new camera I think.


Now with the system description done time to talk about how it sounds. Given Vince is interested in doing some sound comps I did 2 different tunes so I'll give you my impressions on both the competition tune and daily driver tune.

The competition tune is up first. For this tune I turned off the rears and concentrated on the front stage. At first dealing with the small cabin was tuff tuff tuff. I couldn't get the car to image for the life of me. I spent one day playing with it....I finally threw my hands up and went home. Came in the next day just looking to play with it because I didn't have much time to play with it but the time I had was just right. I don't know what I adjusted or what I shifted but I started to make great head way on tuning it out. In the end I ended up with a car that imaged really really good. The stage is about 1" off the pillars with the height at the rear view mirror but it has great depth reaching out to over the hood. Imaging wise this little car will shock you given it OEM speaker locations. Thank you BMW for putting the mids in the kicks. The center image is tight to the middle and stays there. Tonality is pleasant without the famous Focal bright tweeter (I know how to tune). The only thing I wish was that there was a bit more punch in the midbass but the mids are 5.25" so asking a lot of them and bringing the crossover point on the subwoofer up to compensate draws ear to the rear but I found a happy medium. The subwoofer fills the cabin with great well defined low lows. With some fine tuning after break in this car has a lot of competition potential.

Now to the daily driver tune.....the rears get turned on. I was expecting to be walking into hell because I have sworn off doing rear fill of any kind but yet again this car surprised me. I started off with the competition tune as a base and started to tune in the rears. Thankfully it wasn't the headache I thought it was going to be. In the end what I got was a tune like the competition tune but with more output and a little less refinement. The imaging was still there but the center image would bleed a bit side to side and given the fill your gets pulled back ever so slightly at certain frequencies. Overall this tune is much more fun tune to listen to because it just gets after it and that's more what Vince looks for in a system. I think after break in I may have to look at the daily driver tune as a basis for a competition tune.

In every install I look to deliver great attention to detail and with Vince being a HIGHLY detailed person I think I delivered a system that hit all the points set for for the build. So much so we have the next build already scheduled to be started after the first of the year. A little teaser........it's getting a full Sinfoni system.

 
Activity
No one is currently typing a reply...
Old Thread: Please note, there have been no replies in this thread for over 3 years!
Content in this thread may no longer be relevant.
Perhaps it would be better to start a new thread instead.

Similar threads

Check out Sonic Electronix as well. They have some great deals usually and excellent Customer Service also. I like to buy my HUs /Head Units from...
6
350
A set of rounds in all of the doors, not the front or the front and the rears, with the dash speakers, no mention of the rear doors, didn't...
7
616
I knocked out and plugged the internal port which gets me to 5.7', put 6 lbs of poly, 10x34" port should be tuned around 30 dont remember. Just...
29
3K

About this thread

Octave

10+ year member
Member
Thread starter
Octave
Joined
Location
Orlando, FL
Start date
Participants
Who Replied
Replies
7
Views
2,930
Last reply date
Last reply from
2Dcore
1000007975.jpg

Mr FaceCaser

    May 16, 2024
  • 0
  • 0
1000007974.jpg

Mr FaceCaser

    May 16, 2024
  • 0
  • 0

New threads

Top