Well I've got an '01 Blazer, and I love the thing, but it could really use some low-end to round out the sound, so that's where this project starts.
Okay, the background:
The Blazer's been going between owners within my family since it was new, and has always been well taken care of. It's the 4dr LT, that came with the 6-channel bose system. A few years back my Dad had it (just before he passed) and he stuck a Pioneer MVH-X360BT head unit in it. That really transformed the sound, but as it is, the front door speakers (listed as fullrange subs?) are working a bit too hard for my liking, and I'd like to lighten the load on them while also clearing up the sound.
Obstacle #1 : I don't have a lot to spend on this project, and as it is, I'm really having to pinch pennies and save to be able to do any of this at all. So, I want big sound, for cheap, might as well start looking for as inexpensive component sub as I can find. After a couple hours scouring ebay, crutchfield, and amazon, I had come down to two options. Now a little disclaimer first: as I said, I'm on a pretty tight budget, so I decided to go with 8" subs. Since they don't have the raw surface area to push a lot of air, I decided to get a lot of them. This is because the subs I found were both under $20 a piece. The way I look at it is this: they're not going to be very high-quality, however if one blows or otherwise fails, it's quick and cheap enough to replace, and there are enough of them that I can still get sizable sound from them without pushing them too hard. Now that that's out of the way, the first of the two options was from Pyle, and I'm actually considering them as an upgrade path. These are the Pyle PLPW8Ds, a DVC 4Ω driver, rated at 400W RMS and 800W peak. The ones I ended up going with though for the initial build are the Soundstorm SS8 component subs, which aren't DVC like the Pyles, and are only rated for half the power, but the $2.90 difference is what made the decision for me. Because I'm not getting one of these, or two, or even four. I'm getting 8, having two banks of four.
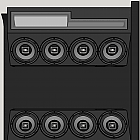
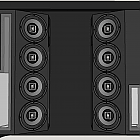
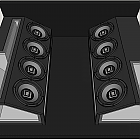
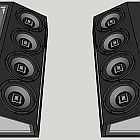
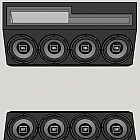
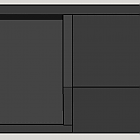
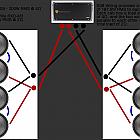
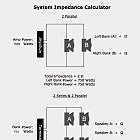
Okay so I found the subs, now how to drive them.... Again I did some research, and found an amp that will work very well for me, the way I'm wiring these. The amp I'll be getting is a Rockville RXD-M3. There are two graphics at the bottom of this post showing both physical layout and wiring, and a more precise diagram showing the mathematics behind it. They should be fairly self-explanatory, and show why I chose this amp: It's powerful enough to drive these to almost their full rating, but not quite, which means I don't have to worry about overdriving them or distortion (though if one did fail, as I mentioned, it'd be cheap enough that I could easily replace it). The other reason I chose this amp is that it's priced at a place where if I were to upgrade to the Pyle subs, I could get a second amp and drive each of the banks independently.
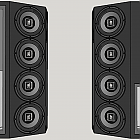
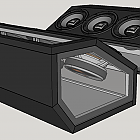
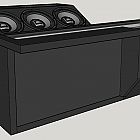
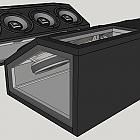
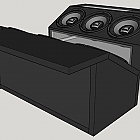
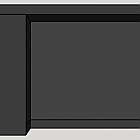
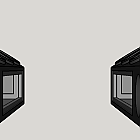
Alright, the subs have been chosen, as has the amp. What about where to put it all? Well I've decided to mount the amp under the driver's seat. Honestly though, that could easily change between now and when I go to install it. As for where to mount the subs, well I'm not going to spend more on an enclosure than I did the drivers, so I'll be building them myself. Not only will I be able to achieve the look I want, and the functionality, but it'll also allow me to build it to fit in my blazer. They'll be on either side of the far back, and they'll be seven-sided boxes, or pentagonal prisms. That's the front and back (against the tailgate and back seats respectively), the sides (perpendicular to the bottom), The top, the bottom, and the speaker face. The speaker face will be 30° from parallel to the top, so that the subs will be facing up and center. I'll be making the boxes out of 3/4" MDF, and I'm seeing about also incorporating some acrylic panels and some RGB lighting, but that's still not finalized. This is about where I'm at thus far with the planning for this project, so I'll leave it here. Below are the links for the products I've mentioned, as well as the two images I mentioned.
SSL SS8 drivers:
Amazon: https://www.amazon.com/SOUND-SS8-Single-400-watt-Subwoofer/dp/B00CMC6O68
Walmart: https://www.walmart.com/ip/SoundStorm-SS8-8in-Woofer-400W-Max/28087334
Pyle Drivers:
Amazon: https://www.amazon.com/Pyle-PLPW8D-8-Inch-Watt-Subwoofer/dp/B007JV7F4W/ref=pd_lpo_107_bs_t_2?_encoding=UTF8&psc=1&refRID=510VS3GPGYHS38DWE0RH
Walmart: https://www.walmart.com/ip/Pyle-PLPW8D-Dual-Voice-Coil-Subwoofer/26680521
Rockville Amp:
Amazon: https://www.amazon.com/Rockville-RXD-M3-2000w-Amplifier-Stereo/dp/B019Z3RIYI/ref=sr_1_1?s=car&ie=UTF8&qid=1489504021&sr=1-1&keywords=Rockville+RXD-M3
Walmart: https://www.walmart.com/ip/Rockville-RXD-M3-4000-Watt-2000w-RMS-Mono-Class-D-1-Ohm-Amplifier-Car-Stereo-Amp/662451227
Okay, the background:
The Blazer's been going between owners within my family since it was new, and has always been well taken care of. It's the 4dr LT, that came with the 6-channel bose system. A few years back my Dad had it (just before he passed) and he stuck a Pioneer MVH-X360BT head unit in it. That really transformed the sound, but as it is, the front door speakers (listed as fullrange subs?) are working a bit too hard for my liking, and I'd like to lighten the load on them while also clearing up the sound.
Obstacle #1 : I don't have a lot to spend on this project, and as it is, I'm really having to pinch pennies and save to be able to do any of this at all. So, I want big sound, for cheap, might as well start looking for as inexpensive component sub as I can find. After a couple hours scouring ebay, crutchfield, and amazon, I had come down to two options. Now a little disclaimer first: as I said, I'm on a pretty tight budget, so I decided to go with 8" subs. Since they don't have the raw surface area to push a lot of air, I decided to get a lot of them. This is because the subs I found were both under $20 a piece. The way I look at it is this: they're not going to be very high-quality, however if one blows or otherwise fails, it's quick and cheap enough to replace, and there are enough of them that I can still get sizable sound from them without pushing them too hard. Now that that's out of the way, the first of the two options was from Pyle, and I'm actually considering them as an upgrade path. These are the Pyle PLPW8Ds, a DVC 4Ω driver, rated at 400W RMS and 800W peak. The ones I ended up going with though for the initial build are the Soundstorm SS8 component subs, which aren't DVC like the Pyles, and are only rated for half the power, but the $2.90 difference is what made the decision for me. Because I'm not getting one of these, or two, or even four. I'm getting 8, having two banks of four.
Okay so I found the subs, now how to drive them.... Again I did some research, and found an amp that will work very well for me, the way I'm wiring these. The amp I'll be getting is a Rockville RXD-M3. There are two graphics at the bottom of this post showing both physical layout and wiring, and a more precise diagram showing the mathematics behind it. They should be fairly self-explanatory, and show why I chose this amp: It's powerful enough to drive these to almost their full rating, but not quite, which means I don't have to worry about overdriving them or distortion (though if one did fail, as I mentioned, it'd be cheap enough that I could easily replace it). The other reason I chose this amp is that it's priced at a place where if I were to upgrade to the Pyle subs, I could get a second amp and drive each of the banks independently.
Alright, the subs have been chosen, as has the amp. What about where to put it all? Well I've decided to mount the amp under the driver's seat. Honestly though, that could easily change between now and when I go to install it. As for where to mount the subs, well I'm not going to spend more on an enclosure than I did the drivers, so I'll be building them myself. Not only will I be able to achieve the look I want, and the functionality, but it'll also allow me to build it to fit in my blazer. They'll be on either side of the far back, and they'll be seven-sided boxes, or pentagonal prisms. That's the front and back (against the tailgate and back seats respectively), the sides (perpendicular to the bottom), The top, the bottom, and the speaker face. The speaker face will be 30° from parallel to the top, so that the subs will be facing up and center. I'll be making the boxes out of 3/4" MDF, and I'm seeing about also incorporating some acrylic panels and some RGB lighting, but that's still not finalized. This is about where I'm at thus far with the planning for this project, so I'll leave it here. Below are the links for the products I've mentioned, as well as the two images I mentioned.
SSL SS8 drivers:
Amazon: https://www.amazon.com/SOUND-SS8-Single-400-watt-Subwoofer/dp/B00CMC6O68
Walmart: https://www.walmart.com/ip/SoundStorm-SS8-8in-Woofer-400W-Max/28087334
Pyle Drivers:
Amazon: https://www.amazon.com/Pyle-PLPW8D-8-Inch-Watt-Subwoofer/dp/B007JV7F4W/ref=pd_lpo_107_bs_t_2?_encoding=UTF8&psc=1&refRID=510VS3GPGYHS38DWE0RH
Walmart: https://www.walmart.com/ip/Pyle-PLPW8D-Dual-Voice-Coil-Subwoofer/26680521
Rockville Amp:
Amazon: https://www.amazon.com/Rockville-RXD-M3-2000w-Amplifier-Stereo/dp/B019Z3RIYI/ref=sr_1_1?s=car&ie=UTF8&qid=1489504021&sr=1-1&keywords=Rockville+RXD-M3
Walmart: https://www.walmart.com/ip/Rockville-RXD-M3-4000-Watt-2000w-RMS-Mono-Class-D-1-Ohm-Amplifier-Car-Stereo-Amp/662451227