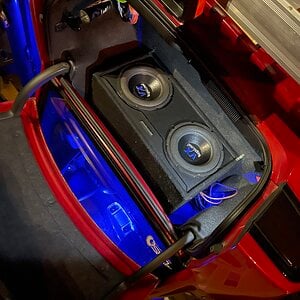
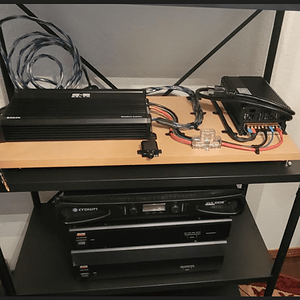
1994 Geo Tracker Build, a rather EXTREME one at that..

Hobbes Caltous
10+ year member

Junior Member
It's been awhile since anyone's tried this(or so i've seen), and i just happened to have finished mine. behold, my project, or, as i've called it, The Last Laugh!

I planned to model this system after DC Comics' The Joker, one of my all time favorite supervillians. The Tracker is green with those stupid purple decals, so it made sense. you will see.

I started planning this thing in June 2010, which is when i first kind of figured out i was going to be buying it. It was my girlfriend's family's sort of beater, whenever one of their cars got fucked, they'd start driving this thing. So it was in a bit of disrepair.

Anyway we'll get to that. here's where i started:

Firstly, I already had the subs i'd use, from an old system i had ripped out of my old car, a 1990 Toyota Celica AWD. i dig old cars. anyway, the POS Pyle amp fired, so i had the subs laying around for literally years while i figured out what to do with them.(i still have the enclosure for sale if anyone's interested).

ANYWAY, here they are, twin 12 inch MTX Thunder subwoofers, each rated at 1000w peak.

2010-0831-1-stereoproject5.jpg


I loved these things, and since i knew they still worked, it saved me a bit of cash(though i had thoughts of buying rockfos punch/power 12s or MTX Jackhammers if needed).

Secondly, i needed new speakers, the crappy little pioneer 4 inchers in this thing would NOT cut it. So i got to work. Days later, along came these two little packages..

First came the brand new RockFos Punch 6x8 speakers, each rated @ 120w peak.

2010-0831-1-stereoproject3.jpg


then came the front speakers which i would mount on the front doors.

twin RockFos 6.5 inch speakers, at 100w peak:

2010-0831-1-stereoproject2.jpg


Now that the speaker hunting was done, i needed a new amp. I'm not much for the new, sleek designs. I had an old RF amp when i did my first build in my Civic, so i knew i'd stick with what works. The old RF amps are MUCH more powerful than what they're rated at, so i knew exactly what i wanted, and it came days later:

a shiny Rockford Fosgate Punch 500a2.

2010-0831-1-stereoproject4.jpg


a bit on the shy side as far as power goes, but then, i'm not driving a monte carlo or something with a huge trunk, so all that power won't be needed! This thing, let loose, will be MORE than enough for a Geo Tracker, which, at the floor, only has 12x41.18 inches of space to play with!

then came the deck. Since i didn't have a whole lot of space to play with- or any, for that matter, i knew i needed a deck that came powerful straight out of the box, which a noticable difference to, like, a pioneer deck.

Most decks you find in stores, you won't find one with more than MAYBE 50 or 54 watts per channel. behold, a no- name deck that is performing the **** out of the power players!

IMG_20100901_143357.jpg


Little known, but powerful as hell. 80 watts per channel, which at RMS upped my stuff to 40w per. touchscreen, bluetooth, ipod dock, SD card reader, USB, 1/8 inch jack, this is their top of the line single DIN receiver.

f-in ******.

IMG_20100901_143514.jpg


i masked the amp, because i knew i'd be painting it.

2010-0831-1-stereoproject7.jpg


"*GASP!* WHAT," you ask? yes. Painting an amp. i checked. the old RF amps basically operated as one big heat sink, so painting it won't hurt at all.

First things first: wiring had to get done before i put anything in, or at least the primary wiring, so i got to work.

power wire...

TheLastLaughAugtoNov20101.jpg


ground wire...

TheLastLaughAugtoNov20103.jpg


i've always been bad with doing my own grounding, so i played this one safe, and consulted a pro on how to do it- thankfully i got it right on the first try; self tapping screw into the body, under the back seat, which is small AS HELL.

 
Last edited by a moderator:
It's been awhile since anyone's tried this(or so i've seen), and i just happened to have finished mine. behold, my project, or, as i've called it, The Last Laugh!I planned to model this system after DC Comics' The Joker, one of my all time favorite supervillians. The Tracker is green with those stupid purple decals, so it made sense. you will see.

I started planning this thing in June 2010, which is when i first kind of figured out i was going to be buying it. It was my girlfriend's family's sort of beater, whenever one of their cars got fucked, they'd start driving this thing. So it was in a bit of disrepair.

Anyway we'll get to that. here's where i started:

Firstly, I already had the subs i'd use, from an old system i had ripped out of my old car, a 1990 Toyota Celica AWD. i dig old cars. anyway, the POS Pyle amp fired, so i had the subs laying around for literally years while i figured out what to do with them.(i still have the enclosure for sale if anyone's interested).

ANYWAY, here they are, twin 12 inch MTX Thunder subwoofers, each rated at 1000w peak.

2010-0831-1-stereoproject5.jpg


I loved these things, and since i knew they still worked, it saved me a bit of cash(though i had thoughts of buying rockfos punch/power 12s or MTX Jackhammers if needed).

Secondly, i needed new speakers, the crappy little pioneer 4 inchers in this thing would NOT cut it. So i got to work. Days later, along came these two little packages..

First came the brand new RockFos Punch 6x8 speakers, each rated @ 120w peak.

2010-0831-1-stereoproject3.jpg


then came the front speakers which i would mount on the front doors.

twin RockFos 6.5 inch speakers, at 100w peak:

2010-0831-1-stereoproject2.jpg


Now that the speaker hunting was done, i needed a new amp. I'm not much for the new, sleek designs. I had an old RF amp when i did my first build in my Civic, so i knew i'd stick with what works. The old RF amps are MUCH more powerful than what they're rated at, so i knew exactly what i wanted, and it came days later:

a shiny Rockford Fosgate Punch 500a2.

2010-0831-1-stereoproject4.jpg


a bit on the shy side as far as power goes, but then, i'm not driving a monte carlo or something with a huge trunk, so all that power won't be needed! This thing, let loose, will be MORE than enough for a Geo Tracker, which, at the floor, only has 12x41.18 inches of space to play with!

then came the deck. Since i didn't have a whole lot of space to play with- or any, for that matter, i knew i needed a deck that came powerful straight out of the box, which a noticable difference to, like, a pioneer deck.

Most decks you find in stores, you won't find one with more than MAYBE 50 or 54 watts per channel. behold, a no- name deck that is performing the **** out of the power players!

IMG_20100901_143357.jpg


Little known, but powerful as hell. 80 watts per channel, which at RMS upped my stuff to 40w per. touchscreen, bluetooth, ipod dock, SD card reader, USB, 1/8 inch jack, this is their top of the line single DIN receiver.

f-in ******.

IMG_20100901_143514.jpg


i masked the amp, because i knew i'd be painting it.

http://i20.photobucket.com/albums/b237/9mmhobbes/geo%20tracker%20stereo%20build/2010-0831-1-stereoproject7.jpg

"*GASP!* WHAT," you ask? yes. Painting an amp. i checked. the old RF amps basically operated as one big heat sink, so painting it won't hurt at all.

First things first: wiring had to get done before i put anything in, or at least the primary wiring, so i got to work.

power wire...

TheLastLaughAugtoNov20101.jpg


ground wire...

TheLastLaughAugtoNov20103.jpg


i've always been bad with doing my own grounding, so i played this one safe, and consulted a pro on how to do it- thankfully i got it right on the first try; self tapping screw into the body, under the back seat, which is small AS HELL.
Thats a terrible place to ground:fyi: Ground on amp to ground on front batt:thumbupw:

 
Ground should be a solid piece of sheet metal, that is on the main body of the car. (Not a piece that has been welded on). Also I would sand down the area around it to shiny bare metal.

Anyways you will never get 40rms per channel out of that guy with a clean signal, 20 if your lucky. Noticed you stated most things by Peak.. bad way to go.

 
I'd run a piece of wire to the front battery. Might as well. That tiny wire you're using couldn't have cost too much //content.invisioncic.com/y282845/emoticons/biggrin.gif.d71a5d36fcbab170f2364c9f2e3946cb.gif

 
next, on to construction. cutting all the wood was a *****, because it's such a small space. 12 inches by 41.18 inches on the floor, which rises up to 9 inches at the top of the back seat. VERY small.

...cutting the wood.

TheLastLaughAugtoNov201017.jpg


TheLastLaughAugtoNov20105.jpg


here is what would become the front speaker mounts and sub mounts. I have to cut mounting rings for the front speakers, because the doors are so thin, the windshield won't be able to roll all the way down without it.

here is the cradle, which i cut to be mounted on a bracket, above the sub cases, under the rear speaker arm and lip.

TheLastLaughAugtoNov201010.jpg


it was right about here that i discovered a giant hole in my vision. i had not taken into account, how THICK the amp and cradle would be, and thus did not see that, when mounted, the amp would cut into the rear arm lip-- i DID NOT want that, i had big plans and so so plan changing was in order.

so i though about it and would cut a NEW cradle to mount the amp BETWEEN the subs, like this:

TheLastLaughAugtoNov201012.jpg


you'll notice the LCD lights on top, there.

anyway, so i got back to cutting and did a mock-up in the "trunk," and it looked pretty good!

TheLastLaughAugtoNov201016.jpg


my happiest moment in this, everything fit. this thing was gonna be bulky as hell, but it would fit!

so i got to gluing. i had at my disposal, a "biscuit cutter," which i think goes unused for a lot of builders. if you can find one, GET IT. it basically cuts long, thin, football shaped dowel slits into your wood, which greatly increases the tensile strength when glued.

rear speaker arm

TheLastLaughAugtoNov201019.jpg


arm joined with lip

TheLastLaughAugtoNov201020.jpg


then i got to work on the sub cases.

TheLastLaughAugtoNov201017.jpg


i can't say it enough, the biscuit cutter really helped. no screws, nails, nothin. just glue and these biscuits!

that done, i began applying felt to the inside of the sub cases, cuz those had to get closed up before i could proceed.

TheLastLaughAugtoNov201023.jpg


next came the *ahem* green shag fur. yup, i said it. green shag fur. i guarantee nobody's done this, cuz this stuff is pretty darned hard to find. observe:

TheLastLaughAugtoNov201026.jpg


then the purple, quarter inch shag fur..

TheLastLaughAugtoNov201029.jpg


can you see it yet?

here is a side view of the top of the sub cases and the rear speaker arm:

TheLastLaughAugtoNov201028.jpg


here it is again, with the speaker holes cut, and the LCD lights added:

TheLastLaughAugtoNov201031.jpg


ran to walmart to pick up 3 pounds of THIS stuff, cuz i'm not playing around; this is a SERIOUSLY small space, and i want to make it sound bigger. if you don't use polyfill for your smaller, SEALED enclosures, yer an idiot. for the record, people who use this stuff on ported box, you're doing it wrong. it's mathematically redundant.

TheLastLaughAugtoNov201039.jpg


covered the wires and plugged the hole, ha.

TheLastLaughAugtoNov201040.jpg


ladies and gentlemen, it's starting to come together.

TheLastLaughAugtoNov201036.jpg


i found this great patterned patent leather at Joann's, on sale for 15 bucks a yard. great stuff. i covered the front of the whole case with this stuff, cemented it down, and then rivet-tacked it into place, all cool like, and mounted the rear speakers:

TheLastLaughAugtoNov201037.jpg


next i got to work, painting the amp. a little Hotrod Red and Starbright White? oooh yeah.

TheLastLaughAugtoNov201038.jpg


while it dried, i finished the new cradle, complete with 12 volt cooling fan, which will **** hot air out and blow it out underneath the cradle into open air:

TheLastLaughAugtoNov201042.jpg


see?

TheLastLaughAugtoNov201043.jpg


i also cut new wire covers out of 1/4 inch plexiglass, i had two GIANT sheets just laying around- no sh__! here it is all pretty n stuff:

TheLastLaughAugtoNov201045.jpg


TheLastLaughAugtoNov201046.jpg


i run the the wires to a switch, so i can control whether it runs or now. winters in wisconsin make a cooling fan pretty redundant, so i won't run it in the winter time.

TheLastLaughAugtoNov201047.jpg


finally came installation. the good news is, it fit like a glove. the bad news is, the rear arm snapped while i was trying to inch the whole thing backward, so it was flapping freely under the fabric, even after all glue and screws.

TheLastLaughAugtoNov201048.jpg


[NOTE: this was the ONLY piece i didnt use biscuits on- more's the pity]. this probably would've happened sooner or later, from bumps and stuff, so i'm glad it happened as i was putting it in.

THANKFULLY i had a few steel brackets in the garage, which i hammered into a 20 degree angle, painted purple, and screwed in. i only needed one, but three do nicely. i'll have a pic of it later on.

you'll also notice, the amp sits on an angle. this helps the fan cool it from underneath, and it also provides space to hide wires. the neat thing is, i hooked up a linear actuator on a button switch and a hinge, so, if i need to get in there to do maintanance, all i have to do is push a button and it opens up.

anyway, getting it in was the main point, so i fixed it, and got to work on the wires. that required a LOT of skeletonizing the interior:

TheLastLaughAugtoNov201049.jpg


considering the space, it actually wasn't too bad!

one thing about old RF amps, is, they don't have the parallel potentiometers, and there's only one company that makes em 3rd party, so i searched one out and found it. this one plugs into the RCA cables! pretty nifty!

TheLastLaughAugtoNov201024.jpg


since i mostly worked on this thing at night, i don't have any day shots yet, but i will, of its completion. for now, i welcome your thoughts and comments.

you'll now realize how i modelled it after the joker!

 
Ground should be a solid piece of sheet metal, that is on the main body of the car. (Not a piece that has been welded on). Also I would sand down the area around it to shiny bare metal.
Anyways you will never get 40rms per channel out of that guy with a clean signal, 20 if your lucky. Noticed you stated most things by Peak.. bad way to go.
quite right. i ground around the area i drilled into, cleaned it off and made sure there was no rust, dirt, or paint. you're right though, 40 watts per channel is pushing it, but then, i don't need a whole lot of power on this system. with everything hooked up, i barely have to turn it up halfway. the system wasn't built to be powerful, really. i don't listen to a lot of music with ultra low end, mostly heavy metal, so all i really need is that added attack, which i get in droves. like i said, i barely have to turn this up half way.

thanks though! keep em coming!

 
That rule doesn't matter when you go straight to the source. Take a look at SPL vehicles, 17ft runs of grounds.
that's interesting. very interesting actually, i'll have to give that some thought. thankfully replacing the ground shouldn't be too big a thing, since it's not under the rig itself, it's under the back seat.

so, you're saying, if i run, a 4Ga wire aaaaaaall the way to the battery it'll make a BETTER ground than what i have now?

 
Activity
No one is currently typing a reply...
Old Thread: Please note, there have been no replies in this thread for over 3 years!
Content in this thread may no longer be relevant.
Perhaps it would be better to start a new thread instead.

Similar threads

About this thread

Hobbes Caltous

10+ year member
Junior Member
Thread starter
Hobbes Caltous
Joined
Location
Milwaukee, Wisconsin, United States
Start date
Participants
Who Replied
Replies
22
Views
10,887
Last reply date
Last reply from
Hobbes Caltous
IMG_5860.jpeg

Brendon Jenness

    May 8, 2024
  • 0
  • 0
Screenshot 2023-12-02 161309.png

Doxquzme

    May 8, 2024
  • 0
  • 0

New threads

Top