The "A" pillars. . .
The bane of my life for the last few months. No joke. I have been racking my brain on how I have wanted to build these. The speakers I am using are not small, heavy for size, and will be on axis just below the eye line on the corners of the dash.
I am going to put up some photos that you may have seen if you are following the build but it's to give more coherence of the gear I am using and to dig a little deeper. Drivers first. I chose these drivers for a open baffle home setup that I had planned on building but have desperately wanted to try using these in the car. I'm sure some of you have seen AMT's, ribbons and planars in builds before. Usually in a higher level install. (SQ)
1. Dayton AMTPRO-4
Dayton Audio AMTPRO-4 Air Motion Transformer Tweeter 4 Ohm (parts-express.com)
I'm using this as a wideband midrange. Bandpassed 1.5k -10khz
2. Dayton Audio PT2C-8
Dayton Audio PT2C-8 Planar Tweeter (parts-express.com)
10khz high pass
I'll be playing with the crossover slopes but for now let's say 24 db/octave for both. If you haven't heard speakers like this they are accurate, have fast transients, and reproduce instruments incredibly well.
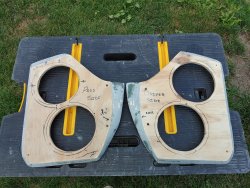
So my first prototypes were based on a stack fab design where i used baltic birch, purple heartwood, and colored popsicle sticks. The way they came out left me unhappy to be honest.
There is also the matter of the weight that had me concerned as well. These drivers together weigh over 5lbs. That weight plus the housings needs to be suspended from the "A" pillar and had to withstand daily use. So using the hinged brackets which you see above I came up with another idea which includes multiple attach points directly to the pillar itself.
So my new design has foregone the asthetics (somewhat) over a stronger design that should reduce fabrication weight. This time I have built the frames out of hardwood dowels assembled with glue.
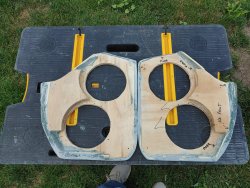
(Picture taken at my eyeline with my head on the headrest.)
It's only the first step; however. Tomorrow I will be reinforcing them further with short strand fiberglass filler both inside and outside similar to what I have used in both the door panels and the IB frame. This should make them incredibly rigid and still be light while only being 3/8"ish thick. At the hardware attachment points I will be adding gussets of the purple heartwood to reinforce the mounting surface.
When I connect the two pieces, the tweeter(Planar) will set a little higher than the AMT's. This will be accomplished by a pair of 90 degree steel brackets bent to the desired listening position. I still have to drill into the pillars and place the rivnuts inside. Then I can fab the mounting tabs that will attach directly to the pillar trim panels. The whole thing will then be sanded smooth and covered with the suede I am using for everything else.
There is a shitload of fab yet to do and I have a shipment of supplies coming on Tues that will get us moving.
When it's done I will permanently mount the caps in-between the two drivers to showcase them. I purchased the caps since the drivers need protection from turn on pops and the AMT's are a dead short to the amp. For as big and heavy as they are they are also delicate. It also acts as a buffer in case the amps dsp fails for whatever reason.
Notice the uneven cuts. haha Just wait until I glass and sand them. They'll look gangster.
I'll post more when I can but weather is going to be 90's and raining until Tues so I'll get done what I can on the porch and put up a couple more pictures tomorrow providing the Jim Beam and Lem-O-nade doesn't shut me down first.
I can't wait for you guys to see them when done. It's really going to be something.