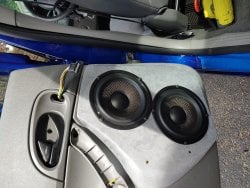
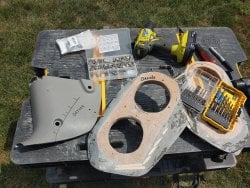
Featured 2005 Ford Focus ZX4 new front door build 2 10" sb acoustics midbass 10/2/25

The whole beaver dam of dowels and glue seems a terribly roundabout way to fill/build up gaps, particularly if you're going to glass everything anyway. Why not just squirt down some spray foam or modeling clay or something else that can be shaped easier and applied faster?
 
The whole beaver dam of dowels and glue seems a terribly roundabout way to fill/build up gaps, particularly if you're going to glass everything anyway. Why not just squirt down some spray foam or modeling clay or something else that can be shaped easier and applied faster?
The method for me at least has worked well. I haven't had much luck with spray foam and I've never used the two part stuff before. I do like the modeling clay idea but I have to find one that doesn't leak wax and doesn't shrink when dry.
The dowels act like rebar in concrete adding some overall rigidity. And it saves me from using extra filler. I'm sure there are better ways but this is the one I prefer for now.
 
We're around a day-ish out from finishing the rear doors and thank god. It has taken quite a long time. I'm not even sure measured in hours. I have a few more photos to share to get you guys caught up.
Here is a shot of both of the inner baffle pieces I am using for the door mounted midbass after the first sanding. Notice how they aren't symmetrical. I made the baffle a little bigger for the rear passenger door.
20220811_151556.jpg


A little quick fitment before I added the second coat of filler. I hit both the front and the rear of both. See there was a little filler ouside the lines but it came right off of the deadener.

20220811_151640.jpg


Another layer of reinforced filler was added. I added a bit more in the third layer but I didn't take as many pictures this time. You guys get the idea. I sanded them to 120 grit in case anyone is curious smoothing the edge profile and the front and rear face.

20220811_160111.jpg


My original plan was to hit them with resin and chop matte but with both the deadener, aluminum tape, and neoprene I really didn't feel like it was necessary. We'll pull the door cards in a couple months to see how they fair. This a single layer of deadener by the by. On the rear of the panels I used a layer of neoprene which is pretty hydrophobic anyway.

20220811_173624.jpg


I added a few pieces of aluminum tape which you can see in the background. When there was a single midbass in the door I used butyl rope and non hardening modeling clay and it made a proper mess, let me tell you. The cable hanging is for the window/lock switches. I will tape (aluminum) it after I wrap in some neoprene or tesa tape so it isn't in there making racket.

20220811_175518.jpg


Aaahhhh. One of the more satisfying shots I have taken in the build. I ended up using seven self tappers which turned out to be more than enough. I could rock the whole car when I pulled on this little bugger.

20220811_180758_HDR.jpg


We're still not done yet though.. You can see from the following shots that I have removed some more material from the door cards themselves. This was for a couple reasons. With the added inner baffle I had fitment issues which required some material to be removed. There was also the matter of having a free path between the inner and outer baffles that is unobstructed.

20220811_185359.jpg


Go Michigan state!
This is how I will manage the transition between the two baffles. Once I wrap the baffle and secure it to the door card I can cut the craft sticks to size and glue them to bridge the gap. Once dry I can use reinforced filler to make the transition more solid. Then I can begin to think of a seal. I think I will just use some rope caulk. This seems to be the easiest. It won't be 100% leak proof but I don't give a cats' pajamas about that.

20220811_185438.jpg


I need to finish the other door getting it to this stage then fabricating the aforementioned transition. Then I will run some wiring through the factory grommets. Each speaker will have it's own amplification and signal processing. I will mirror the values when we get that far.
Tomorrow should be another good fab day (possible rain) but this weekend I am heading to a steampunk/renaissance fair so I won't be working on the car. So it might be monday before I post anything, tomorrow not withstanding.

Kev
 
Talk about a weight off of my shoulders. I have been dying to work on something else...like the frontstage. lol
I'll keep this update shorter-ish on my chatty-kathyness. Onto the pictures..
The panels were much easier to wrap than I thought they would be. The rear were glued a bit more before I installed them but you guys don't need 10 pictures of that. The color is called salt. It actually looked greener until I mounted it to the door. It's a microfiber suede I picked up at Joann fabrics.

20220815_144102.jpg


20220815_144117.jpg


I ended up using two of the front screw holes then added 5 more to the rear of the panel to secure it. I suppose I could take a pic if you guys want. I used a couple sizes based on the depth I had available.
The gold pins were used to cap the holes and I think they give a cool little touch. I will be building a cover/grille later out of fiberglass to shield the speakers but that's later.

20220815_144848.jpg
20220815_154919.jpg

20220815_161510.jpg
 

Attachments

  • 20220815_154910.jpg
    20220815_154910.jpg
    1.2 MB · Views: 60
Talk about a weight off of my shoulders. I have been dying to work on something else...like the frontstage. lol
I'll keep this update shorter-ish on my chatty-kathyness. Onto the pictures..
The panels were much easier to wrap than I thought they would be. The rear were glued a bit more before I installed them but you guys don't need 10 pictures of that. The color is called salt. It actually looked greener until I mounted it to the door. It's a microfiber suede I picked up at Joann fabrics.

View attachment 41622

View attachment 41623

I ended up using two of the front screw holes then added 5 more to the rear of the panel to secure it. I suppose I could take a pic if you guys want. I used a couple sizes based on the depth I had available.
The gold pins were used to cap the holes and I think they give a cool little touch. I will be building a cover/grille later out of fiberglass to shield the speakers but that's later.

View attachment 41625View attachment 41627
View attachment 41629
Man.. Those Turned out Awesome!! JoAnns is the place to go as well as Hobby Lobby for Fabrics and Nick Nacks. we have a Tuesday Morning here also. Pretty nice stuff in those places
 
Man.. Those Turned out Awesome!! JoAnns is the place to go as well as Hobby Lobby for Fabrics and Nick Nacks. we have a Tuesday Morning here also. Pretty nice stuff in those places
Thanks brohamster. I spent a lot of time on them and am so glad they are done. I didn't mention before but right now I have them wired in series 8 ohms and bandpassed. 63hz 18db/octave -1.25khz 24db/octave. Worked with them a little on the EQ too. All through the deck so far.
4 speakers down 28 more to go. Like.. really. 28 more speakers hahahahahahahhaha
Wow!! LOL Most Ive ever ran in one Vehicle was a total of 22 speakers and 4 subs. I know how much patience you have to have and some to wire it all up. especially if you are doing it yourself. at least I knew where every wire went and where it was connected too. that was a good feeling. If Anything failed I was to only blame myself.. LOL. Ive always ran 4,and 2 ohms up front and fill. I have a couple 150-400 rms 6.5 mids @8 ohm Id like to try out again the next install. I think it will be worth it. Great work man.!!! Im enjoying it!!
 
Wow!! LOL Most Ive ever ran in one Vehicle was a total of 22 speakers and 4 subs. I know how much patience you have to have and some to wire it all up. especially if you are doing it yourself. at least I knew where every wire went and where it was connected too. that was a good feeling. If Anything failed I was to only blame myself.. LOL. Ive always ran 4,and 2 ohms up front and fill. I have a couple 150-400 rms 6.5 mids @8 ohm Id like to try out again the next install. I think it will be worth it. Great work man.!!! Im enjoying it!!
aaaaahhhh. we do have fun. I have set no limit to this build. I've been joking with people that every surface in the car is covered with drivers. As fun as that sounds there is a method to my madness. I will have four of those dsp amps when it's all said and done. That gives me 32 channels to mess with. All having their own signal processing. It's an embarassment of riches really.
Tuning this thing is gon' be a sum ***** for sure. But where there's pain there's pleasure right. I'm just imagining playing Jon Hopkins "Collider" when it's all done and it just wrecks someone. I have wanted to build an immersive demo vehicle for a long time. Something you can listen to all day.
I should be able to make some great progress this week and hopefully work doesn't ship me out before I get this done.
 
I started the kicks today. I wanted to start a project that would have a faster turnaround. I also wanted to start working on the frontstage. I have been working from the rear forward which is kind of bass ackwards.
The kicks will have two 5" ess sealed back midrange in each. I started with 2 layers of 3/4" mdf and glued them together. They aren't perfectly cut to be sure but when the filler is applied it is invisible. My inner hack is showing. lol

20220816_140714.jpg


I took this picture for a reference in case anyone was curious. I didn't get many pictures of the deadening process I did on the floor. What you're looking at is 2 layers of deadener in an overlapped pattern with a layer of neoprene and finally the MLV. I used 2lb. per sq. ft. on the floor and will be using the same under the trunk liner. You can see it is secured but is still allowed to move. Anywhooo..

20220816_141449.jpg


I hadn't posted a picture yesterday of the rear pass door being finished. Here ya go..
20220816_182054.jpg


Back to the kicks. We are nowhere near done but Ihave the first layer of applied to the drivers side. To secure them I used self tappers and stainless steel "L" brackets. I should use some rivnuts instead.
20220816_180310.jpg


A look from the passenger side at my eyeline looking down.

20220816_182704.jpg


The pass side isn't secured in this photo. I'm not sure if I will seal the top of the baffles under the dash. The drivers I'm using are sealed back so I think I will fill the cavity with some jut (shredded denim) and we're good.

20220816_183710.jpg


This final photo is a picture of my feet; or rather foot, resting beside the kickpanel. I can still stretch out my left foot and will be able to drive comfortably. Not bad considering it is two 5" in each kick.

20220816_184022.jpg


More tomorrow. . .
 
Last edited:
Whats your thoughts on the GF180s?
They are great drivers and I think they will take the forums by storm much like the silver flutes once did. Listening to them I can tell that they will need some break in time but with the material they are made from it won't be long. I have used a ton of Dayton gear in my last 3 builds and they continue to suprise me.
I would buy them now as PE has a way of putting a driver out there and it performs well and they raise the price on it by 50% or more. The driver performs well to ~1500 Hz. They mention you could take them to 4k but 2khz would be my limit given its frequency response and listening. Also, anything below 50 Hz and it starts to fall on its ass. I have mine with a hpf 63 Hz 18 db/octave slope. Now this can improve with some break in but again it only has 4mm of xmax so we cant think they can do miracles. I would put some dampening material like black hole or shredded denim behind the drivers as the cone is so light there is some sound reflected back through the cone from the rear wave. :)
At $28 bus a piece I think they are a great bargain.
 
Im about to add 6 to the extended cab of my silverado, and I am thinking these will fit the bill. My front doors each have a pair of American Bass VFL65MBs, but those are no longer made. Their replacements are Godfather 6.5CC. Not sure I want MRs.
 
Im about to add 6 to the extended cab of my silverado, and I am thinking these will fit the bill. My front doors each have a pair of American Bass VFL65MBs, but those are no longer made. Their replacements are Godfather 6.5CC. Not sure I want MRs.
I'm not familiar with those but they are pro audio? They may have a higher sensitivity than the daytons. They may not play as loud but they should play lower.I have mine on 40 watts. You could probably run two times that depending on your crossover points. I'm sure you've researched them so you know can get them in 8 ohms as well in case you wanted to run them in parallel.
 
Back with a few more pictures of the kicks. I got a good seven hours in so I have made some progress..
This is the first sand I had done on the panels. No profiling yet. The carpet needs to be cleaned.
20220818_151727.jpg


20220818_160549.jpg


Fresh layer of tape. I typically need to redo the tape three times as it it is destroyed between coats. If I were a smarter man I would use a mold release.

20220818_162955.jpg


You can see in this shot that they are not yet symmetrical. No biggie. We'll just build out the panel.

20220818_164643_HDR.jpg


Extra material was added and the small gaps were filled.

20220818_180712_HDR.jpg


There is a moderate amount of sanding on the panels to be done along with a finish coat. The passenger side needs the angle adjusted to better match the drivers side. So, I will end up hog-ing out some material so they have identical profiles.

20220818_184521_HDR.jpg


The next few shots are closeups of both panels. The drivers side is much closer. It matches the contours of the vehicle rather nicely.

20220818_184206.jpg


This second shot of the drivers' side brings up a conundrum. I think that I will end up bonding the fabbed kick and the plastic fatory panel. It will make it a pain in the but to wrap but I believe it will end up looking better.

20220818_184212_HDR.jpg


Last shot is the passenger side. I am going to try to get as much done as I can tomorrow as it is going to be raining hardcore this weekend and I have a 4 hr. interview for a job on monday.

20220818_184246.jpg
 
Last edited:
So I thought this would be quick, simple project. hahahahha . ... Not so much. I spent another six hours on the kicks today and I actually don't have so much left to go so let's see some fresh photos.
I think this is where we left off yesterday. The passenger side did not match the drivers side so there was some work to be done.
20220818_184521_HDR.jpg

I used a set of graduated lines while the factory kicks were in the car This was used to match when I pulled them and the fiberglassed ones out of the car so everything fit when reinstalled.
You can see in the first pic that I agitated the surface with an 80 grit sanding disc. This was to help with adhesion of the reinforced filler and the wrapping progress. I'll be using the same suede as the door panels.

20220819_140748.jpg

20220819_123429.jpg

You can see that the panels have already been treated to both a layer of deadener and neoprene.
20220819_120752.jpg

20220819_122413.jpg

To secure the two together I used some countersunk allen head screws. The washers you see actually go underneath the bracket. (90 degree stainless steel bent to fit) I used another pair when the bracket was mounted and torqued the nuts. Two more spax screws 1 1/4" in length were driven through the plastic panel to the fiberglass one.
 

Attachments

  • 20220819_120648.jpg
    20220819_120648.jpg
    1.3 MB · Views: 71
Activity
No one is currently typing a reply...

About this thread

just call me KeV

10+ year member
Junior Member
Thread starter
just call me KeV
Joined
Location
chicago suburbs
Start date
Participants
Who Replied
Replies
155
Views
73,331
Last reply date
Last reply from
Jimi77
IMG_1882.jpeg

slater

    Oct 4, 2025
  • 0
  • 0
Screenshot_20251004_120904_Photo Translator.jpg

1aespinoza

    Oct 4, 2025
  • 0
  • 0

New threads

Top