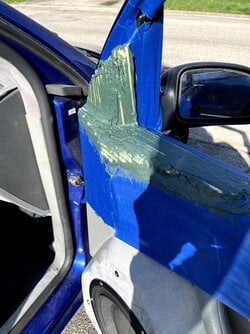
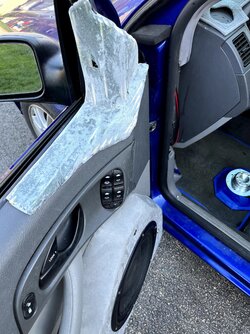
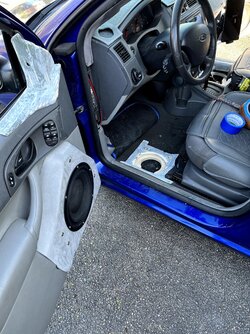
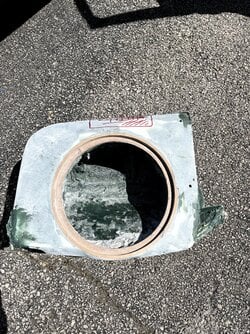
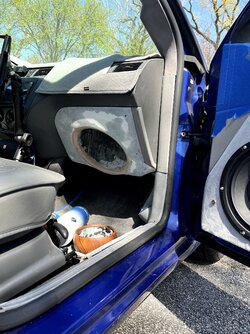
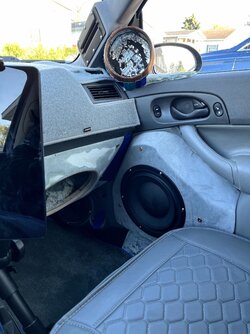
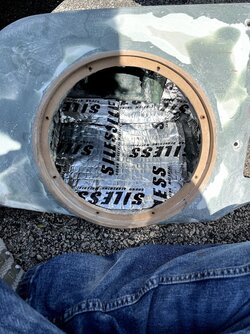
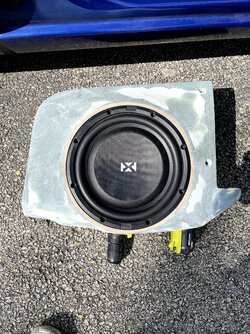
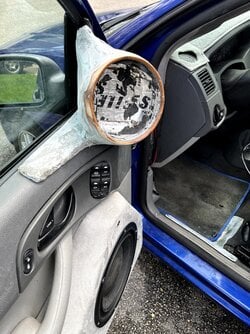
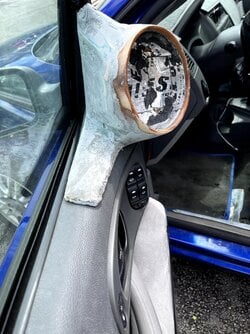
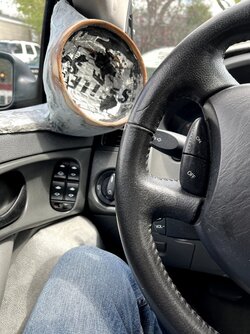
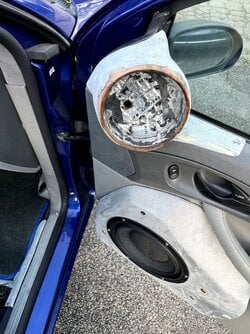
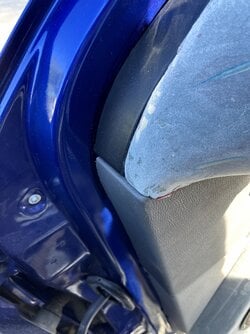
Featured 2005 Ford Focus ZX4 new front door build 2 10" sb acoustics midbass 10/2/25

Welcome back man!! Deff a tight spot there... But Hey?? Let it roll .Ha Ha!! Love it.
You Deff. have some creative crafting skills man, and some really focused and layed out plans for your build and driver locations. Always Interesting to see whats Next!!
Thx brohamster. I've really wanted to get a large fullrange on axis in the car. If I still had my 550I I could definetly done an 8",but my focus is small. We'll try a 5" first, then maybe upgrade to a 6.5" If you have an IG you can see a bunch of other stuff I havent posted here. @kevinmccradic
 
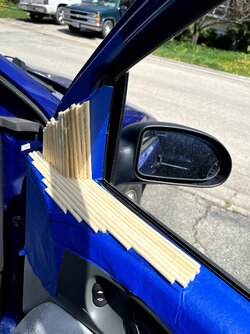
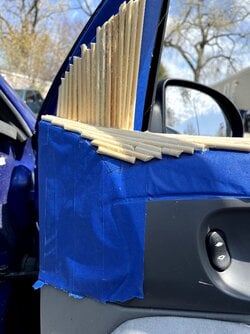
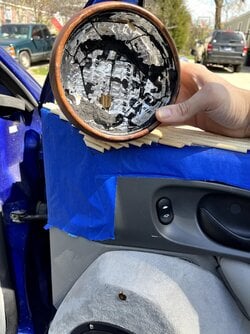
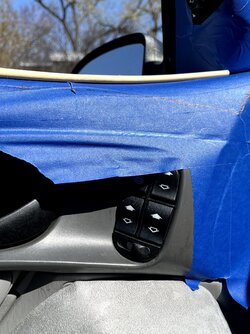
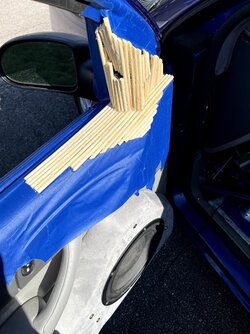
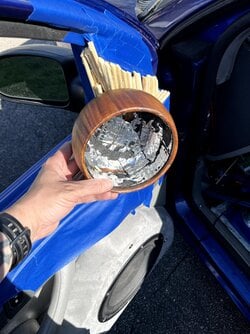
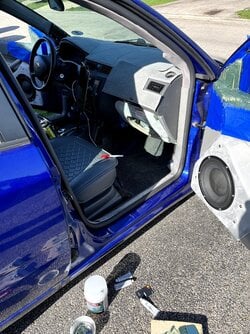
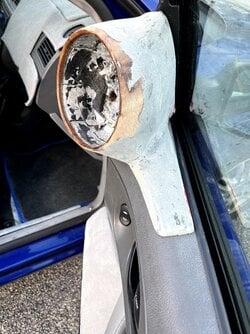
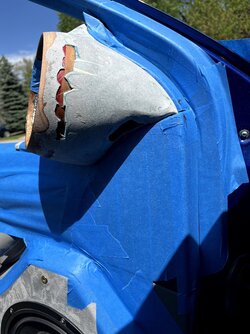
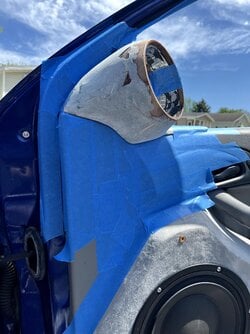
Here are a few more pictures of the mounts for the "salad bowl" enclosures. I put down a layer of tape, and drew a template so I knew where my outline was. Then I used hot glue and wooden dowels to get the initial form that I could cover in some reinforced fiberglass.
IMG_0609.jpg IMG_0611~1.jpg IMG_0612.jpg
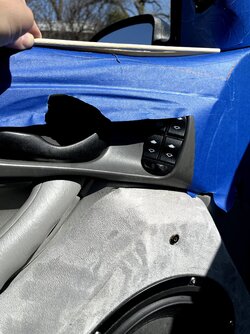
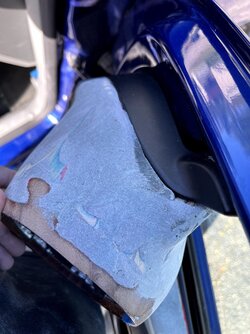
This is why I like working with bamboo. The next couple of photos show me trying to glue a dowel rod to the others but it is straight. It doesn't match up with the contours of the panel. In the second photo you can see by some "cooperative" bending the wooden dowel takes the shape of the door panel. You can feel the fibers being crushed when you bend it. Its a satisfying sensation. You can't bend it into a circle but it does move quite a bit.
IMG_0617~1.jpg IMG_0618.jpg
Once all that nonsese is complete we end up with something like this..

IMG_0619.jpg IMG_0620.jpg
 
Last edited:
Then we add a little reinforced filler and sand...
IMG_0627.jpg IMG_0628.jpg IMG_0629.jpg IMG_0632.jpg
So that's where I'm at. The next step is to mount the salad bowls to the bases and use more dowels and reinforced fiberglass to get a cool shape. Hope to have more for you sunday.
 
Last edited:
So I'll hit ya with some pics straight off...
IMG_0643.jpg
IMG_0644.jpg


So the midbass trim panel has been covered and they have been wired up not screwed down yet. I spent a good amount of time working on the fullrange at the top of the door and the glove box sub today.

I added a same little section to face of the subwoofer so it closes up the gap where it meets the kickpanels. There was a 3" open space and it was driving me crazy.
IMG_0642.jpg

After I added a couple layers of reinforced filler and sanded this is where were at. ..
IMG_0645.jpg
Here is a closer shot. You can see the two holes on the right of the enclosure. These are two of the three mounting locations. I used some m6 rivnuts and sank them into the skeleton of the dash.
IMG_0646.jpg

IMG_0647.jpg
IMG_0648.jpg


So that brings us to our next post. The 5" fullrange in he door.
IMG_0650.jpg
 
Last edited:
So this has been a pain in the butt as I will show you. The fabrication is the normal stuff but getting the two to line up and match is proving difficult. Still I do have some progress photos that I can share with you.
IMG_0657.jpg
Like the previous post. This is the goal. They are meant to be cross firing with a slight upwards tilt. This pic shows the frame with the popsicle sticks already attached.
IMG_0651.jpg
IMG_0652.jpg
IMG_0653.jpg


Here is a shot of the drivers side temp glued. As you can see the alignment is off. The left still needs some bodywork so they will match closer. I did this three times. lol And let me tell you; crawling into the back to take the photo everytime must have been hilarious to watch.

IMG_0655.jpg


It might be saturday before I get to post on the build so stay tuned.
 
feeling my jodeci on my headphones...
IMG_0678.jpg


So, as you can see the glove box subwoofer is complete. It has taken, like.. so long to get done. I am more than happy with the results. Here are a few shots of the "sausage being made." Up front. I hate wrapping panels. **** gives me profound anxiety. lol
I added a layer of deadener for "just cuz" and drilled the holes for the hardware. Looking back I definitely want to put some hurricane nuts in there with some epoxy. I'd rather have a machine screw rather than a coarse thread. Especially with mdf. It's just so prissy. I'm online looking for some machine hardware as we speak. ...
IMG_0676.jpg IMG_0675.jpg
IMG_0677.jpg


Hahaha. you can see the wiring for the front sub I haven't tucked in yet. I'm awesome.
 
And an update on the fullrange on top of the doors. . . I've added a couple layers of kitty hair to the panels. The shape is coming out pretty nice. They are not symmetrical yet as I need to add some height to the passenger side enclosure. IMG_0671.jpg IMG_0672.jpg IMG_0674.jpg IMG_0680.jpg IMG_0681.jpg IMG_0682.jpg
My expertly placed index finger shows the area I need to fiberglass up to. I'm not really sure how long I want that "tab" to be. In my mind it looks more like a swept back wing of a fighter jet. I may take a lot of material off there. I'm not sure. We may get called off for rain tomorrow so we'll see..It may be a few days before the next update.
 
Last edited:
feeling my jodeci on my headphones...
View attachment 58359

So, as you can see the glove box subwoofer is complete. It has taken, like.. so long to get done. I am more than happy with the results. Here are a few shots of the "sausage being made." Up front. I hate wrapping panels. **** gives me profound anxiety. lol
I added a layer of deadener for "just cuz" and drilled the holes for the hardware. Looking back I definitely want to put some hurricane nuts in there with some epoxy. I'd rather have a machine screw rather than a coarse thread. Especially with mdf. It's just so prissy. I'm online looking for some machine hardware as we speak. ...
View attachment 58361View attachment 58360View attachment 58362

Hahaha. you can see the wiring for the front sub I haven't tucked in yet. I'm awesome.
Dammned!! Looks great to me man!! I bet it serves well up front. i plan on two Dayton Audio 80 RMS tens under the front seats of my truck later on. Ive been itching to get back at it. Moving has taken my time along with working. Hopefully in later just before winter Ill be busy on it??Hmm. Hopefully.. Last SPL build out than pull and do an SQ/SQL type system. Looking at all that Badd Azzed installing, I didnt even notice the wiring.. LOL 😁 👀👀:poop:
 
Dammned!! Looks great to me man!! I bet it serves well up front. i plan on two Dayton Audio 80 RMS tens under the front seats of my truck later on. Ive been itching to get back at it. Moving has taken my time along with working. Hopefully in later just before winter Ill be busy on it??Hmm. Hopefully.. Last SPL build out than pull and do an SQ/SQL type system. Looking at all that Badd Azzed installing, I didnt even notice the wiring.. LOL 😁 👀👀:poop:
Thanks brohamster. I've been trying all these crazy ideas and they keep working.
 
Ill add more photos as we go along but you can see I am tightening them up. Getting them to match. Another 10-ish hours they will be ready.
View attachment 58444View attachment 58445View attachment 58446View attachment 58447View attachment 58449View attachment 58448
Looks Badd azz man. You have some patience for sure. Something I need to have more of. Im deff. going to play around with some F.Glass to experience it some. Ive never done any all these years
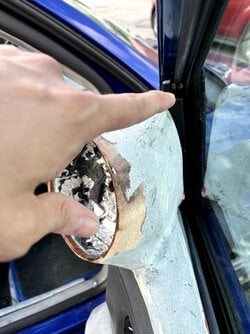
 
So, it has been a while since I have made an update. I had the front sub up and running but the coil delaminated. ...on 70 frickin' watts. All right, cool; so I use the backup I had. Nope, This one runs for like 10 minutes and I start hearing noise. I order another. Install it. Cool. This one isnt fu@%^. Nope. Halfway through a track and the damn thing flatlines......Magic smoke and all. So I go looking around and they aren't even for sale anywhere. That's telling me too much. Definitely a rockville sort of situation. Poor coil gluing caused delamination. .?
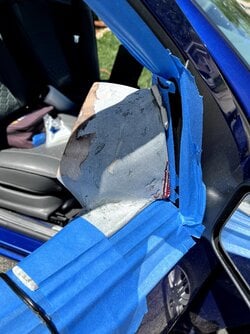
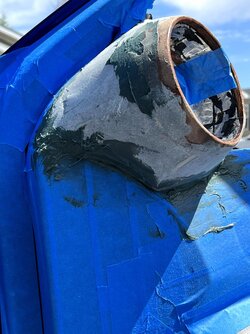
I ended up doing some research to find a sub that would fit as the geometry of the enclosure is...difficult. I ended up finding 4 drivers that had the right inner and outer diameter but the depth was the real challenge. I bought two different GRS subwoofers from Partsexpress. The one I ended up installing was a high excursion model GRS 10SW-4HE. Here is a couple photos of the new sub installed.
IMG_0733.jpg
IMG_0734.jpg


Ill try to get some better photos in a couple of days. In the mean, I have two Soundstream mono blocks coming. They are the compact versions. I also got my other 2 Lisa's (4 channel) from US Acoustics. Thats 6 amps total. I also bought some brackets so I could stack the amplifiers. They were spendy but definitely worth it. Now we need to get one more dsp and a large AGM for the trunk. I want to do a lot more of research before I go to a lithium setup. To be honest I could probably power my entire system on a Titan 8 on an isolator and I may end up doing that.
 
So, it has been a long while since I have done a build update. I have just been geeking out listening to the stereo trying to avoid the gorilla, neigh; the elephant in the trunk. Sometimes, I just don't have the motivation to work on the car. I have built 6 cars to this level of fab and I guess I don't have the fire in my belly I used to, but I digress. I started yesterday by picking up some wood and kittly hair for the build.
When I have the inspiration I hit the ground running. I made some crude measurements and got to work. I have a significant amount of gear to put in the car in a small footprint. I started with a rough estimate of how I wanted to lay everything out as you can see in the first photo.
BJXX6638.JPG


This is a rough draft and after looking at the next photo; I knew there was some manuvering to be done. The trunk hasn't looked like this in well over a year. Given me the anxieties. lol
IMG_0808.jpg


In any case I started doing my rough cuts trying to get it to sit in the car. I probably made 8 or nine cuts total to get it this far...
IMG_0809.jpg

IMG_0810.jpg

IMG_0814.jpg


The eight screw points you can see are from the 2x2's I used to raise the platform. I tried raising it higher with 4 inches of clearance...and it..it didn't look right. In the next photo you can see I added a small bumpout on the drivers' side. I just felt like it needed it. The sides aren't symmetrical. I'm not sure how far out I will go as I have to worry whether I ledge myself up going too far and can't remove it for service without breaking it.
IMG_0815.jpg


IMG_0816.jpg

I boxed it out so it would look a bit cleaner. I think I'll end up putting a radius on the front side just to give it a little better look. Once I got this far I knew I could start the long walk that is finish work. I taped the area up and used some bamboo dowels and reinforced fiberglass to fill the gaps. I missed a spot as you can see but I will need to repeat this process at least two more times. So....much....tape. More tomorrow.
IMG_0818.jpg

IMG_0819.jpg
 
Last edited:
I have a few more pictures. Cutting those fluted areas in the upper left were easier than trying to place a snap bushing there. That 1/0 has some give but it will out muscle that plastic bushing. I sanded all the holes and channels front and back.

IMG_0840.jpg


Just watch how this material color changes in the sun in the next couple photos..
I am going to redo the hadliner with this material as well and let me tell you. This is some of the hardest fabrics I have ever worked with. No give..like at all. I had hand cramps that left me howling with uncomfortable laughter. Even though the panel is flat, this fabric did not want to play ball. Oh, I also found another adhesive from joann fabrics that is complete garbage. It's a good thing I had some Super77 on deck. I actually used a wooden roller to make sure the fabric got good adhesion.

IMG_0842.jpg


Let me hit you with an uno reverse and show you the backside and some cable management..
I used the aluminum tape on account of me not being able to find my zip tie mounts anywhere in the house. No "P" clips. nothing. I had them in my hands two weeks ago. I'm sure of it. It was hot AF and (going to be hotter tom) I had stuff all over the car so I wasn't going anywhere. I don't have any cover and have built the entire car outside so if I need to get materials it's first thing or it has to wait until tomorrow.. In any case you can see in the photos it's easier to prep as much as possible before installing it into the car. The dsp RCA's and distro block for the remote wires could be prepped before putting it into the car. This is for the front and rear, and front and rear subs.

IMG_0844.jpg


The RCA's that I used for the front and rear subs were extra long so I zip tied them and secured them with the aluminum tape. I had a few others that were darker and shorter but didn't really feel they matched. Too dark.

IMG_0845.jpg


The flipside. The color really changes with direct sun and without. I used a speaker wire doubled for the remote and added a brass terminal with heat shrink. If it's worth doing; it's worth overdoing I guess.

IMG_0846.jpg

IMG_0847[1].jpg


As you can see above I have mounted a couple extra terminal blocks for a secondary battery input that I dont have just yet. I'm going to run a relay and/or switch for some Blue LED lighting as well. Just haven't gotten that far. I'm going to build out a trim panel for that grille over the subs too since I guess i've decided to build the whole trunk out. lol....

IMG_0849.jpg
 
It's looking good KeV, how many months of physical hands on work do you estimate you have in the build so far?
I’ve had to rely on the kindness of the weather. I am not sure how much actual time but I have around 30-40 just in the glove box sub. Building it and then matching the contours. A lot of this was new to me so I had to figure out how I was going to put something together on the fly. There are a few things I want to touch up. Like how the door panel seams for the midbass don’t match up perfectly and I would like to rebuild the A pillars as well but I want to finish the trunk first. I imagine I could build the car much faster now.
 
Last edited:
Activity
No one is currently typing a reply...

About this thread

just call me KeV

10+ year member
Junior Member
Thread starter
just call me KeV
Joined
Location
chicago suburbs
Start date
Participants
Who Replied
Replies
155
Views
73,342
Last reply date
Last reply from
Jimi77
IMG_1882.jpeg

slater

    Oct 4, 2025
  • 0
  • 0
Screenshot_20251004_120904_Photo Translator.jpg

1aespinoza

    Oct 4, 2025
  • 0
  • 0

New threads

Top