Agent Cooper
CarAudio.com Newbie
Diane,
Trying to teardown an Alpine CDA-7998 to replace both ribbon cables, in hopes of resuscitating the no-display OELD-401. YES, we all know it's A Long Shot, but We must exhaust all options before sacking the unit for parts, hoping to Merge it with an existing useable OELD-401. Bleh.
PROPS to User=Mobhit for his comments, insight and pictures over on https://www.caraudio.com/threads/repairing-cda-7897.572603/#post-8327342 .
Excellent work, and I appreciate the fact that the photos are still sitting in that Photobucket (or on the Crutchfield Server) after all this time. Was a great help in starting this teardown.
[Only thing that was missed in commentary was the fact that you have to pinch the white standoff next to the ribbon cable with dinky pliers to get it to release the board beneath the CD cradle.]
Anyway, after some coffee, on to the task at hand....
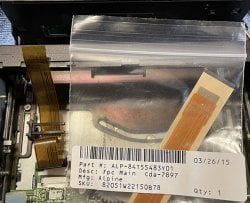
Using the teardown instrux at link above, I was easily able to replace the first ribbon cable, PN 84T55484Y01: https://www.pacparts.com/part.cfm?part_no=84T55484Y01&mfg=Alpine
Item 23 on page 45 of the Service Manual. Thanks again to User=Mobhit.
Replacing the ribbon cable connecting the lower board to the faceplate (PN 84T55483Y01: https://www.pacparts.com/part.cfm?part_no=84T55483Y01&mfg=Alpine) appears to be A Different Matter Entirely, ie "The Owls Are Not What They Seem".
To begin...after following User=Mobhit 's teardown:
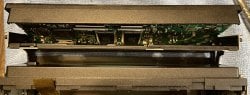
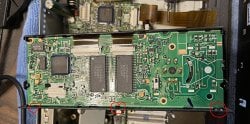
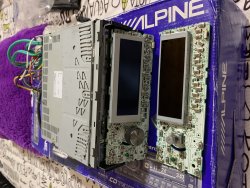
1) Undo the slide locks on the bottom circuit board. See picture, with black slide lock edges circled (poorly) in black. Ribbon cable flops right out.

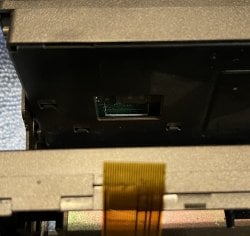
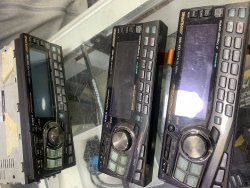
2) The Service Manual for the CDA-7998R shows an exploded view of the faceplate which does NOT correspond to the physical specs on the CDA-7998. It indicates there are two screws at the upper right/left rear of the faceplate, and these are NOT present on the CDA-7998. See page 45 of Service Manual, item 39, and see picture with area in question circled (poorly) in red. Note also there is a spudger-style orifice in the vicinity as well, but I don't want to go at that until hearing back from more experienced Members. This may be The Key to obtaining access to the board contained within the faceplate, but I don't want to snap anything :/

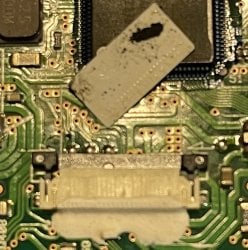
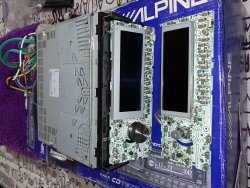
3) I don't think you can just rip the ribbon cable out of it's socket on the back of the faceplate. See picture (above), with area in question circled (poorly) in red. These sorts of connections typically have slide locks on them, see 1) above.
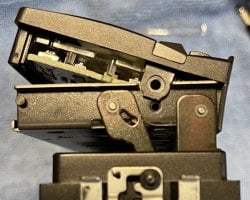
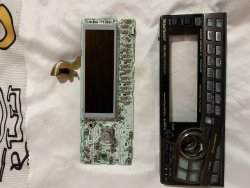
4) See picture, I've circled (poorly) a section of that side of the faceplate....this is a PIN, and will not come out of the side of the faceplate, so I'm at a loss for how to completely remove the faceplate for ease of further dismantling. [Edit: note that screw beneath this pin has been removed. Remove this screw (and the one on the other side) before attempting to spudger in later posts...]

So, that's it, end of pseudo-tutorial-presented-as-a-question.
I'm stuck trying to remove the end of the ribbon cable from the back of the faceplate without causing chaos.
Any insight or guidance from The Community appreciated.
We'll turn this into a tutorial at some point")
Oh, Diane, I almost forgot. I've got to find out how to fix this head unit. They're really something special.
HAHAHA
Trying to teardown an Alpine CDA-7998 to replace both ribbon cables, in hopes of resuscitating the no-display OELD-401. YES, we all know it's A Long Shot, but We must exhaust all options before sacking the unit for parts, hoping to Merge it with an existing useable OELD-401. Bleh.
PROPS to User=Mobhit for his comments, insight and pictures over on https://www.caraudio.com/threads/repairing-cda-7897.572603/#post-8327342 .
Excellent work, and I appreciate the fact that the photos are still sitting in that Photobucket (or on the Crutchfield Server) after all this time. Was a great help in starting this teardown.
[Only thing that was missed in commentary was the fact that you have to pinch the white standoff next to the ribbon cable with dinky pliers to get it to release the board beneath the CD cradle.]
Anyway, after some coffee, on to the task at hand....
Using the teardown instrux at link above, I was easily able to replace the first ribbon cable, PN 84T55484Y01: https://www.pacparts.com/part.cfm?part_no=84T55484Y01&mfg=Alpine
Item 23 on page 45 of the Service Manual. Thanks again to User=Mobhit.
Replacing the ribbon cable connecting the lower board to the faceplate (PN 84T55483Y01: https://www.pacparts.com/part.cfm?part_no=84T55483Y01&mfg=Alpine) appears to be A Different Matter Entirely, ie "The Owls Are Not What They Seem".
To begin...after following User=Mobhit 's teardown:
1) Undo the slide locks on the bottom circuit board. See picture, with black slide lock edges circled (poorly) in black. Ribbon cable flops right out.
2) The Service Manual for the CDA-7998R shows an exploded view of the faceplate which does NOT correspond to the physical specs on the CDA-7998. It indicates there are two screws at the upper right/left rear of the faceplate, and these are NOT present on the CDA-7998. See page 45 of Service Manual, item 39, and see picture with area in question circled (poorly) in red. Note also there is a spudger-style orifice in the vicinity as well, but I don't want to go at that until hearing back from more experienced Members. This may be The Key to obtaining access to the board contained within the faceplate, but I don't want to snap anything :/
3) I don't think you can just rip the ribbon cable out of it's socket on the back of the faceplate. See picture (above), with area in question circled (poorly) in red. These sorts of connections typically have slide locks on them, see 1) above.
4) See picture, I've circled (poorly) a section of that side of the faceplate....this is a PIN, and will not come out of the side of the faceplate, so I'm at a loss for how to completely remove the faceplate for ease of further dismantling. [Edit: note that screw beneath this pin has been removed. Remove this screw (and the one on the other side) before attempting to spudger in later posts...]
So, that's it, end of pseudo-tutorial-presented-as-a-question.
I'm stuck trying to remove the end of the ribbon cable from the back of the faceplate without causing chaos.
Any insight or guidance from The Community appreciated.
We'll turn this into a tutorial at some point
Oh, Diane, I almost forgot. I've got to find out how to fix this head unit. They're really something special.
HAHAHA
Last edited: