2008 350Z Installation Process

Chromatic

Senior VIP Member
330
2
B'ham, AL
Well.. you've probably run across one of my posts in the last month or so while I was researching and asking questions.

I've been working since Friday on this car,.. don't even know how many hours I've put in now, lost count.

Anyhow,.. Here's some pics of the car:

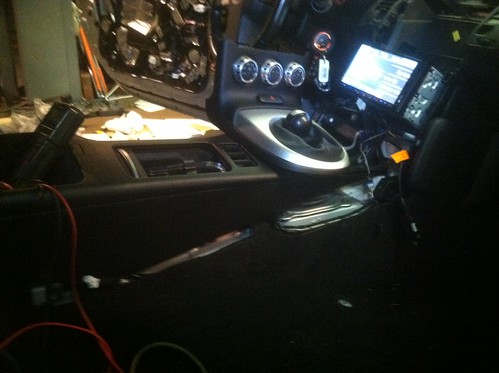
Car interior stripped 90%:


JL 10" sub wired, and mounted into Custom Box:


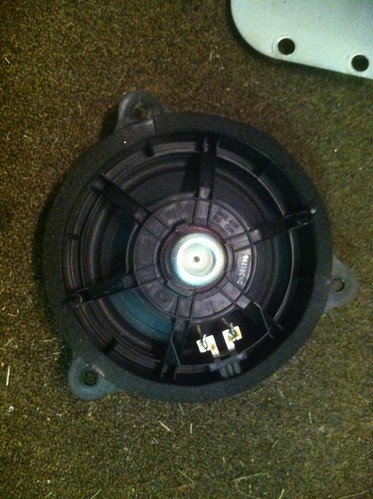
Factory Mids pulled out (Wow, these are terrible!) -- Had to cut them out of their spacer to reuse it with the new Components I bought.


New JBL Components successfully in factory spacers (one heck of a job fabricating those spacers to put these JBL mids!) -- And put the 1" tweeter in stock location (had to cut/fab behind that sail panel quite a bit to get them to fit.. but they fit perfect)


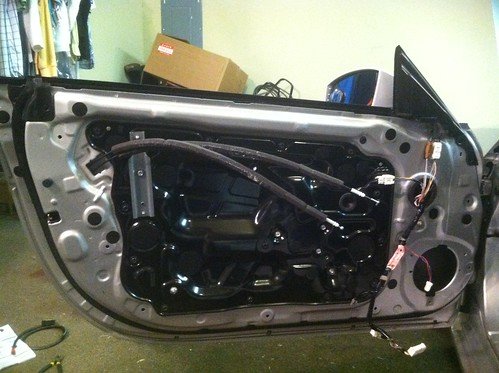
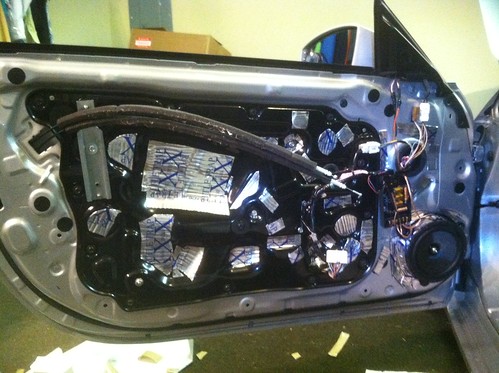
Used Rattle Trap Extreme to deaden doors -- Am running out of deadener, and the doors were A LOT better sealed by factory than I anticipated.

If you have some recommendations of where else to put the deadener on these doors let me know.. I have a little left.


Slot where the Custom stealth box is going,.. Used a ton of sound deadener in this spot.. picture just shows bottom, but it's done up top, sides , etc. Plus there is a 1" rubber mat that is on top of this material, not shown in pic.


(Continued in next post).........................

 
Rear 6.5" (Late 90's German) MB Quarts installed with X-overs. [i used 5+ sq ft. of sound deadener just up in this area.. that stuff goes fast!]


Yes,.. I opted to wire and install a Bass Knob. I KNOW many of you go against the notion of using one,.. but I plan on adjusting it on the fly quite often. So here it is mounted in a discreet "Invisible" location in the center console pop up box (top comes down and covers this). Used Industrial Velcro to mount it (worked fantastic!).. and dremeled below it for the phone cord to come through properly. I think it turned out pretty good:


The Custom Sub Box installed (It's downward firing). [This thing was a beast to get installed,.. 3 of the 12 bolts lined up //content.invisioncic.com/y282845/emoticons/frown.gif.a3531fa0534503350665a1e957861287.gif .. So more dremel work with a light sanding bit being very careful with that MDF.] Turned out well though.


I'd say I'm 90% done now.

I have (not pictured) a carpeted amp rack built to go in the left "glove box" behind passenger seat (which when closed won't be seen).. that's drying right now.

Tomorrow I wire the amp up,.. plug in the headunit,.. and pray. If all works, I dial in the amp, then start re-assembling the vehicle.

Wish me luck!

 
Looks great! You did all of that pretty quick. You're going to be shocked when you hear how it sounds compared to what you had before.
Yeah.. It's going to be a shock one way or another. Going from 10watt two speakers (as shown in that picture with the Quarter sized magnet).. to 4 mid-high end mids/highs.. + 10" sub and amp.. lol. It's WAY over what I was shooting for,.. but I have a volume button for that, right?

Nice work. That was a quick build. I can say my build will be taking my much longer haha
It's been quick in "days spent" .. but I've put a lot of time of those days into it. I have 27 hours into it of solid work.. When I'm done I anticipate 32-36 hours or so.. all depending on any snags I run into.

Believe it or not what I'm most worried about is getting this aftermarket headunit and center gauge pod section back together as the DIY guides were NOT right for my setup so I had to go Maverick on it and start unscrewing whereever I could.. As it's been 3-4 days.. remembering how it was all positioned is going to be mostly like getting into the car for the first time with the deck and center console out and figuring it out as if I'd never seen it before. Maybe I'll get lucky and things will go back in within an hour or less.. That'd make me happy.

But, these things take time that's for sure. Longer than I even planned for. Here it is Monday and I'm just about to get back to it (should be wiring up amp today).. I technically "could" possibly finish it up today and have the car back together.. that would happen if I don't run into any MAJOR snags in the rest of the process..

The subwoofer enclosure might have fit fine without the rubber mat in there. On SRQ's web site I think I saw all the bolts in place.
Good point. However, I think if you saw the actual clearance from the bottom of the sub to the mat itself you'd understand why I put it back in. There's at least 3-5" of clearance from the bottom of the box where sub is downward firing and the mat. It's DEEP in that pocket. So nothing is touching , not even close, inside the area on the Sub side.

I put in the sound deadener as you saw.. but the mat will only help absorb.. and the rubber mat can't be more than 1/2" thick or so.. quite a bit of clearance, so no worries there.

Thanks

 
yeah major snags can be a real problem. i do custom cabinets for a living and my customer will always ask me what how long it will take, And i always say "well most likely a few hours unless something horrible goes wrong and ill be here all night"

 
Looks like its coming along great! I should've taken more pictures when I went through my install, our interiors are almost identical. If you need any help with something or have any questions shoot me a PM, I can probably help you out.

 
Continuation of build:

Today was the big day to see if all my hard work .. well ... worked!

First I decided I should put more sound deadener in the car.. I deadened this entire area and bulk heads.. Plus other areas I didn't bother to take pictures of.


And.. it's ALIVE! -- Setting Gains!


And.. only other shot I took was of the headunit,.. as I tuned the system in after Gains were set properly.


Fired right up! Everything worked flawlessly.. I couldn't believe it //content.invisioncic.com/y282845/emoticons/smile.gif.1ebc41e1811405b213edfc4622c41e27.gif

It sounds phenomenal,.. way better than anticipated.

To get proper voltages for speakers,.. I ended up at 50% on gains for front,.. 50% on gains for rear.. and 60% on gain for Sub. Not too bad.

One thing I DID notice was not only did my 90's MB Quarts work,.. but they sounded at least 5 times better than the JBL's. This isn't knocking the JBL components I put up front,.. but Germany did something right with this old set of MB Quarts I have. WOW! To adjust for the MB Quarts being a greater SQ and tone.. I faded to front about 50%.. thus dropping the quarts down about half way,.. this set things up very well for sound positioning.

For ME,.. Putting rears in the car does sound better. I dropped the rears, then added them.. over an over..

The sub is absolutely DEAD on perfect,.. It's not too much.. but if I WANT it to be ridiculous .. It's right there,.. with my Bass knob next to me.

All in all, I couldn't have done a better job myself... oh wait. //content.invisioncic.com/y282845/emoticons/wink.gif.608e3ea05f1a9f98611af0861652f8fb.gif -- I'm just being a smart a.ss.. Seriously, I'm a very happy guy right now.

Tomorrow is put the interior back in day,.. no more worries of if all my work is going to work! Straight forward job on panels, trim, et al. Wonder what it's going to sound like with the interior back in?

 
yeah major snags can be a real problem. i do custom cabinets for a living and my customer will always ask me what how long it will take, And i always say "well most likely a few hours unless something horrible goes wrong and ill be here all night"
I didn't run into any absolute NIGHTMARE snags.. but quite a few unexpected "Snags" that took up a lot more time than I expected. I had to fabricate, cut, dremel, etc just about every aspect of the install for the proper fitment. Since I had invested SO much time into this,.. I just wasn't going to do anything "half-a.ss" and it's paid off now with sound that is just amazing to ME. You guys might hear it and think otherwise, but it sounds a great deal cleaner and tighter than my last system I had professional installed with 2, 12" subs, kenwood amps.. etc..

At the end of the day,.. time is time,.. and having tackled something like this and it WORKING tonight,.. just puts a grin and sense of satisfaction you can't describe. Nothing like doing it yourself I suppose. Would I want to do it again next week? Heck no! //content.invisioncic.com/y282845/emoticons/smile.gif.1ebc41e1811405b213edfc4622c41e27.gif

 
Looks like its coming along great! I should've taken more pictures when I went through my install, our interiors are almost identical. If you need any help with something or have any questions shoot me a PM, I can probably help you out.
Thanks.. could have used your help on the kabillion questions I've had over the last month for this car.. but Now I just fired it up tonight and she sounds amazing.. everything I did.. apparently,.. I did right! Who would have thought? //content.invisioncic.com/y282845/emoticons/smile.gif.1ebc41e1811405b213edfc4622c41e27.gif

If I run into any snags putting the interior back together I'll certainly hit you up. I think it'l all be smooth except maybe for the Headunit and gauge pod area.. the "guides" for that didn't match up with my headunit at all.. so I had to just start unscrewing stuff until it came out.. I certainly don't remember the 'reverse' procedure 5 days later .. and there's no "guide" for how to install a Pioneer AVH-P4100DVD in a 2008 model 350Z that I could go by to reinstall step by step.

Even though this Pioneer AVH-P4100DVD was a VERY popular headunit to put in the 350Z's because of how well it fits in there as a touchscreen unit with USB, Satellite, Backup camera, CD, DVD, Bluetooth, Auxillary input, etc..

It's this one:

AVH-P4100DVD - In-Dash Double-DIN DVD Multimedia AV Receiver with 7" Widescreen Display | Pioneer Electronics USA

AVH-P4100DVD_front_lrg.jpg


AVH-P4100DVD_rear_lrg.jpg


Link - http://www.pioneerelectronics.com/PUSA/Car/DVD-Receivers/AVH-P4100DVD

You could be a HUGE help if you could find a guide to installation of this unit in a 2008 350Z.. (Wiring I've done, that's no issue) -- It's the physical alignment, and screw locations, what goes in first, etc that would help make that much easier than I anticipate it's going to be.

The 2008 350Z interior is ever so slightly different in these areas than even a few years back.. that the guides for this don't work due to screw locations, and so on. Not sure if the 2008 is the same EXACTLY inside as the 2006 and 2007.. or if they made a few changes for 2008 that aren't in prev. years inside... that are mainly noticeable when you start taking things apart.

Anyhow.. Thanks for your offer of help. The above is about the best thing you could do at this point. //content.invisioncic.com/y282845/emoticons/smile.gif.1ebc41e1811405b213edfc4622c41e27.gif

 
Awesome job Chrome!! Yeah i'm pretty sure those old German made Mbquarts would sound phenomenally better then JBLs considering they retailed over half a grand when they were released, even if its coaxial vs components. you could switch the jbl 6.5s to the rear and the mbquarts to the front and see how it sounds with the crossover and jbl tweets. Might work, might not, but just some ideas to have fun with lol.

 
You used a double din install kit for the Pioneer right? That's what you use to align the deck (to flush mount) with the rest of your dash. Loosen the four screws holding it in on the sides, and slide the unit forward/backward until it fits the position you like, and tighten it down. This may take some trial and error to get perfect.

For putting the center dash back together, you should go in this order (at least it is for the 370s). Screw the dash kit (with the head unit) back into place (four screws). Install the top piece (with the vents), this should snap into place, top to bottom, with two screws holding it into place at the bottom. Then install the side covers (at the bottom of the center dash, to the sides of the shifter knob), these should snap in, with two screws holding each side. Then slide the front of your shifter knob cover into the locations below the deck, and pop he rest into place. Seeing how your climate controls are integrated with the shift boot, that may go in before the side pieces, but I don't think so. Just a heads up. Let me know how that works out for you.

 
Awesome job Chrome!! Yeah i'm pretty sure those old German made Mbquarts would sound phenomenally better then JBLs considering they retailed over half a grand when they were released, even if its coaxial vs components. you could switch the jbl 6.5s to the rear and the mbquarts to the front and see how it sounds with the crossover and jbl tweets. Might work, might not, but just some ideas to have fun with lol.

Thanks.. couldn't sleep last night.. so I am off work today,.. so have been "sleepily" working on the car. Yup.. these MB Quarts were top of the line (or at least high end) in the 90's.. and it's a shame MB Quart was pawned off to the US company "Maxxsonics".. (May be a link to Rockford there.. not sure). But, there quality has definitely gone way down hill. They aren't Walmart stuff.. but they have nothing in their speaker lines that come close to these mid/late 90's MB Quarts I have (not bragging, it's just the truth.. and in my opinion a shame.. MB Quart made some of the best sounding speakers on the planet at one point.).

For now I'm going to leave it.. A TON of work done to get those quarts back there.. In the future when I get an itch.. I may play around with them. If I did anything,.. I'd probably Carefully cut OFF the Tweeter from the Coaxial plastic .. and essentially turn them into Components.. I've looked over the wiring and construction it's very doable.. you just can't SLIP at all.. or you just ruined irreplaceable speakers!

 
Activity
No one is currently typing a reply...
Old Thread: Please note, there have been no replies in this thread for over 3 years!
Content in this thread may no longer be relevant.
Perhaps it would be better to start a new thread instead.

Similar threads

I am installing a Maestro SW, steering wheel control in a 2008 Honda CRV. When I flashed the unit it gave me instructions stating that I needed...
0
928
And it works great with android phones, you can connect, and what can you say about android radio tape recorders are now leaders in functionality...
2
1K
ie just used a new adapter because adapters ignition wiring wouldn't keep constant, works fine now and stopped sending sensors off, never had the...
9
1K

About this thread

Chromatic

Senior VIP Member
Thread starter
Chromatic
Joined
Location
B'ham, AL
Start date
Participants
Who Replied
Replies
54
Views
8,270
Last reply date
Last reply from
Chromatic
IMG_7545.png

Chris Gerrish

    Apr 25, 2024
  • 0
  • 0
IMG_7544.png

Chris Gerrish

    Apr 25, 2024
  • 0
  • 0

Latest topics

Top