Kerfing 101- UNDER CONSTRUCTION
What is Kerfing?
“Kerf” by definition means “width of a saw cut”. This is the width of the actual saw tooth itself as opposed to the width of the blade as a saw tooth flares out and away from a blade. “Kerfing” is a term that many woodworkers have adopted to define the process of making several cuts within a piece of wood to achieve the removal of material. Often this removal of material will allow one to then bend the wood stock making a nice professional and appealing curve that can be incorporated into the project.
Kerfing and Car Audio:
What can Kerfing do for you in your quest of car audio domination? Well first of all it is important to note that in any ported subwoofer box hard corners are the devil. They do not allow efficient air flow which can result in less output and more port noise. Kerfing your port will allow you to maximize efficiency and create the most non-turbulent flow for the air moving in and out of the enclosure.
Secondly Kerfing can be used to make an enclosure or other part of your build more appealing to the eye. You could use it for corners of an amp rack, or to make a custom arm rest more smooth. Kerfing is a process you need to learn to take your builds to the next level.
What you need:
This is outlined in the video but you will need the following (* means you don’t HAVE to have it but it is recommended):
The steps:
Watch the video! Once the kerfed section is made load it up with wood glue and clamp it in place. Finish with fiberglass resin and chop mat and for that added professional touch apply body filler to the area and sand!
The Math:
I go through the math in the video but in case you are having a hard time understanding this should help. Please note this is used for slot porting applications so when I reference “diameter” I am NOT talking about a circular port, I am talking about the curve of the kerf if you were to look at it along its cross section. See the photo below:

Step 1: Determine the diameter of your curve. Note I said “Diameter NOT radius” if you have your radius just multiply it by 2 and you now have your diameter).
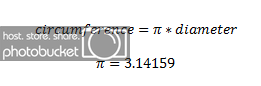
Step 2: Find the circumference of a circle using this diameter. The equation is:
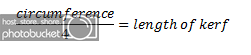
Step 3: You should now have a value for your circumference. Take this value and divide by 4 for a 90 degree turn or 2 for a 180 degree turn, this will give you the “length of kerf”.
Step 4: Record your value for the length of the kerf. This is how much material along your mdf “linearly” must be used to make your curved kerfed section. This is the value you want to “mark off’ for your kerf on the mdf. (Note that this method can also be used to find the “length” of this part of your port so that you can build your port to the target tuning length. Instead of using the diameter of your kerf arc, use the diameter of the arc that is the centerline of the port).
Step 5: Now that you have marked off where your kerf will be on the mdf you are going to take your “length of kerf value” and divide it by 12. This will give you your length between cuts.

Now in the video I show a trick for making these divisions perfect. That way if your value is something like .6384 you don’t have to guess on a tape measure. My method is also much faster as it doesn’t require this steps math. Once you have marked out all the distances between cuts you can proceed with cutting and making your kerfs!
Other notes: These are other notes that have been brought up on other forums and I feel are helpful.
Pictures:
Design of an enclosure using a Kerfed Port:

Box with Kerfed Port:
(Picture to come)
Box with kerfed port and kerfed exit of port:
(Picture to come)
What is Kerfing?
“Kerf” by definition means “width of a saw cut”. This is the width of the actual saw tooth itself as opposed to the width of the blade as a saw tooth flares out and away from a blade. “Kerfing” is a term that many woodworkers have adopted to define the process of making several cuts within a piece of wood to achieve the removal of material. Often this removal of material will allow one to then bend the wood stock making a nice professional and appealing curve that can be incorporated into the project.
Kerfing and Car Audio:
What can Kerfing do for you in your quest of car audio domination? Well first of all it is important to note that in any ported subwoofer box hard corners are the devil. They do not allow efficient air flow which can result in less output and more port noise. Kerfing your port will allow you to maximize efficiency and create the most non-turbulent flow for the air moving in and out of the enclosure.
Secondly Kerfing can be used to make an enclosure or other part of your build more appealing to the eye. You could use it for corners of an amp rack, or to make a custom arm rest more smooth. Kerfing is a process you need to learn to take your builds to the next level.
What you need:
This is outlined in the video but you will need the following (* means you don’t HAVE to have it but it is recommended):
- Circular Saw (Or table saw but the process will differ from the video) Disclaimer: My Saw blade is 1/8” wide. I recommend the same width!
- T-Square (Or table saw fence)
- MDF
- Wood Glue
- Safety Glasses
- Tape Measure
- Marker/Pencil
- Clamps
- Fiberglass Resin*
- Fiberglass Chop Mat*
- Body Filler*
- Sand Paper*
The steps:
Watch the video! Once the kerfed section is made load it up with wood glue and clamp it in place. Finish with fiberglass resin and chop mat and for that added professional touch apply body filler to the area and sand!
The Math:
I go through the math in the video but in case you are having a hard time understanding this should help. Please note this is used for slot porting applications so when I reference “diameter” I am NOT talking about a circular port, I am talking about the curve of the kerf if you were to look at it along its cross section. See the photo below:
Step 1: Determine the diameter of your curve. Note I said “Diameter NOT radius” if you have your radius just multiply it by 2 and you now have your diameter).
Step 2: Find the circumference of a circle using this diameter. The equation is:
Step 3: You should now have a value for your circumference. Take this value and divide by 4 for a 90 degree turn or 2 for a 180 degree turn, this will give you the “length of kerf”.
Step 4: Record your value for the length of the kerf. This is how much material along your mdf “linearly” must be used to make your curved kerfed section. This is the value you want to “mark off’ for your kerf on the mdf. (Note that this method can also be used to find the “length” of this part of your port so that you can build your port to the target tuning length. Instead of using the diameter of your kerf arc, use the diameter of the arc that is the centerline of the port).
Step 5: Now that you have marked off where your kerf will be on the mdf you are going to take your “length of kerf value” and divide it by 12. This will give you your length between cuts.
Now in the video I show a trick for making these divisions perfect. That way if your value is something like .6384 you don’t have to guess on a tape measure. My method is also much faster as it doesn’t require this steps math. Once you have marked out all the distances between cuts you can proceed with cutting and making your kerfs!
Other notes: These are other notes that have been brought up on other forums and I feel are helpful.
- I made the mistake of wearing gloves in the video. Never wear gloves with rotary tools!
- It is not recommended to apply screws in the kerfed section of the mdf, it will likely split, instead use clamps (or heavy objects) and wood glue.
- If you are blade in not 1/8 you will need to do some math to determine how many cuts to make. I generally remove an inch and a half of material, so if your blade is smaller, more cuts, wider, less cuts. Note that fewer cuts will lead to a rougher curve and more a smoother curve but with less strength.
Pictures:
Design of an enclosure using a Kerfed Port:
Box with Kerfed Port:
(Picture to come)
Box with kerfed port and kerfed exit of port:
(Picture to come)
Last edited by a moderator: