Car Audio Hooligan
CarAudio.com Newbie
Hi all,
I'm planning a full DIY audio upgrade for my 2019 RAM 1500 Crew Cab (non-Alpine system with 8.4" Uconnect). I’ve done a full system once before in a sedan, so I have some experience, but not enough to be fully confident. I’m trying to keep the OEM head unit and would love feedback, cost-cutting ideas, and suggestions for improvements.
I mostly listen to electronic music, followed by hip hop, and occasionally rock and country.
Amplifier for components:
Subwoofer amplifier:
ANL fuse holder:
Remote turn-on wire:
Speaker wire:
XIOGZAXI 4 AWG Battery Ground Cable – $13
Thanks for reading and helping!
I'm planning a full DIY audio upgrade for my 2019 RAM 1500 Crew Cab (non-Alpine system with 8.4" Uconnect). I’ve done a full system once before in a sedan, so I have some experience, but not enough to be fully confident. I’m trying to keep the OEM head unit and would love feedback, cost-cutting ideas, and suggestions for improvements.
I mostly listen to electronic music, followed by hip hop, and occasionally rock and country.
1. Front Speakers – Components
- Planning to run component speakers in the front doors.
- Considering 6.5" instead of 6x9 for better clarity and imaging – is this a good call?
- Is it worth using angled speaker spacers (possibly 3D printed) to direct mids toward the listener?
- Factory tweeters are in dash corners — should I relocate them to the A-pillars to avoid windshield reflections?
Amplifier for components:
- Precision Power i1000.4 – 4-Channel – $199
- front speaker
2. Head Unit / Signal Path
- I’m keeping the OEM head unit.
- Built-in EQ is very limited.
- Considering a high-quality LOC instead of a full DSP (for budget reasons):
- AudioControl LC7i (6-Channel LOC w/ AccuBASS) – $128
- EQ
- for some reason this truck still have CD player, is there anything better i could replace it for ?
3. Center Dash Speaker
- My truck includes a 3.5" speaker in the center dash.
- Some suggest disconnecting it for better stereo imaging. Others say to upgrade it for improved passenger clarity. Thoughts?
- Infinity REF-3022CFX – $65
- Audison Prima APX 4 – $249
- Center speaker
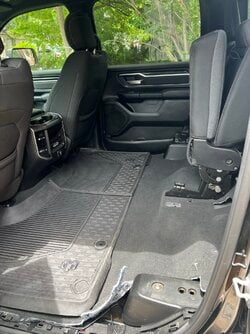
4. Subwoofer Setup
- Planning to install two 12” subwoofers under the rear seats.
- Previously used a sealed box with 2×IDQ10s, but it lacked punch.
- This time I want to build a ported box tuned around 32–34 Hz.
- Wiring plan: dual 4-ohm voice coils, wired in parallel for a final 1-ohm load.
Subwoofer amplifier:
5. Subwoofer Enclosure
- Planning to build a ported box myself using MDF – looking for blueprint recommendations.
- Not sure how much clearance is available under the rear seats.
- Might raise the rear seat slightly to gain depth.
6. Sound Deadening
- Used Dynamat Xtreme in a previous build (doors only).
- Now planning full treatment: doors, floor, rear wall, and possibly roof.
7. Power & Wiring
Main power cable:- InstallGear 1/0 AWG OFC Amplifier Wiring Kit – $66
Includes 15 ft power wire + 300A ANL fuse
ANL fuse holder:
Remote turn-on wire:
Speaker wire:
- 12 AWG OFC – 50 ft – $36 – for subs
- 16 AWG – 50 ft – $10 – for components and center speaker
XIOGZAXI 4 AWG Battery Ground Cable – $13
- Use this 4 AWG ground wire for both amps:
- ICE5000.1D: 4 AWG to chassis,
- i1000.4: 4 AWG to chassis,
8. Tools I Already Own
- Multimeter
- Crimpers
- Wire cutters
- Ferrules
- Zip ties
- Velcro straps
- Heat shrink tubing
- Tessa tape
- Dielectric grease
- Deadening roller
- Panel popper tools
- Heat-resistant wire loom
- Wire loom clips
9. Other Questions / Considerations
- Mounting location for amps — under front seats or rear wall?
- I have a 220A alternator. Should I still do the Big 3 upgrade?
- Alternator to battery positive
- Battery negative to chassis
- Engine block to chassis
- Using 1/0 AWG OFC wire
Thanks for reading and helping!