2005 Ford Focus ZX4. Couple short vids of the car playing. 1/13/24

  • 6
    Participant count
  • Participant list
Im about to add 6 to the extended cab of my silverado, and I am thinking these will fit the bill. My front doors each have a pair of American Bass VFL65MBs, but those are no longer made. Their replacements are Godfather 6.5CC. Not sure I want MRs.
 
Im about to add 6 to the extended cab of my silverado, and I am thinking these will fit the bill. My front doors each have a pair of American Bass VFL65MBs, but those are no longer made. Their replacements are Godfather 6.5CC. Not sure I want MRs.
I'm not familiar with those but they are pro audio? They may have a higher sensitivity than the daytons. They may not play as loud but they should play lower.I have mine on 40 watts. You could probably run two times that depending on your crossover points. I'm sure you've researched them so you know can get them in 8 ohms as well in case you wanted to run them in parallel.
 
Back with a few more pictures of the kicks. I got a good seven hours in so I have made some progress..
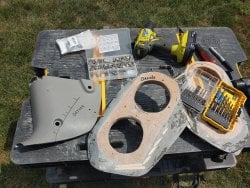
This is the first sand I had done on the panels. No profiling yet. The carpet needs to be cleaned.
20220818_151727.jpg


20220818_160549.jpg


Fresh layer of tape. I typically need to redo the tape three times as it it is destroyed between coats. If I were a smarter man I would use a mold release.

20220818_162955.jpg


You can see in this shot that they are not yet symmetrical. No biggie. We'll just build out the panel.

20220818_164643_HDR.jpg


Extra material was added and the small gaps were filled.

20220818_180712_HDR.jpg


There is a moderate amount of sanding on the panels to be done along with a finish coat. The passenger side needs the angle adjusted to better match the drivers side. So, I will end up hog-ing out some material so they have identical profiles.

20220818_184521_HDR.jpg


The next few shots are closeups of both panels. The drivers side is much closer. It matches the contours of the vehicle rather nicely.

20220818_184206.jpg


This second shot of the drivers' side brings up a conundrum. I think that I will end up bonding the fabbed kick and the plastic fatory panel. It will make it a pain in the but to wrap but I believe it will end up looking better.

20220818_184212_HDR.jpg


Last shot is the passenger side. I am going to try to get as much done as I can tomorrow as it is going to be raining hardcore this weekend and I have a 4 hr. interview for a job on monday.

20220818_184246.jpg
 
Last edited:
So I thought this would be quick, simple project. hahahahha . ... Not so much. I spent another six hours on the kicks today and I actually don't have so much left to go so let's see some fresh photos.
I think this is where we left off yesterday. The passenger side did not match the drivers side so there was some work to be done.
20220818_184521_HDR.jpg

I used a set of graduated lines while the factory kicks were in the car This was used to match when I pulled them and the fiberglassed ones out of the car so everything fit when reinstalled.
You can see in the first pic that I agitated the surface with an 80 grit sanding disc. This was to help with adhesion of the reinforced filler and the wrapping progress. I'll be using the same suede as the door panels.

20220819_140748.jpg

20220819_123429.jpg

You can see that the panels have already been treated to both a layer of deadener and neoprene.
20220819_120752.jpg

20220819_122413.jpg

To secure the two together I used some countersunk allen head screws. The washers you see actually go underneath the bracket. (90 degree stainless steel bent to fit) I used another pair when the bracket was mounted and torqued the nuts. Two more spax screws 1 1/4" in length were driven through the plastic panel to the fiberglass one.
 

Attachments

  • 20220819_120648.jpg
    20220819_120648.jpg
    1.3 MB · Views: 24
Con't...

Took a quick break to eat. One chicken, one chorizo.
20220819_121644.jpg
Used my logjam method to build out the area to be fiberglassed and drilled some holes 1/8", If I remember right. These are used in conjuction with the sanding to help the filler better adhere to the panels. I should also mention that I scrubbed them with a rag and isopropyl. The plastic panels don't match so perfect symmetry is out. I will make them pretty though.
20220819_145039.jpg


This is after the first layer had been applied and sanded. I'll need to do one more coat in the car so they match the contours of the car before wrapping.
20220819_155954_HDR.jpg


Second coat of filler. There are small areas that need attention so ill need to lay-up small amounts until everything is smooth
20220819_162356.jpg

Despite me being vigilant about cleaning the surface I still had a small area that delaminated. I will have to use contact cement and clamps to permanently bond the two surfaces.
20220819_162406.jpg


That's as far as I got today. Next update will be most likely Tues.
20220819_164828_HDR.jpg


20220819_181135_HDR.jpg
 
Last edited:
So the kicks are done. I spent a little extra time by covering the door sills in suede as well. I'm not thrilled how the wrap came out. There isn't much stretch to the material so a couple of the compound angles didn't come out very well. I think I will rewrap them later this fall after I demo them a bit and they get beat up. .I'll also build them out a bit to make the curves less shallow. I'll be sure to use a contact cement next time. I don't believe the super 77 is up to the task.
Here are a couple photos of how they came out. I definitely need to do something with the carpet now. hahaha
20220824_184710.jpg

20220824_171531.jpg


I am going to start working on the A pillars tomorrow. I threw out the second set of prototypes. I am going to start from scratch. I finally think I have a way to proceed. I will be running the AMT's on axis and be running the tweeters crossfiring. Here is a picture that includes a 5" that matches the speakers from the kicks. So it will be three speakers per side.

20220824_132617.jpg


You can see I marked the door panels. I am going to cut a notch in the door panels then Fiberglass it. Then I will be able to mount the AMT's as wide as possible. I may make this notch much larger. I will use the gold pins to finish them. The build is going to take a few days so I will keep you guys updated with plenty of pics.
20220824_132829.jpg
 
So they say prep is everything... I started work on the "A" pillars today. Blue tape and aluminum foil for everybody. My goal today was to make a template out of fiberglass for all three of the drivers that would mount to the pillar itself. The resin I used took ages to cure despite me adding the proper catalyst by weight. 80 drops/8 oz! I used some chop matte to build up a small section of the A pillar. These are three layers thick.
These look like ass now but I just have to trust the process. The plan is to make them larger so I can cut them back and give them a favorable contour that flows with the dash. It has been over 10 yrs since I have worked with resin and it clearly shows. I learned and remembered a bunch today. I do like posting my ugly ducklings. I don't get off on it or anything it's just a nice juxtaposition when they are completed. The "Then" and "Now" type stuff.
20220826_131730.jpg

20220826_185846.jpg
20220826_190047.jpg
20220826_185855.jpg


I'm high as a kite RN so this isn't my usual post so I will come back tomorrow with more photos and you will begin to see the direction in which all this madness is leading. This week has been super weird.
 
Had my sister over today so I didn't get to work on the A pillars. The fibers get into everything and I didn't want her to drive an hour home super itchy. She did help though. I got the baffle mount holes for the subs redrilled, a final layer of reinforced filler and covered it in suede.
I am reworking the kicks. I didn't like the wrap and there were a couple issues I wanted to address. My sister heIped me strip them down and prep them for rework. I won't show those again until I am happier with how they came out. Here are a couple photos of the baffle to tide ya over...

20220827_140246.jpg
20220827_174654.jpg
20220827_174745.jpg

Ironically, or not really; the color looks different between the rear door pods and the baffle but it is from the same bolt of fabric. Weird I guess... The baffle looks much more blue. In any case the baffle needs to be mounted but I need some longer hardware.
I will use some black suede on the rear of the baffle so the trunk matches. I have a bolt of fabric in suede and leather from when I built my 550i. Eventually I want the whole trunk suede but we are getting way ahead of ourselves. Ask me about it again next month.
The holes are drilled already I just haven't cut the fabric, I need to pick up some fresh blades. With the larger stainless steel flat washers it should give me the look I'm going for. I may switch to anodized hardware to match the gold pins I put in the rear door speaker pods but that's a thought for another day.

I should have more progress pics tomorrow and throughout early next week.
 
Last edited:
I got the subs mounted and wired up today. The amps aren't in yet due to the parts and supplies in the trunk. I don't have a mounting solution for them yet. I did spend a couple hours organizing everything. I used snap bushings on both sides of the baffle for a cleaner look and I think it came out pretty great. I used 1/2" bolts with lock and flat washers on both sides. There is also 4 stainless steel "L" shaped brackets that connect to the cars sheetmetal directly to the baffle itself. I couldn't move it when I was all secured. The lower brackets on either side will be used for further attachment but it will be part of the midbass array that goes under it. (Those are the triangle shape pieces which I will fiberglass and vent into the frame rails.)
I don't really have much more to show you today. I wanted to get a few things squared away before I moved forward. Next we will focus on getting the kicks sanded and rewrapped then I can devote my full attention to the "A" pillars.

20220830_171924.jpg
20220830_172100.jpg


Here's a random picture of a butterfly. Love the bugs. He must've been to the wars. Look at those wings.
20220830_143939.jpg


More tomorrow. . .
 
Not much to show today. I am having a hell of a time with the fiberglass resin I am using. It is taking hours to cure. I think I might need an immersion attachment on my drill. I am using the right amount of catalyst vs. resin and the proper stirring times but it is still taking forever.

I wish I had more pictures to show but we will have to wait until tomorrow. I didn't take many due to my aggravation. You can see from these photos that I am making the fiberglass frames a bit larger to accomadate the size of the AMT's. They are around 8" tall.
When they cure I will layup a few more layers to make the piece rigid and add some milkshake to stregthen them. (Resin-body filler mix). Not going to lie this has been the most frustrating part of the build so far. From design to execution. The end should be supremely satisfying. "We hope"
20220901_140950.jpg
20220901_140958.jpg


I meant to post these when I put up shots of the baffle. It is of the attaching hardware on the rear of the baffle. Lockwasher, fender washer (Larger O.D.) and nut. I spent a good amount of time the last couple days researching anodized hardware and accent washers; which is totally a thing by the way. So I may change the hardware down the road a piece to switch it up.

20220901_182109.jpg
20220901_182119.jpg
 
Heyo, I apologize for not updating the build log. Work has my **** upside down. They basically stole me but it's all good since were going to change it up soon. I'm a test technician for fly by wire autothrottle setups on f-18s and corporate planes. Bombadier mostly. I have a teams interview this week which should shake everything up and have me sitting better financially. Like hilariously better.
You can see from the other post I am looking to switch the car to lithium which is a little more complicated than first thought. No biggie. I got some more welding cable, (25ft.)blue/black techflex and some other things coming. Big 3 stuff. I'm going to order an 340 amp alternator this weekend from autotech on the suggestion of a fellow member.
Then I need to order some buss bars for the front battery delete and a lithium battery or cells/kit.
I will be working on the "A"pillars this weekend so I hope I have something to show there as well.

Here's a photo of Master Hamm to tide you over until another update. He lived in the Edo period under the tokugawa shogunate circa 1740.

il_1588xN.3335082024_c0y6.jpg


Hahahaa. Just fu@%^n with ya' Talk at ya later
 
20221001_161046.jpg
20221001_161035.jpg
20221001_161012.jpg
20221001_155407.jpg


I have most of it done. I need to run the power cable to the alternator and another ground to the case. The techflex is 3/4". I'm getting the new Alt and battery for up front. I think the best thing to do is run an isolator up front on an agm battery and have the lithium in the back.
 
Last edited:
Ok, so forward movement finally. I ordered a couple of 15" midbass to be located in the rear seat area. I was going to originally do 12 6.5 Daytons like the ones in the doors but I thought this would be more fun. More wow factor. I have an 8" B&C going in the front doors and will be placing 4 more of the Dayton midbass in the rear deck.
I know it seems mental but there is a method to my madness. I am using multiple midbass locations to even out the response in the vehicle and to remove or diminish any nulls in the freq. response. It is difficult to get good midbass response in a vehicle and for my part; I am looking for significant output in that region. I can reference a few threads by Lycan on DIYMA that goes into it with much more detail. Unlike the other midbass the 15" will play from 60-250hz. I want my drums to sound like drums.
Midbass tirade aside. I have started work on my 3rd set of prototypes for the "A" pillars and I believe we will keep these. Here are a few photos of what they are meant to look like.
20221003_180150.jpg
20221003_180211.jpg
20221003_210708.jpg

They will need to be molded to better fit the interior and I will need to mount them stout-ly as they are quite heavy with the drivers installed and I don't want them to move or shift in any way. I also need a clever way of mounting the caps on the outside. You can see I also got some more techflex and heatshrink. That is for the speaker and sub wiring so it all looks uniform in the trunk. In the trunk I will be using black suede so it should set it off rather nicely. more tomorrow.
 
Last edited:
Back with another small update. I took the time, before I did anything else; to wrap all the wiring in the trunk with techflex. the only exception being the rca cables which is a 6 conductor in one type. I didn't have any large enough and I'm not convinced I could run it in 3/4". So we'll just put a pin in that. I also did the 8 ga. for the subwoofers as well. Seems a shame since it was such a cool color but it is still visible in the cabin so no biggie.
My midbass will be here tomorrow so I will have a little show and tell with them but I am really focusing on the "A" pillars. I don't have many pictures to show in that regard, yet. But will soon.
4850178.jpg

20221004_124840.jpg

You can see the tape isn't holding the mlv. I need to find a better method. At least for the vertical mounting.
20221004_134739.jpg

20221004_140505.jpg

Look at all that spaghetti. Lot's more work to do.
20221004_170549.jpg


To the pillars. I used a series of bamboo dowel rods, gluing them directly to the tape I had applied in a double layer to the pillar. After I used some reinforced filler to cover them but they are not yet sanded. This will serve as our anchor point for the AMT and the Planar. I will remove the plastic trim piece and drill two holes into the pillar and use a couple of nut inserts to secure everything. Since I'm not removing the plastic pillar I will need to get some spacers so it doesn't deform the panel when torqued. I'll be honest with you. I do alot of **** freeform and let my subconscious do it thing. It usually works out in the end.
20221004_182457.jpg

God, I need some seat covers.
20221004_182519.jpg
20221004_134726.jpg
 
Activity
No one is currently typing a reply...

Similar threads

Can anyone in here participate in a short interview I am doing for school about the installation of a Kenwood DMX4070S in my 2005 Ford Expedition...
0
972
I had a '99 Chevy Venture with the 3.8 and buddy had one with the 3.4. Any of those engines including the 3.9 are known to leak coolant at the...
12
445
Then you need what I listed. You also need to find out if your Honda Element has an OEM amplifier or not. And if you have steering wheel controls...
6
820
https://www.sonicelectronix.com/ci95-2005-buick-lacrosse-wiring-harness-to-install-a-new-car-stereo.html?sort_order=price_asc lots of options...
6
2K
You will need a wiring kit too so a little over budget. Depending on if you're going to build on this with an additional amp for rears and a sub...
4
106

About this thread

just call me KeV

10+ year member
Junior Member
Thread starter
just call me KeV
Joined
Location
chicago suburbs
Start date
Participants
Who Replied
Replies
116
Views
58,703
Last reply date
Last reply from
just call me KeV
Screenshot 2024-04-06 200819.png

Doxquzme

    Apr 13, 2024
  • 0
  • 0
Screenshot_20240413-123854.png

1aespinoza

    Apr 13, 2024
  • 0
  • 0

Latest topics

Top