We're around a day-ish out from finishing the rear doors and thank god. It has taken quite a long time. I'm not even sure measured in hours. I have a few more photos to share to get you guys caught up.
Here is a shot of both of the inner baffle pieces I am using for the door mounted midbass after the first sanding. Notice how they aren't symmetrical. I made the baffle a little bigger for the rear passenger door.
A little quick fitment before I added the second coat of filler. I hit both the front and the rear of both. See there was a little filler ouside the lines but it came right off of the deadener.
Another layer of reinforced filler was added. I added a bit more in the third layer but I didn't take as many pictures this time. You guys get the idea. I sanded them to 120 grit in case anyone is curious smoothing the edge profile and the front and rear face.
My original plan was to hit them with resin and chop matte but with both the deadener, aluminum tape, and neoprene I really didn't feel like it was necessary. We'll pull the door cards in a couple months to see how they fair. This a single layer of deadener by the by. On the rear of the panels I used a layer of neoprene which is pretty hydrophobic anyway.
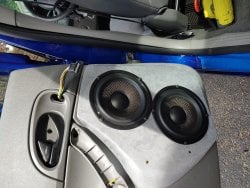
I added a few pieces of aluminum tape which you can see in the background. When there was a single midbass in the door I used butyl rope and non hardening modeling clay and it made a proper mess, let me tell you. The cable hanging is for the window/lock switches. I will tape (aluminum) it after I wrap in some neoprene or tesa tape so it isn't in there making racket.
Aaahhhh. One of the more satisfying shots I have taken in the build. I ended up using seven self tappers which turned out to be more than enough. I could rock the whole car when I pulled on this little bugger.
We're still not done yet though.. You can see from the following shots that I have removed some more material from the door cards themselves. This was for a couple reasons. With the added inner baffle I had fitment issues which required some material to be removed. There was also the matter of having a free path between the inner and outer baffles that is unobstructed.
Go Michigan state!
This is how I will manage the transition between the two baffles. Once I wrap the baffle and secure it to the door card I can cut the craft sticks to size and glue them to bridge the gap. Once dry I can use reinforced filler to make the transition more solid. Then I can begin to think of a seal. I think I will just use some rope caulk. This seems to be the easiest. It won't be 100% leak proof but I don't give a cats' pajamas about that.
I need to finish the other door getting it to this stage then fabricating the aforementioned transition. Then I will run some wiring through the factory grommets. Each speaker will have it's own amplification and signal processing. I will mirror the values when we get that far.
Tomorrow should be another good fab day (possible rain) but this weekend I am heading to a steampunk/renaissance fair so I won't be working on the car. So it might be monday before I post anything, tomorrow not withstanding.
Kev
")

